More actions
No edit summary |
|||
| (367 intermediate revisions by 25 users not shown) | |||
| Line 4: | Line 4: | ||
|stafftype = MARINE | |stafftype = MARINE | ||
|imagebgcolor = lightgrey | |imagebgcolor = lightgrey | ||
|img = | |img = USCM_Squad_Engie.png | ||
|jobtitle = | |jobtitle = Combat Technician [[File:Squad_engineer_icon.png]] | ||
|superior = Squad Leader | |difficulty = Medium | ||
|duties = Set up defenses, babysit | |rank = Private First Class / Lance Corporal / Corporal | ||
|superior = [[Squad Leader]] | |||
|unlock = One hour as any squad role. | |||
|duties = Set up defenses, babysit big guns, open doors and spam barbed wire. | |||
|guides = [[Guide to construction|Construction]], [[Guide to Engineering|Guide to Engineering]] | |guides = [[Guide to construction|Construction]], [[Guide to Engineering|Guide to Engineering]] | ||
}} | |description = You have the equipment and skill to build fortifications, reroute power lines, and bunker down.<br>Your squaddies will look to you when it comes to construction in the field of battle.}} | ||
''But the good news — we got four of these robot sentries with display and scanners intact. They really kick ass, I think they'll come in handy.'' | ''But the good news — we got four of these robot sentries with display and scanners intact. They really kick ass, I think they'll come in handy.'' | ||
―Corporal Hicks, ''Aliens'' | ―Corporal Hicks, ''Aliens'' | ||
As a ''' | As a '''Combat Technician''', your main goals will be '''fixing power''', '''getting through doors''', and '''setting up fortifications for a FOB (Forward Operating Base)''' that'll be used for defense and to secure a supply route. Without you, your platoon will have no power or a FOB which is critical for mission success. | ||
=Combat Technician= | |||
You'll have two different playstyles you can experiment with. One, as a FOB building and '''Utility Technician''', who sets up defences and makes sure power is running. The second way to play technician is to be a '''Combat Technician''', breaching walls, hacking open doors, welding vents and repairing broken APC and lights as marines advance. Both are as good as the other, but too much of one is bad. Make sure there is a FOB that will be able to be defended, and if there is one, make sure marines will be able to make it from building to building effectively. | |||
<center> | |||
==[[File:Surplus_Vendor.png|64px]] Automated Closet [[File:Surplus_Vendor.png|64px]]== | |||
</center> | |||
<tabs> | |||
<tab name="Standard Equipment"> | |||
{| style="border: 2px solid black; class="mw-collapsible" | |||
! style="background-color:#A9A9A9; width:150px;"|'''Equipment:''' | |||
! style="background-color:#A9A9A9; width:800px;"|'''Description:''' | |||
|- | |||
|style="border: 2px solid black; padding: 5px;" |[[File:jumpsuit.png|64px]]<br>'''USCM Marine Uniform''' | |||
|style="border: 2px solid black; padding: 5px;" |A standard-issue Marine uniform, only worn by USCM combat personnel. There are also variants of this uniform issued to other Marine personnel. | |||
|- | |||
|style="border: 2px solid black; padding: 5px;"| [[File:Boots.png|64px]]<br>'''USCM Combat Boots''' | |||
|style="border: 2px solid black; padding: 5px;"| Standard issue combat boots used by the USCM for combat situations. | |||
|- | |||
|style="border: 2px solid black; padding: 5px;"|[[File:M10_technician_helmet.png|64px]]<BR>'''M10 Technician Helmet''' | |||
|style="border: 2px solid black; padding: 5px;"| {{M10 Technician Helmet}} | |||
|- | |||
|style="border: 2px solid black; padding: 5px;"| [[File:Squad_Gloves.gif|64px]]<br>'''USCM Combat Gloves''' | |||
|style="border: 2px solid black; padding: 5px;"| Standard issue insulated marine tactical gloves. | |||
|- | |||
|style="border: 2px solid black; padding: 5px;"| [[File:Headset.png|64px]]<br>'''USCM Headset''' | |||
|style="border: 2px solid black; padding: 5px;"| Standard issue USCM headset which has an inbuilt HUD for the user that displays marine roles. | |||
|- | |||
|style="border: 2px solid black; padding: 5px;"| [[File:MRE.png|64px]] | |||
'''MRE''' | |||
|style="border: 2px solid black; padding: 5px;"| Standard issue USCM brand Meal Ready-to-Eat, property of the US Colonial Marines. Meant to be consumed in the field, and has an expiration that is at least two decades past your combat life expectancy. | |||
|} | |||
</tab> | |||
<tab name="Armor"> | |||
{| style="border: 2px solid black; class="mw-collapsible" | |||
! style="background-color:#A9A9A9; width:130px;"|'''Armor:''' | |||
! style="background-color:#A9A9A9;"|'''Description:''' | |||
|- | |||
|style="border: 2px solid black; padding: 5px;" |[[File:M3 light armor.png]] | |||
'''M3-L Pattern Armor''' | |||
|style="border: 2px solid black; padding: 5px;" |{{M3-L Pattern Light Armor}} | |||
|- | |||
|style="border: 2px solid black; padding: 5px;"|[[File:M3_Pattern_Personal_Armor.png|64px]] | |||
'''M3 Pattern Marine Armor''' | |||
|style="border: 2px solid black; padding: 5px;"|{{M3 Medium Armor}} | |||
|- | |||
|style="border: 2px solid black; padding: 5px;" |[[File:M3 heavy armor.png]] | |||
'''M3 EOD Pattern Heavy Armor''' | |||
|style="border: 2px solid black; padding: 5px;" |{{M3 EOD Armor}} | |||
|- | |||
|} | |||
</tab> | |||
<tab name="Backpacks"> | |||
{| style="border: 2px solid black; class="mw-collapsible" | |||
! style="background-color:#A9A9A9; width:130px;"|'''Backpack:''' | |||
! style="background-color:#A9A9A9;"|'''Description:''' | |||
|- | |||
|style="border: 2px solid black; padding: 5px;"|[[File:H5_pattern_M2132_machete_scabbard.png|64px]] | |||
'''H5 Pattern M2132 Machete Scabbard''' | |||
|style="border: 2px solid black; padding: 5px;"|A large leather scabbard used to carry an M2132 machete. It can be strapped to the back or the armor. | |||
|- | |||
|style="border: 2px solid black; padding: 5px;" |[[File:Technician_backpack.png]] | |||
'''Technician Backpack''' | |||
|style="border: 2px solid black; padding: 5px;" |A standard-issue backpack worn by USCM technicians. | |||
Has to be held in one hand to access items inside. Holds 7 normal size items. | |||
|- | |||
|style="border: 2px solid black; padding: 5px;"| [[File:Technician_satchel.png]] | |||
'''Technician Satchel''' | |||
|style="border: 2px solid black; padding: 5px;"| A heavy duty chestrig used by some USCM technicians. | |||
It is standard gear for most of the USCM. Holds 5 normal size items. | |||
|- | |||
|style="border: 2px solid black; padding: 5px;"| [[File:L44_M37A2_scabbard.png]] | |||
'''L44 M37A2 Scabbard ''' | |||
|style="border: 2px solid black; padding: 5px;"| A large leather holster allowing the storage of an M37A2 Shotgun. It contains harnesses that allow it to be secured to the back for easy storage. | |||
|- | |||
|style="border: 2px solid black; padding: 5px;"|[[File:Welderpack.png|64px]] | |||
'''Technician Welderpack''' | |||
|style="border: 2px solid black; padding: 5px;"|{{USCM Technician Welderpack}} | |||
|- | |||
|style="border: 2px solid black; padding: 5px;"|[[File:Weldersatchel.png|64px]] | |||
'''Technician Welder-Satchel''' | |||
|style="border: 2px solid black; padding: 5px;"|{{USCM Technician Welder-Satchel}} | |||
|} | |||
</tab> | |||
<tab name="Belts"> | |||
{| style="border: 2px solid black; class="mw-collapsible" | |||
! style="background-color:#A9A9A9; width:150px;"|'''Belt:''' | |||
! style="background-color:#A9A9A9; width:800px;"|'''Description:''' | |||
|- | |||
{{G8-A General Utility Pouch}} | |||
|- | |||
{{M276 pattern ammo load rig}} | |||
|- | |||
|style="border: 2px solid black; padding: 5px;"| [[File:M276_pattern_M4A3_holster_rig.png|64px]]<br>'''M276 Pattern General Pistol Holster Rig''' | |||
|style="border: 2px solid black; padding: 5px;"|The M276 is the standard load-bearing equipment of the USCM. It consists of a modular belt with various clips. This version has a holster assembly that allows one to carry the M4A3, 88M4, or the M1911 comfortably secure. It also contains side pouches that can store 9mm or .45 magazines. | |||
It is one of the uncommon rigs inside USCM Vendors. It is also the standard rig for '''Cargo Technicians, Intelligence Officers, Pilot Officers, Staff Officers, and the [[Executive Officer]]'''. | |||
|- | |||
|style="border: 2px solid black; padding: 5px;"| [[File:M276_pattern_M39_holster_rig.png|64px]]<br>'''M276 Pattern M39 Holster Rig''' | |||
|style="border: 2px solid black; padding: 5px;"| The M276 is the standard load-bearing equipment of the USCM. It consists of a modular belt with various clips. This version is designed for the M39 SMG and features a larger frame to support the gun. Due to its unorthodox design, it isn't a very common sight and is only specially issued. | |||
|- | |||
|style="border: 2px solid black; padding: 5px;"| [[File:M276_pattern_M44_holster_rig.png|64px]]<br>'''M276 Pattern M44 Holster Rig''' | |||
|style="border: 2px solid black; padding: 5px;"| The M276 is the standard load-bearing equipment of the USCM. It consists of a modular belt with various clips. This version is for the M44 magnum revolver, along with three pouches for speedloaders. It faintly smells of hay. | |||
|- | |||
|style="border: 2px solid black; padding: 5px;"| [[File:M276_pattern_M82F flare gun holster rig.png|64px]]<br>'''M276 Pattern M82F Holster Rig''' | |||
|style="border: 2px solid black; padding: 5px;"| The M276 is the standard load-bearing equipment of the USCM. It consists of a modular belt with various clips. This version is for the M82F flare gun. | |||
|- | |||
|style="border: 2px solid black; padding: 5px;"| [[File:Shotgun_belt.png|64px]]<br>'''Shotgun Shell Load Rig''' | |||
|style="border: 2px solid black; padding: 5px;"| An ammunition belt designed to hold shotgun shells or individual bullets. Holds 10 handfuls of shells. | |||
|- | |||
|style="border: 2px solid black; padding: 5px;"| [[File:M276_pattern_mortar_operator_belt.png|64px]]<br>'''M276 pattern mortar operator belt''' | |||
|style="border: 2px solid black; padding: 5px;"| A belt specifically designed to carry ammunition for the M402 mortar along with a sidearm. | |||
Holds 4 mortar shells of any kind and reserves a slot for a pistol. | |||
|- | |||
|style="border: 2px solid black; padding: 5px;"| [[File:M276_pattern_M40_HEDP.png|64px]]<br>'''M276 Pattern M40 Grenade Rig''' | |||
|style="border: 2px solid black; padding: 5px;"| The M276 is the standard load-bearing equipment of the USCM. It consists of a modular belt with various clips. This version is designed to carry bulk quantities of M40 series of Grenades. | |||
It is the standard rig for '''Frontline Grenadier Kits'''. | |||
|- | |||
|style="border: 2px solid black; padding: 5px;"| [[File:M276_Pattern_Toolbelt_Rig.png|64px]]<br>'''M276 Pattern Toolbelt Rig''' | |||
|style="border: 2px solid black; padding: 5px;"|The M276 is the standard load-bearing equipment of the USCM. It consists of a modular belt with various clips. This version lacks any combat functionality and is commonly used by technicians to transport important tools. This contains all the tools for the Combat Technicians and Maintenance Technicians to do their work. | |||
|} | |||
</tab> | |||
<tab name="Pouches"> | |||
{| style="border: 2px solid black; class="mw-collapsible" | |||
! style="background-color:#A9A9A9; width:150px;"|'''Pouch:''' | |||
! style="background-color:#A9A9A9; width:800px;"|'''Description:''' | |||
|- | |||
|style="border: 2px solid black; padding: 5px;" |[[File:Const-pouch.png|64px]]<br>'''Construction Pouch''' | |||
|style="border: 2px solid black; padding: 5px;" |Designed to holster construction materials. | |||
|- | |||
|style="border: 2px solid black; padding: 5px;"| [[File:Aid-pouch.png|64px]]<br>'''First-Aid Pouch(Refillable Injectors)''' | |||
|style="border: 2px solid black; padding: 5px;"|{{aid-pouch-refil}} | |||
|- | |||
|style="border: 2px solid black; padding: 5px;"| [[File:Aid-pouch.png|64px]]<br>'''First-Aid Pouch(Splints, Gauze, Ointment)''' | |||
|style="border: 2px solid black; padding: 5px;"|{{aid-pouch-splints}} | |||
|- | |||
|style="border: 2px solid black; padding: 5px;"| [[File:Aid-pouch.png|64px]]<br>'''First-Aid Pouch(Pill Packets)''' | |||
|style="border: 2px solid black; padding: 5px;"|{{aid-pouch-packet}} | |||
|- | |||
|style="border: 2px solid black; padding: 5px;"| [[File:Electronics-pouch.png|64px]]<br>'''Electronics Pouch (Full)''' | |||
|style="border: 2px solid black; padding: 5px;"|Designed to hold all your electronic needs as a technician. Issued to Combat technicians, or found inside the '''ColMarTech automated armaments vendor''' in [[Requisitions]]. | |||
Contains 6 slots. | |||
{| border="1" class="wikitable style="width: 20%;" | |||
|[[File:Circuitboard.png|48px]] | |||
[[#Circuitboards|'''Circuitboards''']] | |||
||[[File:Powercell.png|48px]] | |||
[[#Powercells|'''Powercells''']] | |||
|} | |||
|- | |||
|style="border: 2px solid black; padding: 5px;"| [[File:Explarge-pouch.png|64px]]<br>'''Explosive Pouch''' | |||
|style="border: 2px solid black; padding: 5px;"| Container designed to hold up to three grenades or other explosives | |||
|- | |||
|style="border: 2px solid black; padding: 5px;"| [[File:Flare-pouch.png|64px]]<br>'''Flare Pouch''' | |||
|style="border: 2px solid black; padding: 5px;"| Can hold 8 flares (including activated flare). Refillable with a M94 Flare Pack. | |||
|- | |||
|style="border: 2px solid black; padding: 5px;"| [[File:Pistol-mag-pouch-large.png|64px]]<br>'''Large Pistol Magazine Pouch''' | |||
|style="border: 2px solid black; padding: 5px;"| Pouch able to hold pistol magazines. | |||
|- | |||
|style="border: 2px solid black; padding: 5px;"| [[File:Medmag-pouch.png|64px]]<br>'''Magazine Pouch''' | |||
|style="border: 2px solid black; padding: 5px;"|{{Magazine Pouch Description}} | |||
|- | |||
|style="border: 2px solid black; padding: 5px;"| [[File:Shell-pouch.png|64px]]<br>'''Shotgun Shell Pouch''' | |||
|style="border: 2px solid black; padding: 5px;"| A shotgun shell pouch. It can contain handfuls of shells, or bullets if you choose to for some reason. Holds 5 slots. | |||
|- | |||
|style="border: 2px solid black; padding: 5px;"| [[File:Medium-gen-pouch.png|64px]]<br>'''Medium General Pouch''' | |||
|style="border: 2px solid black; padding: 5px;"| A general purpose pouch used to carry more small items and also magazines. Contains 2 slots. | |||
|- | |||
|style="border: 2px solid black; padding: 5px;"| [[File:Pistol-pouch.png|64px]]<br>'''Pistol Pouch''' | |||
|style="border: 2px solid black; padding: 5px;"| A holster to carry pistols, typically a standard issue M4A3 handgun, or 88M4 Pistol. | |||
|- | |||
|style="border: 2px solid black; padding: 5px;"| [[File:Tool_Pouch.png|64px]]<br>'''Tools Pouch (Full)''' | |||
|style="border: 2px solid black; padding: 5px;"| Designed to hold all your different types of tools. | |||
</tab> | |||
<tab name="Accessories"> | |||
{| style="border: 2px solid black; class="mw-collapsible" | |||
! style="background-color:#A9A9A9; width:150px;"|'''Accessories:''' | |||
! style="background-color:#A9A9A9;"|'''Description:''' | |||
|- | |||
|style="border: 2px solid black; padding: 5px;"|[[File:Shoulder_Holster.png|64px]] | |||
'''Shoulder Holster''' | |||
|style="border: 2px solid black; padding: 5px;"|A traditional shoulder holster that can be attached to all uniforms. Can holster any handgun and completes the look of any hard-boiled detective. | |||
|- | |||
|style="border: 2px solid black; padding: 5px;" | [[File:Webbing.png|64px]]<br>'''Webbing''' | |||
|style="border: 2px solid black; padding: 5px;" | Sturdy mess of synthcotton belts and buckles, ready to share your burden. Holds 3 small sized items or magazines. | |||
|- | |||
|style="border: 2px solid black; padding: 5px;" | [[File:Brown_webbing_vest.png|64px]]<br>'''Brown Webbing Vest''' | |||
|style="border: 2px solid black; padding: 5px;" | Worn brownish synthcotton vest with lots of small pockets to unburden your hands. Holds 5 small sized items. | |||
|- | |||
|style="border: 2px solid black; padding: 5px;" | [[File:Black_webbing_vest.png|64px]]<br>'''Black Webbing Vest''' | |||
|style="border: 2px solid black; padding: 5px;" | Robust black synthcotton vest with lots of pockets to hold whatever you need, but cannot hold in hands. Holds 5 small sized items. | |||
|- | |||
|style="border: 2px solid black; padding: 5px;" | [[File:Drop_Pouch.png|64px]]<br>'''Drop Pouch''' | |||
|style="border: 2px solid black; padding: 5px;" | A convenient pouch to carry loose items around. Able to hold 2 large items. | |||
</tab> | |||
<tab name="Masks"> | |||
{| style="border: 2px solid black; class="mw-collapsible" | |||
! style="background-color:#A9A9A9; width:150px;"|'''Mask:''' | |||
! style="background-color:#A9A9A9; width:800px;"|'''Description:''' | |||
|- | |||
|style="border: 2px solid black; padding: 5px;" |[[File:Gasmask.png|64px]]<br>'''Gas Mask''' | |||
|style="border: 2px solid black; padding: 5px;" |{{Gas Mask}} | |||
|- | |||
|style="border: 2px solid black; padding: 5px;" |[[File:Heat_absorbent_coif.png|64px]]<br>'''Heat Absorbent Coif''' | |||
|style="border: 2px solid black; padding: 5px;" |{{Heat Absorbent Coif Description}} | |||
|} | |||
</tab> | |||
</tabs> | |||
<center> | |||
==[[File:Entrenching_Tool_Unfolded.png|64px]] Automated Equipment Rack [[File:CombatEngi.png|64px]]== | |||
= | |||
= | Each Equipment Rack starts with 45 points for you to spend on additional items for your deployment. These are all listed below. | ||
{| | {| style="width: 73%; border: none" | ||
! style="background-color:#A9A9A9;" | | <tabs> | ||
! style="background-color:#A9A9A9;" |Description: | <tab name="Essential Engineer Set"> | ||
{| style="border: 2px solid black; class="mw-collapsible" | |||
! style="background-color:#A9A9A9; width:130px;"|'''Equipment:''' | |||
! style="background-color:#A9A9A9; width:800px;"|'''Description:''' | |||
|- | |||
|style="border: 2px solid black; padding: 5px;" |[[File:C4.png]]<br>'''Plastique Explosive''' | |||
|style="border: 2px solid black; padding: 5px;" |{{C4 Description}} | |||
|- | |||
|style="border: 2px solid black; padding: 5px;" |[[File:Sandbag_Empty.png|64px]]<br>'''Sandbags x25''' | |||
|style="border: 2px solid black; padding: 5px;" |Holds twenty five (25) empty sandbags. Must be filled with dirt (or snow) manually. Dirt not included. | |||
|- | |||
|style="border: 2px solid black; padding: 5px;" |[[File:Metal.png|64px]]<br>'''Metal x50''' | |||
|style="border: 2px solid black; padding: 5px;" |Stack of fifty (50) sheets of metal. Can be constructed into standard Metal Barricades or other misc items. | |||
|- | |||
|style="border: 2px solid black; padding: 5px;"| [[File:Plasteel.png|64px]]<br>'''Plasteel x40''' | |||
|style="border: 2px solid black; padding: 5px;"| A forty (40) sheet stack of plasteel. Used in the construction of durable Plasteel Barricades. | |||
|- | |||
|style="border: 2px solid black; padding: 5px;" |[[File:Powercell.png|64px]]<br>'''High Cap Power Cell''' | |||
|style="border: 2px solid black; padding: 5px;" |Used for powering various devices that require power. 10,000W. | |||
|- | |||
|style="border: 2px solid black; padding: 5px;" |[[File:Entrenching_Tool_Unfolded.png|64px]]<br>'''Entrenching Tool''' | |||
|style="border: 2px solid black; padding: 5px;" |Used for digging and filling up sandbags, as well as deconstructing them. Can be folded to fit in a backpack. | |||
|- | |||
|style="border: 2px solid black; padding: 5px;" |[[File:Lightreplacer.png]]<br>'''Light Replacer''' | |||
|style="border: 2px solid black; padding: 5px;" |Can be used to instantly replace broken lights with fresh new ones. Limited charges. | |||
|} | |||
</tab> | |||
<tab name="Handheld Defences"> | |||
{| style="border: 2px solid black; | |||
! style="background-color:#A9A9A9;"|'''Structures:''' | |||
! style="background-color:#A9A9A9;"|'''Description:''' | |||
|- | |- | ||
|[[File:SentryGun.png|64px]]<br>'''UA 571-C Sentry''' | |style="border: 2px solid black; padding: 5px;"| [[File:SentryGun.png|64px]]<br>'''UA 571-C Sentry Gun''' | ||
|The Sentry Gun automatically tracks and fires upon any target that is wearing an ID not hooked up to the Almayer's systems. Via IFF, they are unable to hit friendly marines, allowing them to be safely placed behind marine lines as they lay down suppressing fire. | |style="border: 2px solid black; padding: 5px;"| The Sentry Gun automatically tracks and fires upon any target that is wearing an ID not hooked up to the Almayer's systems. Via IFF, they are unable to hit friendly marines, allowing them to be safely placed behind marine lines as they lay down suppressing fire. The sentry has a 135 degree firing arc, 5 tile range and a steady fire rate. Has 500 bullets. | ||
{| border="1" class="mw-collapsible mw-collapsed" | {| border="1" class="mw-collapsible mw-collapsed" | ||
|+ style="text-align:left;"|'''Ammunition:''' | |+ style="text-align:left;"|'''Ammunition:''' | ||
|[[File: | |width=150|[[File:M30_Ammo_Drum.png]] | ||
|Contains 500 10x28 caseless rounds. Ammunition for the UA 571-C Sentry. | '''M30 Ammo Drum (10x28mm Caseless)''' | ||
|Contains five hundred (500) 10x28 caseless rounds. Ammunition for the UA 571-C Sentry. | |||
|} | |} | ||
{| border="1" class="mw-collapsible mw-collapsed" | {| border="1" class="mw-collapsible mw-collapsed" | ||
|+ style="text-align:left;"|''' | |+ style="text-align:left;"|'''Deployment and Maintenance:''' | ||
| '''How To | |width=150| '''How To Deploy It:''' | ||
* | * Activate the sentry gun in your hand. The tile in front of your character must be in an open space. | ||
* Simply click on the sentry gun to turn it on. | |||
* | |||
'''Maintenance:''' | '''Maintenance:''' | ||
* [[File:Wrench.png|32px]] Wrench for unanchoring the sentry, making it moveable | * [[File:Wrench.png|32px]] Wrench for anchoring/unanchoring the sentry, making it moveable. | ||
* [[File:Screwdriver.png|32px]] Screwdriver for | <!-- * [[File:Screwdriver.png|32px]] Screwdriver for rotating the sentry (after turning off). --> | ||
* [[File:Welder.gif|32px]] Welder for repairing. | * [[File:Welder.gif|32px]] Welder for repairing. | ||
* | * [[File:Multitool.png|32px]] Use the Security Access Tunner (multitool) on the sentry gun to disassemble it for pickup. | ||
|} | |} | ||
|- | |- | ||
|style="border: 2px solid black; border-bottom: 2px solid black; padding: 5px;" | [[File:Flamer-Sentry-Gun.png|64px]]<br>'''UA 42-F Sentry Flamer''' | |||
|The | |style="border: 2px solid black; border-bottom: 2px solid black; padding: 5px;" | The Flamethrower Sentry Gun automatically tracks and fires upon any target that is wearing an ID not hooked up to the Almayer's systems. Just like the UA 571-C Sentry gun, this sentry has IFF but the fire that lingers doesn't. The flamethrower sentry has a 135 degree firing arc, 5 tile range and a slow fire rate. Has 100 units of fuel. | ||
{| border="1" class="mw-collapsible mw-collapsed" | {| border="1" class="mw-collapsible mw-collapsed" | ||
|+ style="text-align:left;"|''' | |+ style="text-align:left;"|'''Ammunition:''' | ||
| '''How To | |width=150|[[File:M30_Ammo_Drum.png]] | ||
* | '''Sentry Incinerator Fuel Tank''' | ||
|A fuel tank of usually Ultra Thick Napthal Fuel, a sticky combustible liquid chemical, used in the UA 42-F. Contains 100 units of fuel. | |||
|} | |||
{| border="1" class="mw-collapsible mw-collapsed" | |||
* | |+ style="text-align:left;"|'''Deployment and Maintenance:''' | ||
|width=150| '''How To Deploy It:''' | |||
* Activate the sentry gun in your hand. The tile in front of your character must be in an open space. | |||
* Simply click on the sentry gun to turn it on. | |||
'''Maintenance:''' | '''Maintenance:''' | ||
* [[File:Wrench.png|32px]] Wrench for anchoring/unanchoring the sentry, making it moveable. | |||
* [[File: | <!-- * [[File:Screwdriver.png|32px]] Screwdriver for rotating the sentry (after turning off). --> | ||
* [[File: | |||
* [[File:Welder.gif|32px]] Welder for repairing. | * [[File:Welder.gif|32px]] Welder for repairing. | ||
* [[File:Multitool.png|32px]] Use the Security Access Tunner (multitool) on the sentry gun to disassemble it for pickup. | |||
|} | |} | ||
|- | |||
|style="border: 2px solid black; padding: 5px;"| [[File:Tesla-Coil.png|64px]]<br>'''21S Tesla Coil''' | |||
|style="border: 2px solid black; padding: 5px;"| A perfected way of producing high-voltage, low-current and high frequency electricity. Minor modifications allow it to only hit hostile targets with a devastating shock. When hostile targets are zapped, they are significantly slowed down. It has a maximum range of 3 tiles, though if other defence modules are placed in its range, they'll be zapped and disabled. | |||
{| border="1" class="mw-collapsible mw-collapsed" | |||
|+ style="text-align:left;"|'''Deployment and Maintenance:''' | |||
|width=150| '''How To Deploy It:''' | |||
* Activate the Tesla Coil in your hand. The tile in front of your character must be in an open space. | |||
* Simply click on the Tesla Coil to turn it on. | |||
'''Maintenance:''' | |||
* [[File:Wrench.png|32px]] Wrench for anchoring/unanchoring the Tesla Coil, making it moveable. | |||
* [[File:Welder.gif|32px]] Welder for repairing. | |||
* [[File:Multitool.png|32px]] Use the Security Access Tunner (multitool) on the Tesla Coil to disassemble it for pickup. | |||
|} | |} | ||
= | |- | ||
|style="border: 2px solid black; border-bottom: 2px solid black; padding: 5px;" | [[File:Defence-Flag.png|64px]]<br>'''JIMA Planted Flag ''' | |||
|style="border: 2px solid black; border-bottom: 2px solid black; padding: 5px;" | A planted flag with the iconic USCM flag plastered all over it, you feel a burst of energy by its mere sight. An inspiring piece of work that just screams of freedom. This flag once activated, provides a permanent Focus and Hold order buff to all nearby marines within a 3 tile radius. Multiple flags overlapping will not improve the buff but if placed correctly, it will extend it. | |||
{| border="1" class="mw-collapsible mw-collapsed" | {| border="1" class="mw-collapsible mw-collapsed" | ||
|+ style="text-align:left;"|''' | |+ style="text-align:left;"|'''Deployment and Maintenance:''' | ||
! style="background-color:#A9A9A9;"| | |width=150| '''How To Deploy It:''' | ||
! style="background-color:#A9A9A9;"| | * Activate the Flag in your hand. The tile in front of your character must be in an open space. | ||
* Simply click on the Flag to turn it on. | |||
'''Maintenance:''' | |||
* [[File:Wrench.png|32px]] Wrench for anchoring/unanchoring the Flag, making it moveable. | |||
* [[File:Welder.gif|32px]] Welder for repairing. | |||
* [[File:Multitool.png|32px]] Use the Security Access Tunner (multitool) on the Flag to disassemble it for pickup. | |||
|} | |||
|- | |||
|style="border: 2px solid black; border-bottom: 2px solid black; padding: 5px;" | '''Sentry Upgrade Kit'''<br> [[File:sentry_upgrade_kit.png|64px]]<br> Cost: 15 Points | |||
|style="border: 2px solid black; border-bottom: 2px solid black; padding: 5px;" | Allows the combat technician to upgrade their chosen handheld defense into the below upgrades: | |||
{{Sentry Upgrades}} | |||
</tab> | |||
<tab name="Engineering Supplies"> | |||
{| style="border: 2px solid black; class="mw-collapsible" | |||
! style="background-color:#A9A9A9; width:130px;"|'''Equipment:''' | |||
! style="background-color:#A9A9A9; width:800px;"|'''Description:''' | |||
|- | |||
|style="border: 2px solid black; padding: 5px;"| [[File:Circuitboard.png|64px]]<br>'''Airlock Electronics'''<br>Cost:2 Points | |||
|style="border: 2px solid black; padding: 5px;"| Used in the construction or maintenance of a door. | |||
|- | |||
|style="border: 2px solid black; padding: 5px;"| [[File:Circuitboard.png|64px]]<br>'''APC Circuit Board'''<br>Cost:2 Points | |||
|style="border: 2px solid black; padding: 5px;"| Used in the construction or maintenance of Area Power Networks (APC). | |||
|- | |||
|style="border: 2px solid black; padding: 5px;"| [[File:Entrenching_Tool_Unfolded.png|64px]]<br>'''Entrenching Tool'''<br>Cost:2 Points | |||
|style="border: 2px solid black; padding: 5px;"| Used for digging and filling up sandbags, as well as deconstructing them. Can be folded to fit in a backpack. | |||
|- | |||
|style="border: 2px solid black; padding: 5px;"| [[File:Powercell.png|64px]]<br>'''High Capacity Power Cell'''<br>Cost:3 Points | |||
|style="border: 2px solid black; padding: 5px;"| Used for powering various devices that require power. 10,000W. | |||
|- | |- | ||
|[[File: | |style="border: 2px solid black; padding: 5px;" |[[File:Metal.png|64px]]<br>'''Metal x10'''<br>Cost: 5 Points | ||
|style="border: 2px solid black; padding: 5px;" |Stack of ten (10) sheets of metal. Can be constructed into standard Metal Barricades or other misc items. | |||
|- | |||
|style="border: 2px solid black; padding: 5px;"| [[File:Plasteel.png|64px]]<br>'''Plasteel x10'''<br>Cost:7 Points | |||
|style="border: 2px solid black; padding: 5px;"| A ten (10) sheet stack of plasteel. Used in the construction of durable Plasteel Barricades. | |||
|- | |- | ||
|[[File: | |style="border: 2px solid black; padding: 5px;" |[[File:C4.png]]<br>'''Plastic Explosive'''<br>Cost: 3 Points | ||
|style="border: 2px solid black; padding: 5px;" |{{C4 Description}} | |||
|- | |- | ||
|[[File: | |style="border: 2px solid black; padding: 5px;" |[[File:Breaching_Charge.png]]<br>'''Breaching Charge'''<br>Cost: 5 Points | ||
|style="border: 2px solid black; padding: 5px;" |An explosive device used to break into areas while protecting the user from the blast as well as deploying deadly shrapnel on the other side. | |||
|- | |- | ||
|[[File: | |style="border: 2px solid black; padding: 5px;"|[[File:Range_Finders.png|64px]]<br>'''Range Finder'''<br> Costs:10 points | ||
|style="border: 2px solid black; padding: 5px;"|A pair of binoculars, with a laser targeting function. This one is only used for gathering coordinates for mortar targets, supply drop coordinates and Orbital Bombardment coordinates. Ctrl + Click turf to acquire its coordinates. Ctrl + Click rangefinder to stop lasing. The tile's Longitude and Latitude coordinates will be displayed in a pop up menu | |||
|- | |- | ||
|[[File: | |style="border: 2px solid black; padding: 5px;"|[[File:Tactical_Binoculars.png|64px]] | ||
'''Laser Designator'''<br> Costs:15 points | |||
|style="border: 2px solid black; padding: 5px;"|A pair of binoculars, with a laser targeting function. It is used to mark an area for CAS or a mortar target to the targeted location. Has a targeting ID for CAS to identify which laser is which. Ctrl + Click a turf to target something. Ctrl + Click designator to stop lasing. Alt + Click designator to switch modes. | |||
{| border="1" | |||
|+ style="text-align:left;"|'''Tactical Binocular Different Modes:''' | |||
| | |||
*'''Rangefinder Mode:''' After Ctrl + Clicking the desired target a green laser will appear after which that tile's Longitude and Latitude coordinates will be displayed in a pop up menu. Coordinates used for '''Mortars''' and '''Orbital Bombardments''' | |||
*'''CAS Mode:''' After Ctrl + Clicking the desired target a red laser will appear from which any pilot doing a flyby mission can select this mark as a CAS target. | |||
|} | |||
|- | |- | ||
|[[File: | |style="border: 2px solid black; padding: 5px;"| [[File:Sandbag_Empty.png|64px]]<br>'''Sandbags x25'''<br>Cost:10 Points | ||
|style="border: 2px solid black; padding: 5px;"| Holds twenty five (25) empty sandbags. Must be filled with dirt (or snow) manually. Dirt not included. | |||
|- | |- | ||
|[[File: | |style="border: 2px solid black; padding: 5px;" |[[File:Powercell.png|64px]]<br>'''Super Cap Power Cell'''<br>Cost:10 Points | ||
|} | |style="border: 2px solid black; padding: 5px;" |Used for powering various devices that require power. 20,000W. | ||
|- | |||
|style="border: 2px solid black; padding: 5px;"| [[File:Goggles.png|64px]]<br>'''Welding Goggles'''<br>Costs:5 Points | |||
|style="border: 2px solid black; padding: 5px;"| A pair of Welding Goggles. Goes on the eyes slot. | |||
|- | |||
|style="border: 2px solid black; padding: 5px;" |[[File:MiniFuelTank.png]]<br>'''ES-11 Mobile Fuel Canister'''<br>Cost: 4 Points | |||
|style="border: 2px solid black; padding: 5px;" |A robust little pressurized canister that is small enough to fit in most bags and made for use with welding fuel. | |||
|} | |||
</tab> | |||
<tab name="Explosives"> | |||
<center><big>'''Note:You have 45 points to spend on additional items.'''</big></center> | |||
{| style="border: 2px solid black; class="mw-collapsible" | |||
! style="background-color:#A9A9A9; width:150px;"|'''Weapon:''' | |||
! style="background-color:#A9A9A9;"|'''Description:''' | |||
|- | |||
{{TabsItem | |||
|Description = Contains three [[Marine Equipment#USCM Weapons|HEDP]] high explosive grenades. | |||
'''Costs 18 points.''' | |||
|Icon = hedp_packet | |||
|Title = M40 HEDP High Explosive Packet | |||
}} | |||
|- | |||
{{TabsItem | |||
|Description = Contains three [[Marine Equipment#USCM Weapons|HIDP]] incendiary grenades. | |||
'''Costs 18 points.''' | |||
|Icon = hidp_packet | |||
|Title = M40 HIDP Incendiary Packet | |||
}} | |||
|- | |||
{{TabsItem | |||
|Description = Contains three [[Marine Equipment#USCM Weapons|HPDP]] white phosphorus grenades. | |||
'''Costs 18 points.''' | |||
|Icon = hpdp_packet | |||
|Title = M40 HPDP White Phosphorus Packet | |||
}} | |||
|- | |||
{{TabsItem | |||
|Description = Contains three [[Marine Equipment#USCM Weapons|HSDP]] smoke grenades. | |||
'''Costs 9 points.''' | |||
|Icon = hsdp_packet | |||
|Title = M40 HSDP Smoke Packet | |||
}} | |||
|- | |||
{{TabsItem | |||
|Description = Contains three [[Marine Equipment#USCM Weapons|AGM-F]] airburst grenades. | |||
'''Costs 18 points.''' | |||
|Icon = agm_airburst_packet | |||
|Title = M74 AGM-Frag Airburst Packet | |||
}} | |||
|- | |||
{{TabsItem | |||
|Description = Contains three [[Marine Equipment#USCM Weapons|AGM-I]] incendiary grenades. | |||
'''Costs 18 points.''' | |||
|Icon = agm_incendiary_airburst_packet | |||
|Title = M74 AGM-Incendiary Airburst Packet | |||
}} | |||
|- | |||
{{TabsItem | |||
|Description = Contains four [[Marine Equipment#USCM Weapons|AGM-H]] hornet grenades. | |||
'''Costs 10 points.''' | |||
|Icon = agm_smoke_airburst_packet | |||
|Title = M74 AGM-SmokeAirburst Packet | |||
}} | |||
|- | |- | ||
|[[ | {{TabsItem | ||
|Description = Contains three [[Marine Equipment#USCM Weapons|AGM-S]] smoke grenades. | |||
'''Costs 20 points.''' | |||
|Icon = hornet_packet | |||
|Title = M74 AGM-Hornet Airburst Packet | |||
}} | |||
|- | |- | ||
|[[ | {{TabsItem | ||
|Description = Contains five [[Marine Equipment#USCM Weapons|claymores]]. Can also be acquired via [[Requisitions]] or asking a [[Combat Technician]] if they have spare. | |||
'''Costs 18 points.''' | |||
|Icon = M20_mine_box | |||
|Title = M20 Mine Box | |||
}} | |||
|- | |- | ||
{{TabsItem | |||
{ | |Description = Contains one MFHS metal foam grenade. | ||
''' | '''Costs 5 points.''' | ||
|Icon = Metal_Foam_Grenade | |||
|Title = M40 MFHS Metal Foam Grenade | |||
}} | |||
|- | |||
|} | |} | ||
</tab> | |||
<tab name="Special Ammunition"> | |||
{| style="border: 2px solid black; class="mw-collapsible" | |||
! style="background-color:#A9A9A9; width:130px;"|'''Magazine:''' | |||
! style="background-color:#A9A9A9; width:800px;"|'''Description:''' | |||
|- | |- | ||
|[[ | |||
|style="border: 2px solid black; padding: 5px;"| [[File:M39-AP-mag.png|64px]]<br>'''M39 Armor Piercing Magazine'''<br> Costs:6 points | |||
|style="border: 2px solid black; padding: 5px;"| Holds forty eight (48) 10x20mm AP rounds. Has better armor penetration, but lower overall damage. | |||
|- | |- | ||
|[[File: | |style="border: 2px solid black; padding: 5px;"| [[File:M39-extended-mag.png|64px]]<br>'''M39 Extended Magazine'''<br> Costs:6 points | ||
|style="border: 2px solid black; padding: 5px;"| Holds seventy two (72) 10x20mm rounds. Holds more ammunition than the standard magazines. | |||
|- | |- | ||
|[[File: | |style="border: 2px solid black; padding: 5px;"| [[File:M41A-AP-mag.png|64px]]<br>'''M41A Armor Piercing Magazine'''<br> Costs:6 points | ||
|style="border: 2px solid black; padding: 5px;"| Holds forty (40) 10x24mm AP rifle rounds. Has better armor penetration, but lower overall damage. | |||
|- | |- | ||
|[[File: | |style="border: 2px solid black; padding: 5px;"| [[File:M41A-extended-mag.png|64px]]<br>'''M41A Extended Magazine'''<br> Costs:6 points | ||
|style="border: 2px solid black; padding: 5px;"| Holds sixty (60) 10x24mm rifle rounds. Holds more ammunition than the standard magazines. | |||
|- | |- | ||
|[[ | |style="border: 2px solid black; padding: 5px;"| [[File:M4RA-AP-mag.png|64px]]<br>'''M4RA Armor Piercing Magazine'''<br> Costs:6 points | ||
|style="border: 2px solid black; padding: 5px;"| Holds twenty (20) 10x20mm rounds. Has better armor penetration, but lower overall damage. | |||
|} | |||
</tab> | |||
<tab name="Restricted Firearms"> | |||
<center><big>'''Note:You have 45 points to spend on additional items.'''</big></center> | |||
{| style="border: 2px solid black; class="mw-collapsible" | |||
! style="background-color:#A9A9A9; width:150px;"|'''Weapon:''' | |||
! style="background-color:#A9A9A9;"|'''Description:''' | |||
|- | |||
{{TabsItem | |||
|Description = {{VP78 Guncase}} | |||
'''Costs 8 points.''' | |||
|Icon = weaponcase | |||
|Title = VP78 Pistol | |||
}} | |||
|- | |||
{{TabsItem | |||
|Description = {{Smartpistol Guncase}} | |||
'''Costs 12 Points.''' | |||
|Icon = weaponcase | |||
|Title = SU-6 Smartpistol | |||
}} | |||
|- | |||
{{TabsItem | |||
|Description = {{Incinerator Guncase}} | |||
'''Costs 12 Points.''' | |||
|Icon = weaponcase | |||
|Title = M240 Incinerator Unit | |||
}} | |||
|- | |||
{{TabsItem | |||
|Description = {{HPR Guncase}} | |||
'''Costs 18 points.''' | |||
|Icon = weaponcase | |||
|Title = M41AE2 Heavy Pulse Rifle | |||
}} | |||
|- | |||
{{TabsItem | |||
|Description = {{M79 Guncase}} | |||
=== | '''Costs 24 points.''' | ||
|Icon = weaponcase | |||
|Title = M79 Grenade Launcher | |||
}} | |||
|- | |||
{{TabsItem | |||
|Description = {{M56D Guncase}} | |||
'''Costs 24 points.''' | |||
|Icon = weaponcase | |||
|Title = M56D Heavy Machine Gun | |||
}} | |||
|} | |||
</tab> | |||
<tab name="Utilities"> | |||
<center><big>'''Note:You have 45 points to spend on additional items.'''</big></center> | |||
# | {| style="border: 2px solid black; class="mw-collapsible" | ||
# | ! style="background-color:#A9A9A9; width:150px;"|'''Extra Items:''' | ||
! style="background-color:#A9A9A9;"|'''Description:''' | |||
|- | |||
|style="border: 2px solid black; padding: 5px;"|[[File:MedicHud.png|64px]] | |||
'''SensorMate Medical HUD'''<br> Costs:12 points | |||
|style="border: 2px solid black; padding: 5px;"|{{Sensormate_Description}} The Healthmate Hud also allows you to add holographic cards onto marines you examine for triage purposes (same way that you mark criminals as 'wanted' with security HUD glasses). | |||
|- | |||
|style="border: 2px solid black; padding: 5px;"|[[File:RollerBed.png|64px]] | |||
'''Roller Bed'''<br> Costs:5 points | |||
|style="border: 2px solid black; padding: 5px;"|Allows you to quickly transport injured marines and other personnel across the battlefield. Can be folded up when not in use. | |||
*You can attach a body bag or a stasis bag onto a roller bed for faster transportation | |||
*To fold it, drag it to yourself when not occupied | |||
|- | |||
|style="border: 2px solid black; padding: 5px;"|[[File:Fulton_Device.png|64px]] | |||
'''Fulton Device'''<br> Costs:5 points | |||
|style="border: 2px solid black; padding: 5px;"|A system used by the USCM for retrieving objects of interest on the ground from a AUD-25 dropship. Can be used to extract unrevivable corpses or crates, typically lasting around 3 minutes in the air. There are 20 uses in the stack. | |||
|- | |||
|style="border: 2px solid black; padding: 5px;"|[[File:B12_Pattern_Personal_Armour.png|64px]] | |||
'''B12 Pattern Armor'''<br> Costs:24 points | |||
|style="border: 2px solid black; padding: 5px;"|{{B12 Armor}} | |||
|- | |||
|style="border: 2px solid black; padding: 5px;"|[[File:XM4_Pattern_Intel_Armor.png|64px]] | |||
'''M4 Pattern Armor'''<br> Costs:30 points | |||
|style="border: 2px solid black; padding: 5px;"|{{M4 Armor}} | |||
|- | |||
|style="border: 2px solid black; padding: 5px;"|[[File:Large-gen-pouch.png|64px]] | |||
'''Large General Pouch'''<br> Costs:6 points | |||
|style="border: 2px solid black; padding: 5px;"|A general purpose pouch used to carry more small items and also magazines. Contains 3 slots. | |||
|- | |- | ||
| | |style="border: 2px solid black; padding: 5px;"|[[File:Sling_pouch.png|64px]] | ||
'''Sling Pouch'''<br> Costs:6 points | |||
|style="border: 2px solid black; padding: 5px;"|Keeps a single item attached to a strap. | |||
|- | |- | ||
| | |style="border: 2px solid black; padding: 5px;"|[[File:Flame-pouch.png|64px]] | ||
'''Large Magazine Pouch'''<br>Costs:4 points | |||
|style="border: 2px solid black; padding: 5px;"| Holds two M240-pattern napalm tanks. | |||
|- | |- | ||
| | |style="border: 2px solid black; padding: 5px;"|[[File:largemag-pouch.png|64px]] | ||
'''Large Magazine Pouch'''<br>Costs:6 points | |||
|style="border: 2px solid black; padding: 5px;"|{{Large Magazine Pouch Description}} | |||
|- | |- | ||
| | |style="border: 2px solid black; padding: 5px;"|[[File:Machete_pouch.png|64px]] | ||
'''H6B pattern M2132 machete scabbard'''<br> Costs:8 points | |||
|style="border: 2px solid black; padding: 5px;"|A large leather scabbard used to carry a M2132 machete. It can be strapped to the pouch slot. | |||
|- | |||
|style="border: 2px solid black; padding: 5px;"|[[File:Mini_Extinguisher.png|64px]] | |||
'''Mini Extinguisher'''<br> Costs:3 points | |||
|style="border: 2px solid black; padding: 5px;"|A portable fire extinguisher, highly useful for saving inventory space compared to the traditional extinguisher. | |||
|- | |- | ||
|style="border: 2px solid black; padding: 5px;"|[[File:Motion_Detector.gif|64px]] | |||
'''Motion Detector'''<br> Costs:8 points | |||
|style="border: 2px solid black; padding: 5px;"| The Motion Detector highlights anything not wearing an ID that is on your screen and a few tiles off screen. For example, if an alien is on the other side of a wall, it will be highlighted and give off a high-pitched pinging sound. Hold the motion tracker in your hand or store it in your belt slot, and turn it on either by clicking on it or {{Key press|Z}} (in hotkey mode). | |||
= | |||
{| border="1" | |||
|+ style="text-align:left;"|'''Motion Tracker Range Modes:''' | |||
| You can cycle through two different range modes, '''Long Range''' and '''Short Range''' by right clicking the motion detector and then clicking on ''Toggle Range Mode''. | |||
*'''Long Range:''' The motion detector will detect movement on your whole screen and further at a slow rate. | |||
*'''Short Range:''' The motion tracker covers a smaller amount of your screen but detects movement at a faster rate. | |||
|} | |||
|- | |||
|style="border: 2px solid black; padding: 5px;"|[[File:Whistle.png|64px]] | |||
'''Whistle'''<br> Costs:3 points | |||
|style="border: 2px solid black; padding: 5px;"|A whistle, usually reserved for Squad leaders and the Command Staff, to help coordinate marines. To use the whistle you can click on it while it's in your hand or you can wear it in your mask slot and then click it with an empty hand. Click and drag to take it out of your mask slot. | |||
|- | |||
|style="border: 2px solid black; padding: 5px;"|[[File:JTAC-Pamphlet.png|64px]] | |||
'''JTAC Pamphlet'''<br> Costs:15 points | |||
|style="border: 2px solid black; padding: 5px;"|A pamphlet that grants +1 to the JTAC skill, allowing you to lase faster with tactical binoculars. | |||
|- | |- | ||
|[[File: | |style="border: 2px solid black; padding: 5px;"|[[File:Powerloader-Pamphlet.png|64px]] | ||
'''Powerloader Certification'''<br> Costs:45 points | |||
|style="border: 2px solid black; padding: 5px;"|A pamphlet that grants +1 to the powerloader skill, allowing you to use the powerloader. | |||
|- | |- | ||
|[[File: | |style="border: 2px solid black; padding: 5px;"|[[File:Largeshell-pouch.png|64px]] | ||
'''Large Shotgun Shell Pouch'''<br> Costs:10 points | |||
|style="border: 2px solid black; padding: 5px;"|{{Large Shotgun Shell Pouch Description}} | |||
|- | |- | ||
|[[File: | |style="border: 2px solid black; padding: 5px;"|[[File:M276_Pattern_Combat_Toolbelt_Rig.png|64px]] | ||
'''M276 Pattern Combat Toolbelt Rig'''<br> Costs:15 points | |||
|style="border: 2px solid black; padding: 5px;"| | |||
The M276 pattern combat toolbelt rig is an alternative load-bearing equipment of the USCM for engineers conducting repairs within combat zones. It consists of a modular belt with various clips and pouches for tools along with a holster for a sidearm. Due to the bulk of the sidearm, it is unable to hold as many tools as its standard counterpart. | |||
Holds 5 slots for tools and the 6th slot is reserved for a sidearm. | |||
|} | |||
</tab> | |||
</tabs> | |||
|} | |||
</center> | |||
---- | |||
==Equipment and Gear== | |||
=== Metal and Sandbags === | |||
At round start, there are 30 plasteel sheets and 50 metal sheets in your essential technician kit. Plasteel is an expensive but very resistant material at your disposal. More can be purchased at your equipment closet or as supplies start trickling in through the ASRS, you may be able to acquire more. Don't hoard loads of building supplies otherwise you might find fellow Combat Technicians unable to perform their jobs, and if you are captured or die with a lot of supplies, they will likely be gone from the round. | |||
==Linking Plasteel Barricades [[File:Plasteel Barricade.gif]] == | |||
You can link plasteel barricades together with a crowbar. This is can used for making a gate for more marines to fit through. It requires at least 2 plasteel barricades facing the same direction and same state (Open/Closed) in order for it to work. Sometimes barricades may be moved or repositioned, and the person doing it may wrench them in place but forget to close the protective cover with their screwdriver. If you ever use your crowbar on a plasteel barricade and do not get the prompt that the barricade is ready for linking, check with your screwdriver (or Shift+Click to examine). | |||
== In the field == | |||
=== Power and T-Comms === | |||
Upon the first deployment, you are likely to be tasked to either [[Guide_to_Engineering#Power_Duty|fixing the Power]], [[Guide_to_Engineering#Static_Telecommunications|fixing the Telecommunications Tower]] or FOB duty. | |||
<br> | |||
=== Overcoming obstacles === | |||
* [[File:Crowbar.png|32px]] Use a crowbar to pry open powered down doors. | |||
* [[Guide_to_Engineering#Hacking|Hack]] doors to open previously locked passageways. If a door is not powered, but is bolted (Solid yellow lights on the door), you will have to restore power to the door before it will open. | |||
* [[File:C4.png|32px]] C4 doors/walls if you don't have time to hack/deconstruct. | |||
* Disassembling windows ([[File:screwdriver.png|32px]]->[[File:crowbar.png|32px]]->[[File:screwdriver.png|32px]]) and window frames ([[File:Wrench.png|32px]]) | |||
<br> | |||
=== Lighting up the place === | |||
* [[Guide_to_Engineering#APC_Maintenance|Fix the APC's]] and replace broken lights with the light replacer along the way as you advance.+ | |||
* Fixing lights is (in my opinion) one of the most powerful tools the combat technician has at his disposal. Without lights, anybody passing between the front line and the landing zone is walking through dark passages, and most of the time the people doing this are medics with a wounded ally. | |||
<br> | |||
==== Floodlight Repair ==== | |||
While you may have fixed the power for the colony (and turned on the Colony Floodlight Switch [[File:Colony_Floodlight_Switch.gif|32px]]), the aliens will have most likely broken floodlights around the place which you'll need to fix. To fix a floodlight you'll want to use the following steps: | |||
[[File:Broken_Floodlight.png|48px]] = [[File:Screwdriver.png|48px|link=|Screwdriver]] -> [[File:Crowbar.png|48px|link=|Crowbar]] -> [[File:Welder.gif|48px|link=|Welder]] -> [[File:CableCoils.png|48px|link=|Cable Coil]] -> [[File:Screwdriver.png|48px|link=|Screwdriver]] | |||
* Emergency Floodlights can be unwrenched and be moved around. | |||
<br> | |||
=== [[File:SentryGun.png|64px]] Deploying your defensive structure [[File:Tesla-Coil.png|64px]] === | |||
When you hit the field, you'll be needing to place your defensive structure down in order to have it either man the flanks or aid the marines in combat. | |||
Simply take the defensive structure in your hand and click on it while it's in your active hand. Make sure the tile in front of you is empty and clear. Once deployed, make sure you click on the defensive structure again to turn it on, and lock it via the right-click menu or a verb in the "Object" tab if you want to prevent non-technicians turning it off. You can easily pick it up with a Security Access Tuner [[File:Multitool.png|32px]] as long as it is in pristine condition. If it has been damaged, simply use a welder to repair it. You can also unanchor it to move it around without needing to pick it back up again with a Wrench [[File:Wrench.png|32px]]. | |||
==== [[File:SentryLaptop.png|64px]] Using the Sentry Laptop ==== | |||
Once you've deployed your sentry of choice, you may also set up a sentry laptop - available from Requisitions or your preparation room, alongside unique encryption keys. To connect it to your sentry, use your Security Access Tuner [[File:Multitool.png|32px]] on the laptop, then click on the sentry gun with the same Security Access Tuner to connect it. Multiple sentries can be connected to the same laptop. | |||
When deployed and interacted with after linking, you may toggle the IFF settings of the sentry to control who it will NOT fire upon, ranging from avoiding USCMC + WY personnel, USCMC personnel, or all humanoids, and you may use it as a camera with the same view range as a human. Additionally, when engaging a target, the sentry will send a report over a radio, which you can hear using the unique encryption keys that come with it. | |||
=== Make use of vendors === | |||
* [[File:Wrench.png|32px]] Use a wrench to move useful vendors like medical vendor to a FOB then hack [[File:Multitool.png|32px]] them to allow medics and marines to vendor the items. | |||
=== Securing flanks/supply route === | |||
It's crucial to secure the supply route from FOB to the front. Otherwise, reinforcements, Medics, and wounded marines will be easy targets to be picked off and the front will risk being cut off and encircled. Since material supply might be limited under certain circumstance so you can't barricade all the way; instead, you need to focus on the choke points like doorways, to secure as many sections you can with the little materials you have. You can save some materials by simply welding doors shut along the way. And once marines have learned that can Xenos use vents, you can weld the vents shut to deny their usage. You can also use vendors/cabinets as blockades to save more materials but they can potentially block bullets as well, resulting in a potential cover for aliens. | |||
Your flanks are a vital part of your frontlines, FOBs and supply lines. | |||
The enemy will always try to find a way to breach your vulnerable locations and pick off your fellow team mates. | |||
If you think they can breach into your vulnerable flanks or supply lines, secure it. | |||
<br> | |||
== In the Front == | |||
This is where the combat technician shines and determines whether or not the marines will gain a foothold or be routed after their initial push. There are three main types of barricade lines you can build in the front, but there are some principles that apply to all. | |||
* Build the barricades inward for more firing space and bigger kill zone | |||
* Force the enemy into the choke point/corridor so fewer of them can attack at once (and block each other when they retreat) | |||
* Distant the barricades to enemies' nearest corners/covers, thus exposing them with more firepower before they can reach the barricades and when they retreat | |||
* Build the barricades with marines standing one tile behind in mind | |||
<br> | |||
{| style="border: 2px solid black; | |||
! style="background-color:orange;"|'''Barricade Layout:''' | |||
! style="background-color:orange;"|'''Description:''' | |||
|- | |- | ||
|[[File: | |style="border: 2px solid black; padding: 5px;" |[[File:Killingzone.png|400px]] | ||
|style="border: 2px solid black; padding: 5px;" |The original barricade line makes a small chokepoint which can't effectively utilise the full power of the marines in the area; to fix this the barricade defence could've been constructed on the <span style="color:red">'''red line'''</span> to allow for additional marines to fire or even further back on the <span style="color:DeepSkyBlue">'''blue line'''</span> to use the xenos cover against them and create a two tile chokepoint that will expose them to more gunfire, while also keeping the defending marines at a safe distance. | |||
<br> | |||
✔ Large kill zone. | |||
✔ Forces the enemy to walk past a choke, Exposing them to more fire on their attempted exit | |||
✔ Two tiles from the enemies nearest position with cover. (Meaning they have to expose themselves to push) | |||
✔ Marines standing one tile behind the barricaded position so they can't be slashed but can still hold the barricade itself. | |||
|- | |- | ||
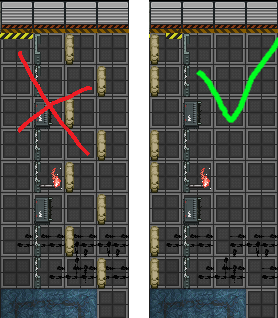
|[[File: | |style="border: 2px solid black; padding: 5px;" |[[File:Inward3.png|400px]] | ||
|style="border: 2px solid black; padding: 5px;" |<span style="color:darkred">'''This is an example of what not to do when constructing a barricade position.'''</span> | |||
By having the barricades extend outwards it places the defending marines into the chokepoint giving them a disadvantage during combat. | |||
|- | |- | ||
|[[File: | |style="border: 2px solid black; padding: 5px;" |[[File:Inward4.png|400px]] | ||
|style="border: 2px solid black; padding: 5px;" |<span style="color:darkgreen">'''This is an example of what you should do when constructing a barricade position.'''</span> | |||
By having the barricades extend inwards it utilises the chokepoint making it harder for the xenos to push through. | |||
|} | |||
<br> | |||
=== Frontline FOB/Outpost === | |||
A secured space slightly behind the front for marines to resupply, triage and casevac. Without a frontline FOB, Medics and the wounded will be harassed constantly and supply melted. And in the event of counterattack, marines will likely to be routed without a place to fall back to. Frontline FOB doesn't need to be big (a 6x6 space will do, bigger if high pop), otherwise, parts of the FOB likely be left unguarded and be melted. | |||
<br><br> | |||
=== Secured barricade line === | |||
Build at a choke point, apply the principles, and you get a decent defensive position. To reinforce a barricade line, build barricades one tile in front of the barricade line not behind. | |||
<br><br> | |||
=== Unsecured barricades === | |||
Mostly seen when you want to build a secured barricade line but ran out of plasteel, so you have to leave some gaps. While they are not fully secured, they are still useful to hinder counter attacks and block off Boiler gas and Crusher charge. To avoid hindering marines' push, you can build them in the middle of the corridor (e.g. middle 2 tiles out of 4 tiles), then the sides tiles in further one tile. | |||
<br><br> | |||
=== Barricade as marines push === | |||
Sandbags are particularly well suited for this job, as they can be built by marines and the build time is short. Metal barricades (with barbed wire) work too, though instead of standing in the front and build there, it's much safer to build it just behind the front then move them to the front (See [[Combat_Technician#Fortifications_of_the_Trade|this table]] for how to move barricades). | |||
<br><br> | |||
=== Robotic limbs repairing === | |||
Target the damaged limb while on assist intent and use: | |||
* [[File:Welder.gif|32px]] Blowtorch for brute damage. | |||
* [[File:CableCoils.png|32px]] Cable coils for burn damage. | |||
<br> | |||
== FOB Duty == | |||
As a Combat Technician on FOB duty, you'll be setting up the base that the marines will primarily use to organize, resupply, to retreat to, and to make a final last stand. To make a good FOB, you'll want to make strategic use of your landmines, the smartgun HMG or the sentry gun, and various defensive emplacements. A good FOB is a difference between losing the round and holding off long enough to make a push back and finally win the round. | |||
<br><br> | |||
The [[Guide to construction|Construction]] page will have everything you need to construct a FOB, from wooden barricades to plasteel barricades. It also includes many other helpful things for a combat technician to build around the FOB, or elsewhere. | |||
<br><br> | |||
=== Principles === | |||
[[File:CargoCadeBypassed.png|160px|thumb|link=http://cm-ss13.com/wiki/images/6/62/CargoCadeBypassed.png|Ghost and see where isn't vital after FOB has fallen]][[File:LVLZbreached.png|160px|thumb|link=http://cm-ss13.com/wiki/images/3/3a/LVLZbreached.png|''One breach is all it takes'']] | |||
[[File:3plasteeloverkill.png|160px|thumb|''One is enough'']] | |||
[[File:Block3.png|160px|thumb|''Fancy and bad''|link=http://cm-ss13.com/wiki/images/b/b7/Block3.png]] | |||
[[File:cade pain.png|160px|thumb|''Too close together, boilers will hit them all at once'']] | |||
==== You don't always need a mega FOB ==== | |||
LZ/FOB will only see poking most of the round until siege happens because FOB is a hard target. Thus, ambush xenos are likely to focus on marine's unsecured sections of the supply route. Focusing your effort solely on FOB means using a large amount of material to counter a token force while ignoring the threat targeting the more vulnerable areas. Instead, you need to [[Combat_Technician#Securing_flanks.2Fsupply_route|secure flanks/supply route]]. | |||
==== Barricade where enemy can't bypass ==== | |||
While Xeno will try to flank you, your job is to make them a hard time to do so. If you build barricades where they don't matter (not part of the supply route/no marine will be there), you will do Xenos a favour, as there will be fewer defences where it does matter. | |||
==== It is the weakest point that matters ==== | |||
It doesn't matter there are three layers of barricades in Nexus if the one layer metal barricades at LZ is breached, the wounded and the supply will be killed and melted. Even worse, Xeno can ignore Nexus entirely and focus on LZ then everything in Nexus will be wasted. | |||
==== Use materials wisely ==== | |||
[[Requisitions#Engineering|Plasteel is expensive]], $4,000 for 30 plasteel (3 doors) vs. $2,000 for 50 metal (8 barricades with barbed wire). Yet plasteel is crucial to how many secure spaces you can create. If you are out of plasteel, you are forced to keep an opening in the cade line, thus compromising the effect of the barricade line. | |||
A corridor with traffic? A plasteel barricade with barbed wire. No traffic but a high threat (e.g., Crusher charge/constant poking)? Sandbags barricades with barbed wire. No traffic and want to keep Runners out? Metal barricades with barbed wire. And try to save materials by | |||
* [[File:Welder.gif|32px]] Use blowtorch on the vents/doors. ([[File:Goggles.png]] Flip down before you start.) | |||
* [[File:Wrench.png|32px]] Use wrench to move vendors/cabinets/hydro trays as blockades (hydro trays '''don't''' block Runner). | |||
* Then build barricades behind them if it's high threat and if you can spare the supplies. | |||
====Putting cades close together isn't usually a good idea==== | |||
Boilers can gas cades in either a 5x5 or 3x3 square, putting cades closer than 3 tiles together is asking for a trapper to shoot both at once. Ideally you always need a 3 tile gap - one tile of empty space for HMGs, one tile for defenders to stand on/sentries/combat technicians to weld from so that they can't get slashed, and another line behind that for people to move around in. This will also allow for a proper evacuation of the cadeline in case of boiler attack. | |||
---- | |||
===FOB Construction Quick Tips=== | ===FOB Construction Quick Tips=== | ||
| Line 273: | Line 884: | ||
<span style="color:darkred">'''This is an example of what not to do when constructing a defensive position.'''</span> | <span style="color:darkred">'''This is an example of what not to do when constructing a defensive position.'''</span> | ||
In the picture on the left you'll see that the | In the picture on the left, you'll see that the aliens can hit the barricade without being shot due to its forward position and as such the alien will be able to break through and kill that marine with ease. | ||
|- | |- | ||
|style="border: 2px solid black;|[[File:WIKIFOB2.png|thumb|right]] | |style="border: 2px solid black;|[[File:WIKIFOB2.png|thumb|right]] | ||
| Line 279: | Line 890: | ||
<span style="color:darkgreen">'''This is an example of what you should do when constructing a defensive position.'''</span> | <span style="color:darkgreen">'''This is an example of what you should do when constructing a defensive position.'''</span> | ||
To rectify the above barricade placement errors you'll want to move the barricades back one tile like the photo on the left. By moving the barricades back this will allow you to shoot | To rectify the above barricade placement errors you'll want to move the barricades back one tile like the photo on the left. By moving the barricades back this will allow you to shoot aliens who are attacking them. | ||
|} | |} | ||
<br> | <br> | ||
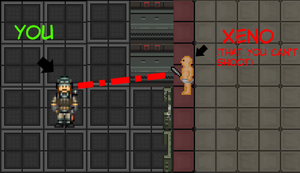
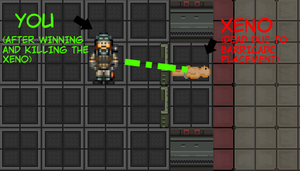
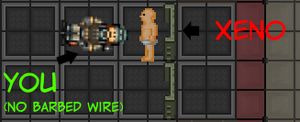
====Barbed Wire==== | ====Barbed Wire==== | ||
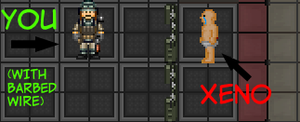
[[File:Barbed_Wire.png|32px]]'''Barbed wire is a string of sharp metal that will harm and prevent xenos from pouncing over barricades once attached. It also gives a small health boost to the barricade itself. | [[File:Barbed_Wire.png|32px]]'''Barbed wire is a string of sharp metal that will harm and prevent xenos from pouncing over barricades once attached. It also gives a small health boost to the barricade itself. | ||
| Line 290: | Line 902: | ||
|- | |- | ||
|style="border: 2px solid black;|[[File:barbedwirenone.png|thumb|left]] | |style="border: 2px solid black;|[[File:barbedwirenone.png|thumb|left]] | ||
|style="border: 2px solid black;| In the picture you'll see that the | |style="border: 2px solid black;| In the picture you'll see that the combat technician was killed due to the alien being able to pounce over the barricade. | ||
|- | |- | ||
|style="border: 2px solid black;|[[File:barbedwireyes.png|thumb|left]] | |style="border: 2px solid black;|[[File:barbedwireyes.png|thumb|left]] | ||
|style="border: 2px solid black;| | |style="border: 2px solid black;| | ||
Due to the | Due to the combat technician placing barbed wire onto the barricades the alien was unable to jump over. | ||
|} | |} | ||
<br> | <br> | ||
| Line 324: | Line 936: | ||
|} | |} | ||
<br> | <br> | ||
====Fixing Breaches in Defences==== | ====Fixing Breaches in Defences==== | ||
{| style="border: 2px solid black; | {| style="border: 2px solid black; | ||
| Line 333: | Line 946: | ||
<span style="color:darkred">'''This is an example of what not to do when attempting to fix a breach in the defensive line with hostiles nearby.'''</span> | <span style="color:darkred">'''This is an example of what not to do when attempting to fix a breach in the defensive line with hostiles nearby.'''</span> | ||
In the picture you'll see that this is a highly dangerous and ineffective way to fix the breach in a defensive line if hostiles are nearby. This will let you get slashed up by an alien running up willy nilly | In the picture you'll see that this is a highly dangerous and ineffective way to fix the breach in a defensive line if hostiles are nearby. This will let you get slashed up by an alien running up willy nilly and will give you less time to react if multiple Aliens decide to push the defensive line. | ||
|- | |- | ||
| Line 340: | Line 953: | ||
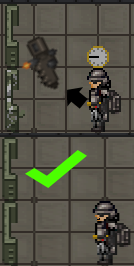
<span style="color:green">'''This is an example of what to do when attempting to fix a breach in the defensive line with hostiles nearby.'''</span> | <span style="color:green">'''This is an example of what to do when attempting to fix a breach in the defensive line with hostiles nearby.'''</span> | ||
In the picture you'll see that it shows the optimal way of repairing a breach in your | In the picture you'll see that it shows the optimal way of repairing a breach in your defenses if Aliens are nearby. | ||
<br> | <br> | ||
<br> | <br> | ||
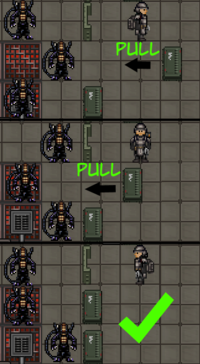
'''To perform this fixing | '''To perform this fixing maneuver, you'll want to:''' | ||
*Build a barricade a few tiles back, | *Build (or unsecure for redeployment) a barricade a few tiles back, | ||
*Screwdriver the freshly built barricade, | *[[File:Screwdriver.png|32px]]Screwdriver the freshly built barricade, | ||
*Wrench it, to allow it to be moved, | *[[File:Wrench.png|32px]]Wrench it, to allow it to be moved, | ||
*Pull the barricade ''(Ctrl + Click or open up the right click menu)'' and then pull it to the tile below you ''(By clicking on the tile)'', and then finally the breached tile as demonstrated in the photo. | *Pull the barricade ''(Ctrl + Click or open up the right click menu)'' and then pull it to the tile below you ''(By clicking on the tile)'', and then finally the breached tile as demonstrated in the photo. | ||
* Wrench then screwdriver the barricade to secure it again. | |||
<br> | <br> | ||
This will force the | This will force the aliens to run into the FOB to attack you, and put themselves at risk of death due to being in the FOB. This method takes much more time than the above one, however, the safety gained from doing it is worth it's weight in attachments ten times over. If there are no hostiles at all, building it in the normal manner is perfectly acceptable. | ||
|} | |} | ||
<br> | <br> | ||
====Misc. FOB tips==== | ====Misc. FOB tips==== | ||
{| style="border: 2px solid black; | {| style="border: 2px solid black; | ||
| Line 359: | Line 974: | ||
|style="border: 2px solid black;|[[File:windows.png|187px|thumb|left]] | |style="border: 2px solid black;|[[File:windows.png|187px|thumb|left]] | ||
|style="border: 2px solid black;| | |style="border: 2px solid black;| | ||
In the picture you'll see that it | In the picture you'll see that it demonstrates that windows, even if reinforced, are not an acceptable replacement for a line of all-American steel barricades. | ||
<br> | <br> | ||
'''Windows as a defence:''' | '''Windows as a defence:''' | ||
* | *Provides no firing lines | ||
* | *Weak | ||
'''In summary, avoid using them as a defence.''' | '''In summary, avoid using them as a defence.''' | ||
|- | |||
|style="border: 2px solid black;|[[File:Frontnotbehind.png|thumb|left]] | |||
|style="border: 2px solid black;| If you have a secured barricade line and you want to strengthen it, put the extra barricades in front of the secured barricade line not behind, and don't block the plasteel barricades. And if you can make a secured cade line, make one, checkerboard barricades do nothing to hinder the aliens' attack. | |||
|- | |- | ||
|style="border: 2px solid black;|[[File:Repairingbarricades.png|thumb|left]] | |style="border: 2px solid black;|[[File:Repairingbarricades.png|thumb|left]] | ||
|style="border: 2px solid black;| | |style="border: 2px solid black;| | ||
Barricades will end up damaged due to the ravages of war and incompetence, and if it isn't | Barricades will end up damaged due to the ravages of war and incompetence, and if it isn't heavily damaged, you'll be able to use a blowtorch on it to repair it. This works on metal and plasteel barricades. Note that if a barricade is too damaged, you will be unable to fix it. | ||
<br> | <br> | ||
<br> | <br> | ||
'''Each time you repair a barricade it will consume one unit of welder fuel.''' | '''Each time you repair a barricade, it will consume one unit of welder fuel.''' | ||
|- | |||
|style="border: 2px solid black;|[[File:Alighdoors.png|thumb|left]] | |||
|style="border: 2px solid black;| | |||
Align the plasteel barricades to reduce traffic jam. | |||
|- | |||
|style="border: 2px solid black;|[[File:Doortoside.png|thumb|left]] | |||
|style="border: 2px solid black;| | |||
Place the plasteel barricade at the side reduce the chance retreating marines blocking defensive fire. It also avoids two marines getting in the way of each other when both are exiting/entering. [[File:Middle_door_traffic_jam.gif|frame]] | |||
|- | |||
|style="border: 2px solid black;|[[File:Maze_barricades_bad.png|thumb|left]] | |||
|style="border: 2px solid black;| | |||
Maze-like barricades serve no purpose as Xeno will not follow the corridor, they will slash them down with no regard yet marines will surfer traffic jam. Instead, align the exit with plasteel. | |||
|} | |} | ||
== | ==Fortifications of the Trade== | ||
[[File: | {{main|Guide to Construction#Defences}} | ||
{| class="wikitable" | |||
!Fortification | |||
!Material | |||
!Function | |||
|- | |||
|[[File:Handrail.png]]<br>'''Hand Rail''' | |||
|2 Metal [[File:Metal.png]] | |||
|A handrail to ward off any intrusions into unwanted areas. Provides very little cover without reinforcing it. To reinforce the handrail, simply add 1 metal sheet to it and weld it. | |||
'''To remove reinforced plate''' : [[File:Crowbar.png|32px]], | |||
'''To unsecure''': [[File:Wrench.png|32px]] (To secure: [[File:Wrench.png|32px]]), | |||
'''Deconstruct''': [[File:Wrench.png|32px]] -> [[File:Screwdriver.png|32px]] | |||
|- | |||
|[[File:Snow_barricade.png|64px]]<br>'''Snow Barricade''' | |||
|3 Snow Piles[[File:Snow_pile.png|64px]] | |||
|A very weak barricade constructed from snow piles with a snow shovel. It's better than thin air at least. | |||
'''Deconstruct''': [[File:Snow_shovel.png|32px]] Click on the snow barricade with the snow shovel. Gives back 3 snow piles (fewer if barricade is damaged). | |||
|- | |||
|[[File:WoodenBarricade.png|64px]]<br>'''Wood Barricade''' | |||
|10 Wooden Planks [[File:Planks.png|64px]] | |||
|Used for a hasty defense against aliens. Mostly seen prespawned. Can be repaired with additional wooden planks at ''any'' damaged condition. | |||
'''Deconstruct:''' Bash the wooden barricade to break it. Give back 3 wooden planks [[File:Planks.png]]. | |||
|- | |||
|[[File:Metal_Barricade.png|64px]]<br>'''Metal Barricade''' | |||
|4 Metal[[File:Metal.png]] | |||
|The most common among the three main types of barricades (20 points for 50 sheets). Can be repaired with a blowtorch if not overtly damaged. | |||
'''To unsecure:''' [[File:Screwdriver.png|32px]] -> [[File:Wrench.png|32px]] (To secure: [[File:Wrench.png|32px]] -> [[File:Screwdriver.png|32px]]) | |||
'''Deconstruct:''' [[File:Screwdriver.png|32px]] -> [[File:Wrench.png|32px]] -> [[File:Crowbar.png|32px]] | |||
''To upgrade a barricade, click on one with 2 metal sheets, a window will prompt open in which you select the upgrade.'' | |||
|- | |||
|[[File:Metal_Barricade_Reinforced.png|64px]]<br>'''Metal Barricade Reinforced ''' | |||
|2 Metal[[File:Metal.png]] | |||
|An upgraded version of the metal barricade. This one can take much more damage from bullets and slashes. Can be repaired with a blowtorch if not overtly damaged. | |||
|- | |||
|[[File:Metal_Barricade_Anti_Acid.png|64px]]<br>'''Metal Barricade Bio-hazard Resistant''' | |||
|2 Metal[[File:Metal.png]] | |||
|An upgraded version of the metal barricade. This one can take much more damage from acids and fire. Can be repaired with a blowtorch if not overtly damaged. | |||
|- | |||
|[[File:Metal_Barricade_Anti_Explosion.png|64px]]<br>'''Metal Barricade Explosion Resistant''' | |||
|2 Metal[[File:Metal.png]] | |||
|An upgraded version of the metal barricade. This one can take much more damage from explosive sources with no downside. Can be repaired with a blowtorch if not overtly damaged. | |||
|- | |||
|[[File:Sandbag_Full.png|64px]]<br>'''Sandbags''' | |||
|5 Sandbags[[File:Sandbag_Empty.png|64px]] | |||
|Dig up dirt with an entrenching tool to fill up the empty sandbags. A fast fortification to field and can built by any marines. You can construct a sandbag barricade with any amount (maximum of 5) from a stack. The more you have in a stack, the stronger it becomes but if you deploy a sandbag with less than the maximum, the weaker the sandbag's maximum health will be. More sandbags can be added to a weaker one until it reaches full strength. Relatively cheap (20 points for 50 empty sandbags). Can be repaired by using filled sandbags. | |||
'''Deconstruct:''' [[File:Entrenching_Tool_Unfolded.png|32px]] Use Entrenching Tool. Give back 5 sandbags (fewer if barricade is damaged). | |||
|- | |||
|[[File:Plasteel_barricade.png|64px]]<br>'''Plasteel Barricade''' | |||
|8 Plasteel[[File:Plasteel.png]] | |||
|Functions as a gate. The most durable fortification with longest build time. The most expensive barricade (40 points for 30 sheets). Can be repaired with a blowtorch if not overtly damaged. | |||
'''To unsecure:''' [[File:Screwdriver.png|32px]] -> [[File:Wrench.png|32px]] (To secure: [[File:Wrench.png|32px]] -> [[File:Screwdriver.png|32px]]) '''Deconstruct:''' [[File:Screwdriver.png|32px]] -> [[File:Wrench.png|32px]] -> [[File:Crowbar.png|32px]] | |||
|- | |||
|[[File:Foldable cade FIXED (SORRY).png|64x64px]]<br>'''Folding Metal Barricade''' | |||
|6 Metal[[File:Metal.png]] | |||
|A folding barricade made out of metal, making it slightly weaker than a normal metal barricade. Use a blowtorch to repair. Can be flipped down to create a path. | |||
|- | |||
|[[File:Barbed_Wire.png|64px]]<br>'''Barbed Wire''' | |||
|1 Metal[[File:Metal.png]] | |||
|Can be added to barricades prevent them from being pounced and climbed over. Damages mobs that melee attack without a weapon. '''Deconstruct:''' [[File:Wirecutters.png|32px]] Use wirecutter to remove Barbed Wire from barricade. | |||
|- | |||
|[[File:Wall.png]]<br>'''Wall''' | |||
|12 Metal [[File:Metal.png]] | |||
|Used to fully block off an area. See [[Guide to construction]] for how to construct and deconstruct. | |||
|} | |||
[[File:Foldable cade.png|thumb]] | |||
<br> | |||
== Your Skillset == | |||
{{MarineSkills | |||
|firearms=1 | |||
|endurance=1 | |||
|engineering=2 | |||
|construction=2 | |||
|vehicles=1 | |||
|jtac=1 | |||
|fireman=1 | |||
}} | |||
To find out about how the skill system works head over to the [http://cm-ss13.com/wiki/The_Skill_System skills system page]. | |||
* | == Guides == | ||
* [https://cm-ss13.com/forums/showthread.php?8424-Guide-to-Engineer-2021-edition-(By-Karl) Guide To Engineer] by Stan_albatross on 08 Aug 2021, updated on 14 Nov 2021 | |||
* [https://cm-ss13.com/forums/showthread.php?3757 On FOB Duty] by RNGPriest on 07 Nov 2019 | |||
* [http://cm-ss13.com/viewtopic.php?f=135&t=16412 A couple tactically sensible 'cade layout tips] by FreeStylaLT on 25 Feb 2018 | |||
* [http://cm-ss13.com/viewtopic.php?f=94&t=15018 The Field Engineer Commandments] by Surrealistik on 01 Oct 2017, updated 07 Aug 2018 | |||
* [http://cm-ss13.com/viewtopic.php?f=94&t=14084 <nowiki>[WIP]</nowiki> Useful FOB engineering 101] by Challenger on 22 Jul 2017 | |||
Latest revision as of 20:13, 24 October 2024
 |
Difficulty: Medium Supervisors: Squad Leader Rank: Private First Class / Lance Corporal / Corporal Duties: Set up defenses, babysit big guns, open doors and spam barbed wire. Guides: Construction, Guide to Engineering Unlock Requirements: One hour as any squad role. Detailed Description: You have the equipment and skill to build fortifications, reroute power lines, and bunker down. Your squaddies will look to you when it comes to construction in the field of battle. |__________| |
But the good news — we got four of these robot sentries with display and scanners intact. They really kick ass, I think they'll come in handy.
―Corporal Hicks, Aliens
As a Combat Technician, your main goals will be fixing power, getting through doors, and setting up fortifications for a FOB (Forward Operating Base) that'll be used for defense and to secure a supply route. Without you, your platoon will have no power or a FOB which is critical for mission success.
Combat Technician
You'll have two different playstyles you can experiment with. One, as a FOB building and Utility Technician, who sets up defences and makes sure power is running. The second way to play technician is to be a Combat Technician, breaching walls, hacking open doors, welding vents and repairing broken APC and lights as marines advance. Both are as good as the other, but too much of one is bad. Make sure there is a FOB that will be able to be defended, and if there is one, make sure marines will be able to make it from building to building effectively.
 Automated Closet
| Armor: | Description: | ||
|---|---|---|---|

M3-L Pattern Armor |
A lighter, cut down version of the standard M3 pattern armor. It sacrifices protection for more speed. Protects more against acid.
| ||

M3 Pattern Marine Armor |
Standard Issue Armor used by USCM. Provides modest protection from bullet and melee attacks. It also has a shoulder-mounted directional flashlight for night time combat and a HUD to see their Marine roles. An all rounder in terms of protection with an additional 3 slots in the armor.
| ||

M3 EOD Pattern Heavy Armor |
A heavier version of the standard M3 pattern armor, the armor is primarily designed to withstand ballistic, explosive, and internal damage, with the drawback of increased bulk and thus reduced movement speed, alongside little additional protection from standard blunt force impacts and none from biological threats.
|
| Backpack: | Description: |
|---|---|

H5 Pattern M2132 Machete Scabbard |
A large leather scabbard used to carry an M2132 machete. It can be strapped to the back or the armor. |

Technician Backpack |
A standard-issue backpack worn by USCM technicians.
Has to be held in one hand to access items inside. Holds 7 normal size items. |

Technician Satchel |
A heavy duty chestrig used by some USCM technicians.
It is standard gear for most of the USCM. Holds 5 normal size items. |

L44 M37A2 Scabbard |
A large leather holster allowing the storage of an M37A2 Shotgun. It contains harnesses that allow it to be secured to the back for easy storage. |

Technician Welderpack |
A specialized backpack worn by USCM technicians. It carries a fuel tank for quick welder refuelling and use.
Has to be held in one hand to access items inside. Holds 7 normal size items and 260 units of welder fuel. |

Technician Welder-Satchel |
A specialized satchel worn by USCM technicians and engineers. It carries two small fuel tanks for quick welder refueling and use.
Holds 4 normal sized items. Contains 100 units of fuel. |
| Belt: | Description: |
|---|---|
 G8-A General Utility Pouch |
A small, lightweight pouch that can be clipped onto Armat Systems M3 Pattern armor to provide additional storage. The newer G8-A model, while uncomfortable, can also be clipped around the waist. Can hold more varied items than the standard belts. It is one of the rarer pouches inside the ColMarTech automated armaments vendor in Requisitions. They can hold 3 items. |
 M276 Pattern Ammo Load Rig |
The M276 is the standard load-bearing equipment of the USCM. It consists of a modular belt with various clips. This version is the standard variant designed for bulk ammunition-carrying operations. Holds 5 various magazines. |
 M276 Pattern General Pistol Holster Rig |
The M276 is the standard load-bearing equipment of the USCM. It consists of a modular belt with various clips. This version has a holster assembly that allows one to carry the M4A3, 88M4, or the M1911 comfortably secure. It also contains side pouches that can store 9mm or .45 magazines.
It is one of the uncommon rigs inside USCM Vendors. It is also the standard rig for Cargo Technicians, Intelligence Officers, Pilot Officers, Staff Officers, and the Executive Officer. |
 M276 Pattern M39 Holster Rig |
The M276 is the standard load-bearing equipment of the USCM. It consists of a modular belt with various clips. This version is designed for the M39 SMG and features a larger frame to support the gun. Due to its unorthodox design, it isn't a very common sight and is only specially issued. |
 M276 Pattern M44 Holster Rig |
The M276 is the standard load-bearing equipment of the USCM. It consists of a modular belt with various clips. This version is for the M44 magnum revolver, along with three pouches for speedloaders. It faintly smells of hay. |
 M276 Pattern M82F Holster Rig |
The M276 is the standard load-bearing equipment of the USCM. It consists of a modular belt with various clips. This version is for the M82F flare gun. |
 Shotgun Shell Load Rig |
An ammunition belt designed to hold shotgun shells or individual bullets. Holds 10 handfuls of shells. |
 M276 pattern mortar operator belt |
A belt specifically designed to carry ammunition for the M402 mortar along with a sidearm.
Holds 4 mortar shells of any kind and reserves a slot for a pistol. |
 M276 Pattern M40 Grenade Rig |
The M276 is the standard load-bearing equipment of the USCM. It consists of a modular belt with various clips. This version is designed to carry bulk quantities of M40 series of Grenades.
It is the standard rig for Frontline Grenadier Kits. |
 M276 Pattern Toolbelt Rig |
The M276 is the standard load-bearing equipment of the USCM. It consists of a modular belt with various clips. This version lacks any combat functionality and is commonly used by technicians to transport important tools. This contains all the tools for the Combat Technicians and Maintenance Technicians to do their work. |
| Pouch: | Description: | ||||
|---|---|---|---|---|---|
 Construction Pouch |
Designed to holster construction materials. | ||||
 First-Aid Pouch(Refillable Injectors) |
Standard issue field aid for all soldiers. Comes pre-loaded with basic medical supplies. Expended autoinjectors can be restocked at a medical vendor on the Almayer and Dropships (sometimes NanoMed machines are functional planetside.) It is one of the pouch options of the ColMarTech Automated Closet.
It contains the following:
| ||||
 First-Aid Pouch(Splints, Gauze, Ointment) |
Standard issue field aid for all soldiers. Comes pre-loaded with basic medical supplies. Expended autoinjectors can be restocked at a NanoMed
| ||||
 First-Aid Pouch(Pill Packets) |
Standard issue field aid for all soldiers. Comes pre-loaded with basic medical supplies. Comes with two packets of 4 pills. One containing Tricordazine and the other with Tramadol. It is one of the pouch options of the ColMarTech Automated Closet.
It contains the following:
| ||||
 Electronics Pouch (Full) |
Designed to hold all your electronic needs as a technician. Issued to Combat technicians, or found inside the ColMarTech automated armaments vendor in Requisitions.
Contains 6 slots. | ||||
 Explosive Pouch |
Container designed to hold up to three grenades or other explosives | ||||
 Flare Pouch |
Can hold 8 flares (including activated flare). Refillable with a M94 Flare Pack. | ||||
 Large Pistol Magazine Pouch |
Pouch able to hold pistol magazines. | ||||
 Magazine Pouch |
Uncommon issue pouch that can hold three magazines and/or handfuls of shotgun shells. Issued to Medics and Engineers. It is also one of the pouch options of the ColMarTech Automated Closet and is found in the ColMarTech automated armaments vendor in Requisitions. Contains 3 slots. | ||||
 Shotgun Shell Pouch |
A shotgun shell pouch. It can contain handfuls of shells, or bullets if you choose to for some reason. Holds 5 slots. | ||||
 Medium General Pouch |
A general purpose pouch used to carry more small items and also magazines. Contains 2 slots. | ||||
 Pistol Pouch |
A holster to carry pistols, typically a standard issue M4A3 handgun, or 88M4 Pistol. | ||||
 Tools Pouch (Full) |
Designed to hold all your different types of tools. |
| Accessories: | Description: |
|---|---|

Shoulder Holster |
A traditional shoulder holster that can be attached to all uniforms. Can holster any handgun and completes the look of any hard-boiled detective. |
 Webbing |
Sturdy mess of synthcotton belts and buckles, ready to share your burden. Holds 3 small sized items or magazines. |
 Brown Webbing Vest |
Worn brownish synthcotton vest with lots of small pockets to unburden your hands. Holds 5 small sized items. |
 Black Webbing Vest |
Robust black synthcotton vest with lots of pockets to hold whatever you need, but cannot hold in hands. Holds 5 small sized items. |
 Drop Pouch |
A convenient pouch to carry loose items around. Able to hold 2 large items. |
| Mask: | Description: |
|---|---|
 Gas Mask |
Gas masks are available in ColMarTech Automated Closets for all marines. Does not protect the head in anyway. |
 Heat Absorbent Coif |
A close-fitting cap that covers the top, back, and sides of the head. Can also be adjusted to cover the lower part of the face so it keeps the user warm in harsh conditions.
Part of the marine uniform on snow planets. |
 Automated Equipment Rack
Each Equipment Rack starts with 45 points for you to spend on additional items for your deployment. These are all listed below.
|
Equipment and Gear
Metal and Sandbags
At round start, there are 30 plasteel sheets and 50 metal sheets in your essential technician kit. Plasteel is an expensive but very resistant material at your disposal. More can be purchased at your equipment closet or as supplies start trickling in through the ASRS, you may be able to acquire more. Don't hoard loads of building supplies otherwise you might find fellow Combat Technicians unable to perform their jobs, and if you are captured or die with a lot of supplies, they will likely be gone from the round.
Linking Plasteel Barricades 
You can link plasteel barricades together with a crowbar. This is can used for making a gate for more marines to fit through. It requires at least 2 plasteel barricades facing the same direction and same state (Open/Closed) in order for it to work. Sometimes barricades may be moved or repositioned, and the person doing it may wrench them in place but forget to close the protective cover with their screwdriver. If you ever use your crowbar on a plasteel barricade and do not get the prompt that the barricade is ready for linking, check with your screwdriver (or Shift+Click to examine).
In the field
Power and T-Comms
Upon the first deployment, you are likely to be tasked to either fixing the Power, fixing the Telecommunications Tower or FOB duty.
Overcoming obstacles
 Use a crowbar to pry open powered down doors.
- Hack doors to open previously locked passageways. If a door is not powered, but is bolted (Solid yellow lights on the door), you will have to restore power to the door before it will open.
 C4 doors/walls if you don't have time to hack/deconstruct.
- Disassembling windows (
 ->
-> ->
-> ) and window frames (
 )
)
Lighting up the place
- Fix the APC's and replace broken lights with the light replacer along the way as you advance.+
- Fixing lights is (in my opinion) one of the most powerful tools the combat technician has at his disposal. Without lights, anybody passing between the front line and the landing zone is walking through dark passages, and most of the time the people doing this are medics with a wounded ally.
Floodlight Repair
While you may have fixed the power for the colony (and turned on the Colony Floodlight Switch ![]() ), the aliens will have most likely broken floodlights around the place which you'll need to fix. To fix a floodlight you'll want to use the following steps:
), the aliens will have most likely broken floodlights around the place which you'll need to fix. To fix a floodlight you'll want to use the following steps:
- Emergency Floodlights can be unwrenched and be moved around.
 Deploying your defensive structure
When you hit the field, you'll be needing to place your defensive structure down in order to have it either man the flanks or aid the marines in combat.
Simply take the defensive structure in your hand and click on it while it's in your active hand. Make sure the tile in front of you is empty and clear. Once deployed, make sure you click on the defensive structure again to turn it on, and lock it via the right-click menu or a verb in the "Object" tab if you want to prevent non-technicians turning it off. You can easily pick it up with a Security Access Tuner ![]() as long as it is in pristine condition. If it has been damaged, simply use a welder to repair it. You can also unanchor it to move it around without needing to pick it back up again with a Wrench
as long as it is in pristine condition. If it has been damaged, simply use a welder to repair it. You can also unanchor it to move it around without needing to pick it back up again with a Wrench ![]() .
.
 Using the Sentry Laptop
Once you've deployed your sentry of choice, you may also set up a sentry laptop - available from Requisitions or your preparation room, alongside unique encryption keys. To connect it to your sentry, use your Security Access Tuner ![]() on the laptop, then click on the sentry gun with the same Security Access Tuner to connect it. Multiple sentries can be connected to the same laptop.
on the laptop, then click on the sentry gun with the same Security Access Tuner to connect it. Multiple sentries can be connected to the same laptop.
When deployed and interacted with after linking, you may toggle the IFF settings of the sentry to control who it will NOT fire upon, ranging from avoiding USCMC + WY personnel, USCMC personnel, or all humanoids, and you may use it as a camera with the same view range as a human. Additionally, when engaging a target, the sentry will send a report over a radio, which you can hear using the unique encryption keys that come with it.
Make use of vendors
 Use a wrench to move useful vendors like medical vendor to a FOB then hack
  them to allow medics and marines to vendor the items.
Securing flanks/supply route
It's crucial to secure the supply route from FOB to the front. Otherwise, reinforcements, Medics, and wounded marines will be easy targets to be picked off and the front will risk being cut off and encircled. Since material supply might be limited under certain circumstance so you can't barricade all the way; instead, you need to focus on the choke points like doorways, to secure as many sections you can with the little materials you have. You can save some materials by simply welding doors shut along the way. And once marines have learned that can Xenos use vents, you can weld the vents shut to deny their usage. You can also use vendors/cabinets as blockades to save more materials but they can potentially block bullets as well, resulting in a potential cover for aliens.
Your flanks are a vital part of your frontlines, FOBs and supply lines.
The enemy will always try to find a way to breach your vulnerable locations and pick off your fellow team mates.
If you think they can breach into your vulnerable flanks or supply lines, secure it.
In the Front
This is where the combat technician shines and determines whether or not the marines will gain a foothold or be routed after their initial push. There are three main types of barricade lines you can build in the front, but there are some principles that apply to all.
- Build the barricades inward for more firing space and bigger kill zone
- Force the enemy into the choke point/corridor so fewer of them can attack at once (and block each other when they retreat)
- Distant the barricades to enemies' nearest corners/covers, thus exposing them with more firepower before they can reach the barricades and when they retreat
- Build the barricades with marines standing one tile behind in mind
| Barricade Layout: | Description: |
|---|---|
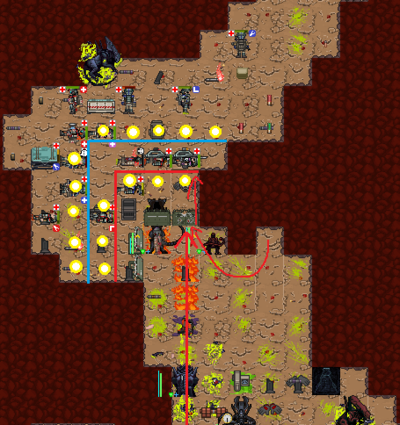
|
The original barricade line makes a small chokepoint which can't effectively utilise the full power of the marines in the area; to fix this the barricade defence could've been constructed on the red line to allow for additional marines to fire or even further back on the blue line to use the xenos cover against them and create a two tile chokepoint that will expose them to more gunfire, while also keeping the defending marines at a safe distance.
✔ Forces the enemy to walk past a choke, Exposing them to more fire on their attempted exit ✔ Two tiles from the enemies nearest position with cover. (Meaning they have to expose themselves to push) ✔ Marines standing one tile behind the barricaded position so they can't be slashed but can still hold the barricade itself. |
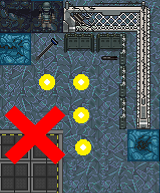
|
This is an example of what not to do when constructing a barricade position.
By having the barricades extend outwards it places the defending marines into the chokepoint giving them a disadvantage during combat. |
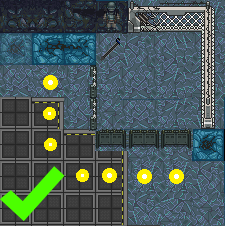
|
This is an example of what you should do when constructing a barricade position.
By having the barricades extend inwards it utilises the chokepoint making it harder for the xenos to push through. |
Frontline FOB/Outpost
A secured space slightly behind the front for marines to resupply, triage and casevac. Without a frontline FOB, Medics and the wounded will be harassed constantly and supply melted. And in the event of counterattack, marines will likely to be routed without a place to fall back to. Frontline FOB doesn't need to be big (a 6x6 space will do, bigger if high pop), otherwise, parts of the FOB likely be left unguarded and be melted.
Secured barricade line
Build at a choke point, apply the principles, and you get a decent defensive position. To reinforce a barricade line, build barricades one tile in front of the barricade line not behind.
Unsecured barricades
Mostly seen when you want to build a secured barricade line but ran out of plasteel, so you have to leave some gaps. While they are not fully secured, they are still useful to hinder counter attacks and block off Boiler gas and Crusher charge. To avoid hindering marines' push, you can build them in the middle of the corridor (e.g. middle 2 tiles out of 4 tiles), then the sides tiles in further one tile.
Barricade as marines push
Sandbags are particularly well suited for this job, as they can be built by marines and the build time is short. Metal barricades (with barbed wire) work too, though instead of standing in the front and build there, it's much safer to build it just behind the front then move them to the front (See this table for how to move barricades).
Robotic limbs repairing
Target the damaged limb while on assist intent and use:
FOB Duty
As a Combat Technician on FOB duty, you'll be setting up the base that the marines will primarily use to organize, resupply, to retreat to, and to make a final last stand. To make a good FOB, you'll want to make strategic use of your landmines, the smartgun HMG or the sentry gun, and various defensive emplacements. A good FOB is a difference between losing the round and holding off long enough to make a push back and finally win the round.
The Construction page will have everything you need to construct a FOB, from wooden barricades to plasteel barricades. It also includes many other helpful things for a combat technician to build around the FOB, or elsewhere.
Principles
You don't always need a mega FOB
LZ/FOB will only see poking most of the round until siege happens because FOB is a hard target. Thus, ambush xenos are likely to focus on marine's unsecured sections of the supply route. Focusing your effort solely on FOB means using a large amount of material to counter a token force while ignoring the threat targeting the more vulnerable areas. Instead, you need to secure flanks/supply route.
Barricade where enemy can't bypass
While Xeno will try to flank you, your job is to make them a hard time to do so. If you build barricades where they don't matter (not part of the supply route/no marine will be there), you will do Xenos a favour, as there will be fewer defences where it does matter.
It is the weakest point that matters
It doesn't matter there are three layers of barricades in Nexus if the one layer metal barricades at LZ is breached, the wounded and the supply will be killed and melted. Even worse, Xeno can ignore Nexus entirely and focus on LZ then everything in Nexus will be wasted.
Use materials wisely
Plasteel is expensive, $4,000 for 30 plasteel (3 doors) vs. $2,000 for 50 metal (8 barricades with barbed wire). Yet plasteel is crucial to how many secure spaces you can create. If you are out of plasteel, you are forced to keep an opening in the cade line, thus compromising the effect of the barricade line.
A corridor with traffic? A plasteel barricade with barbed wire. No traffic but a high threat (e.g., Crusher charge/constant poking)? Sandbags barricades with barbed wire. No traffic and want to keep Runners out? Metal barricades with barbed wire. And try to save materials by
 Use blowtorch on the vents/doors. (
 Flip down before you start.)
 Use wrench to move vendors/cabinets/hydro trays as blockades (hydro trays don't block Runner).
- Then build barricades behind them if it's high threat and if you can spare the supplies.
Putting cades close together isn't usually a good idea
Boilers can gas cades in either a 5x5 or 3x3 square, putting cades closer than 3 tiles together is asking for a trapper to shoot both at once. Ideally you always need a 3 tile gap - one tile of empty space for HMGs, one tile for defenders to stand on/sentries/combat technicians to weld from so that they can't get slashed, and another line behind that for people to move around in. This will also allow for a proper evacuation of the cadeline in case of boiler attack.
FOB Construction Quick Tips
Barricade Placement
| Barricade Placement | Description |
|---|---|
|
This is an example of what not to do when constructing a defensive position. In the picture on the left, you'll see that the aliens can hit the barricade without being shot due to its forward position and as such the alien will be able to break through and kill that marine with ease. | |
|
This is an example of what you should do when constructing a defensive position. To rectify the above barricade placement errors you'll want to move the barricades back one tile like the photo on the left. By moving the barricades back this will allow you to shoot aliens who are attacking them. |
Barbed Wire
![]() Barbed wire is a string of sharp metal that will harm and prevent xenos from pouncing over barricades once attached. It also gives a small health boost to the barricade itself.
Barbed wire is a string of sharp metal that will harm and prevent xenos from pouncing over barricades once attached. It also gives a small health boost to the barricade itself.
| Barbed Wire Tactics | Description |
|---|---|
| In the picture you'll see that the combat technician was killed due to the alien being able to pounce over the barricade. | |
|
Due to the combat technician placing barbed wire onto the barricades the alien was unable to jump over. |
FOB Space
| How To: Fob Space | Description |
|---|---|
|
This is an example of what not to do when constructing a defensive position. In the picture you'll see that the FOB has very little space for the marines to move around in which will lead to:
| |
|
This is an example of what you should do when constructing a defensive position. In the picture you'll see that the FOB has ample space to move which means:
|
Fixing Breaches in Defences
| Fixing Defensive Breaches | Description |
|---|---|
|
This is an example of what not to do when attempting to fix a breach in the defensive line with hostiles nearby. In the picture you'll see that this is a highly dangerous and ineffective way to fix the breach in a defensive line if hostiles are nearby. This will let you get slashed up by an alien running up willy nilly and will give you less time to react if multiple Aliens decide to push the defensive line. | |
|
This is an example of what to do when attempting to fix a breach in the defensive line with hostiles nearby. In the picture you'll see that it shows the optimal way of repairing a breach in your defenses if Aliens are nearby.
|
Misc. FOB tips
| Fob Tips | Description |
|---|---|
|
In the picture you'll see that it demonstrates that windows, even if reinforced, are not an acceptable replacement for a line of all-American steel barricades.
In summary, avoid using them as a defence. | |
| If you have a secured barricade line and you want to strengthen it, put the extra barricades in front of the secured barricade line not behind, and don't block the plasteel barricades. And if you can make a secured cade line, make one, checkerboard barricades do nothing to hinder the aliens' attack. | |
|
Barricades will end up damaged due to the ravages of war and incompetence, and if it isn't heavily damaged, you'll be able to use a blowtorch on it to repair it. This works on metal and plasteel barricades. Note that if a barricade is too damaged, you will be unable to fix it.
| |
|
Align the plasteel barricades to reduce traffic jam. | |
| Place the plasteel barricade at the side reduce the chance retreating marines blocking defensive fire. It also avoids two marines getting in the way of each other when both are exiting/entering. | |
|
Maze-like barricades serve no purpose as Xeno will not follow the corridor, they will slash them down with no regard yet marines will surfer traffic jam. Instead, align the exit with plasteel. |
Fortifications of the Trade
- Main article: Guide to Construction#Defences
| Fortification | Material | Function |
|---|---|---|
 Hand Rail |
2 Metal 
|
A handrail to ward off any intrusions into unwanted areas. Provides very little cover without reinforcing it. To reinforce the handrail, simply add 1 metal sheet to it and weld it.
To remove reinforced plate : |
 Snow Barricade |
3 Snow Piles
|
A very weak barricade constructed from snow piles with a snow shovel. It's better than thin air at least.
Deconstruct: |
 Wood Barricade |
10 Wooden Planks 
|
Used for a hasty defense against aliens. Mostly seen prespawned. Can be repaired with additional wooden planks at any damaged condition.
Deconstruct: Bash the wooden barricade to break it. Give back 3 wooden planks |
 Metal Barricade |
4 Metal
|
The most common among the three main types of barricades (20 points for 50 sheets). Can be repaired with a blowtorch if not overtly damaged.
To unsecure: To upgrade a barricade, click on one with 2 metal sheets, a window will prompt open in which you select the upgrade. |
 Metal Barricade Reinforced |
2 Metal
|
An upgraded version of the metal barricade. This one can take much more damage from bullets and slashes. Can be repaired with a blowtorch if not overtly damaged. |
 Metal Barricade Bio-hazard Resistant |
2 Metal
|
An upgraded version of the metal barricade. This one can take much more damage from acids and fire. Can be repaired with a blowtorch if not overtly damaged. |
 Metal Barricade Explosion Resistant |
2 Metal
|
An upgraded version of the metal barricade. This one can take much more damage from explosive sources with no downside. Can be repaired with a blowtorch if not overtly damaged. |
 Sandbags |
5 Sandbags
|
Dig up dirt with an entrenching tool to fill up the empty sandbags. A fast fortification to field and can built by any marines. You can construct a sandbag barricade with any amount (maximum of 5) from a stack. The more you have in a stack, the stronger it becomes but if you deploy a sandbag with less than the maximum, the weaker the sandbag's maximum health will be. More sandbags can be added to a weaker one until it reaches full strength. Relatively cheap (20 points for 50 empty sandbags). Can be repaired by using filled sandbags.
Deconstruct: |
 Plasteel Barricade |
8 Plasteel
|
Functions as a gate. The most durable fortification with longest build time. The most expensive barricade (40 points for 30 sheets). Can be repaired with a blowtorch if not overtly damaged. |
 Folding Metal Barricade |
6 Metal
|
A folding barricade made out of metal, making it slightly weaker than a normal metal barricade. Use a blowtorch to repair. Can be flipped down to create a path. |
 Barbed Wire |
1 Metal
|
Can be added to barricades prevent them from being pounced and climbed over. Damages mobs that melee attack without a weapon. Deconstruct: |
 Wall |
12 Metal 
|
Used to fully block off an area. See Guide to construction for how to construct and deconstruct. |
Your Skillset
|
| ||||||||||||||||||||||||||||||||||||||||||||||||||||||
|
| ||||||||||||||||||||||||||||||||||||||||||||||||||||||
|
|
To find out about how the skill system works head over to the skills system page.
Guides
- Guide To Engineer by Stan_albatross on 08 Aug 2021, updated on 14 Nov 2021
- On FOB Duty by RNGPriest on 07 Nov 2019
- A couple tactically sensible 'cade layout tips by FreeStylaLT on 25 Feb 2018
- The Field Engineer Commandments by Surrealistik on 01 Oct 2017, updated 07 Aug 2018
- [WIP] Useful FOB engineering 101 by Challenger on 22 Jul 2017


