Pilot Officer: Difference between revisions
More actions
XSlayer300 (talk | contribs) No edit summary |
Outdated |
||
| (211 intermediate revisions by 33 users not shown) | |||
| Line 7: | Line 7: | ||
|jobtitle = Pilot Officer | |jobtitle = Pilot Officer | ||
|difficulty = Medium | |difficulty = Medium | ||
|superior = | |rank = Second Lieutenant | ||
|duties = Pilot and | |superior = [[Auxiliary Support Officer]] | ||
|guides = | |unlock = Two hours as [[Dropship Crew Chief]] | ||
|duties = Pilot and maintain the dropships. | |||
|guides = Located at the bottom of the page. | |||
|description = Your job is to fly, protect, and maintain the ship's dropship. | |||
While you are an officer, your authority is limited to the dropship, where you have authority over the enlisted personnel. | |||
If you are not piloting, there is an autopilot fallback for command, but don't leave the dropship without reason. | |||
As the pilot officer you answer to the auxiliary support officer and the acting commander. Special circumstances may change this. | |||
}} | }} | ||
''"We're in the pipe, five by five."'' ― Cpl. Ferro, Aliens | ''"We're in the pipe, five by five."'' ― Cpl. Ferro, Aliens | ||
The '''Pilot Officer''', is split into two roles; Dropship Pilot and Gunship Pilot, as the name indicates, pilots the ships of [[USS Almayer]]. They transport marines between the Almayer and the Landing Zones (LZ), protect and maintain their AUD-25 dropships, and provide Close Air Support (CAS) for those marines who want a fireworks show earlier than the 4th of July. Either can take on the others role should they be unavailable to do so. | |||
=Overview= | |||
Congratulations lieutenant! You finished your pilot training, got yourself a shiny commissioned rank, and have a badass ship to fly in the frontiers of space. Report to your fellow officers and command staff over the command channel (''':v'''). Your Pilot's Bunks (east of CIC), and your Office (north of lower medbay and directly east of the pilot workshop), should have everything you need for the mission, '''If you're going somewhere cold, grab a coif!''' | |||
The two dropships assigned to the piloting team at the hangar are the '''Alamo''', and the '''Normandy''', Both can go to any Landing Zone(LZ). They can fly two different kinds of missions: '''Transport''' and '''Fly By'''. The '''Alamo''' is conventionally the Dropship, and the '''Normandy''' the Gunship. You can jump in the Powerloaders at the repair bay to install specialized equipment and ammo onto the dropships to support these missions, You can also ask the engineering department(''':n''') to give you a hand and help you. | |||
= | ==Attaching the parts and loading weapons== | ||
To attach modules onto your dropship, you will first need to know how to operate a cargo loader. To board this iconic piece of hardware, simply drag your sprite onto it. Now, only people who are trained in the powerloaders skill can board and operate a cargoloader. | |||
<br> | |||
Notice how you have 2 clamps on that thing? That means you can hold 2 items at the same time without having to drop anything. To pick up a module, weapon or ammunition, simply click on it with an empty clamp and you will collect it with your loader. | |||
<br> | |||
---- | |||
*To install the module, click on one of the available slots on the dropship that corresponds to the module type with the module in your clamp to install it. | |||
---- | |||
*To load ammunition into a module you need to click on the installed weapon with its corresponding ammunition type in the clamp to load it. To drop a module, simply click on an empty tile next to you. '''You can additionally combine ammunition by having both stacks of ammo in both clamps of the powerloader, and then just clicking on the other clamp holding one set of ammunition to combine them.''' | |||
---- | |||
*To remove a weapon from a slot, simply click on the weapon or the slot that it's in with an empty clamp. | |||
---- | |||
===Different Mounting Points=== | |||
{| style="border: 2px solid black; class=" mw-collapsible" | |||
! style="background-color:#A9A9A9; width:150px;" |'''Mounting Point:''' | |||
! style="background-color:#A9A9A9;" |'''Description:''' | |||
|- | |||
| style="width:125px; border: 2px solid black; border-bottom: 2px solid black; padding: 5px;" |<center>[[File:engine.png]]<br> '''Engine Mount Point'''</center> | |||
| style="border: 2px solid black; border-bottom: 2px solid black; padding: 5px;" |Install Engine Attachments here: Fuel Enhancers and the Cooling System. | |||
|- | |||
| style="width:125px; border: 2px solid black; border-bottom: 2px solid black; padding: 5px;" |<center>[[File:support.png]]<br> '''Support Equipment Mount Point'''</center> | |||
| style="border: 2px solid black; border-bottom: 2px solid black; padding: 5px;" |Install Support equipment here: Medevac System, the Fulton Recovery System and optionally a machine gun or a sentry. | |||
|- | |||
| style="width:125px; border: 2px solid black; border-bottom: 2px solid black; padding: 5px;" |<center>[[File:weapon1.png]]<br>'''Weapon Mount Point'''</center> | |||
| style="border: 2px solid black; border-bottom: 2px solid black; padding: 5px;" |Install Weapon Mounts here: LAU-444 Guided Missile Launcher, LAU-229 Rocket Pod, GAU-21 'Rattler' 30mm Cannon, LWU-6B Laser Cannon, A/A-32-P Sentry Defense System, and the MTU-4B Door Gunner Hardpoint System. | |||
|- | |||
| style="width:125px; border: 2px solid black; border-bottom: 2px solid black; padding: 5px;" |<center>[[File:electronic.png]]<br> '''Electronics Mount Point'''</center> | |||
| style="border: 2px solid black; border-bottom: 2px solid black; padding: 5px;" |Install Weapons on the OUTER fitting and Electronics on the INNER fitting. Same Weapons as on the other mounting point. The Electronics are: Spotlight, Targeting System and the Landing Zone Detector System. | |||
|} | |||
= | =The Essentials of Piloting= | ||
The lions' share of your piloting is orchestrated in the exclusive cockpit of your AUD-25 Cheyenne dropship. Seating two, it offers three consoles with plenty of buttons for you and your co-pilot to push while the autopilot does all the work: | |||
---- | |||
*The '''camera console''' on the left allows you to watch over the dropship's cameras as well as any extra sights provided by the installable LZ detector system, which allows you to see where will you inevitably land. | |||
---- | |||
*The '''flight console''' in the middle lets you launch the dropship, toggle the flight mode between transport and fly-by, and lock the shutters and doors. It also lets you ''optimize the flight path'' - only available to trained pilots like you - to cut down on transport and cooldown time at no cost. | |||
---- | |||
*The '''weapons console''' at the right allows you to fire externally mounted weapons and deploy sentries and paradrop marines to locations designated by a laser designator or signal flare. In the case of firing weapons, both via fire mission or direct fire, you are able to use a camera to view the area you are interested in firing upon before you commit to firing if there is no opaque roofing over head. If there is opaque roofing over head, the camera may not see anything at all. The console is also where you activate the fulton recovery module, Medevac winch, and deploy external hardpoint mounted sentry guns. | |||
---- | |||
So with that in mind, what are the differences between your two flight modes, '''transport''' and '''flyby'''? Well, in short, '''transport mode''' lets you move marines and supplies between the hangar and LZ, but sacrifices your ability to fire the bigger guns, while '''flyby''' mode lets you use the most deadly weaponry you can load, but your dropship will only return to where it launched from. | |||
{| class="wikitable" | |||
|- | |||
| | |||
!Transport | |||
!Flyby ("Close Air Support and Med Evac") | |||
|- | |||
!Where does the dropship go? | |||
|Moves you from A to B, or B to A. If you take off from the Almayer, you move to the LZ, and if you take off from the LZ, you move to the Almayer. | |||
|Moves you from A to A, or B to B. If you take off from the Almayer, you return to the Almayer. | |||
|- | |||
!Which weapons and utilities can the dropship use mid-air? | |||
|GAU-21 30mm Cannon, LWU-6B Laser Cannon, RMU-19 Fulton Recovery System, and RMU-4M Medevac System. | |||
|All weapons that are available to you at the printer. | |||
|- | |||
!How long does the dropship stay in the air? | |||
|Depends on engine upgrades and whether the flight plan was optimized, to move men and supplies as fast as possible. | |||
|Also depends on the engine upgrade which extends your flight time by a good bit. | |||
|} | |||
= | =Close Air Support= | ||
==The Weapons Control Console== | |||
The console has a dual 'Multi Function Display' system so you have have two screens side by side using them both at the same time. The buttons themselves are multi function and will change depending on the Menu selected. | |||
===Main Menu=== | |||
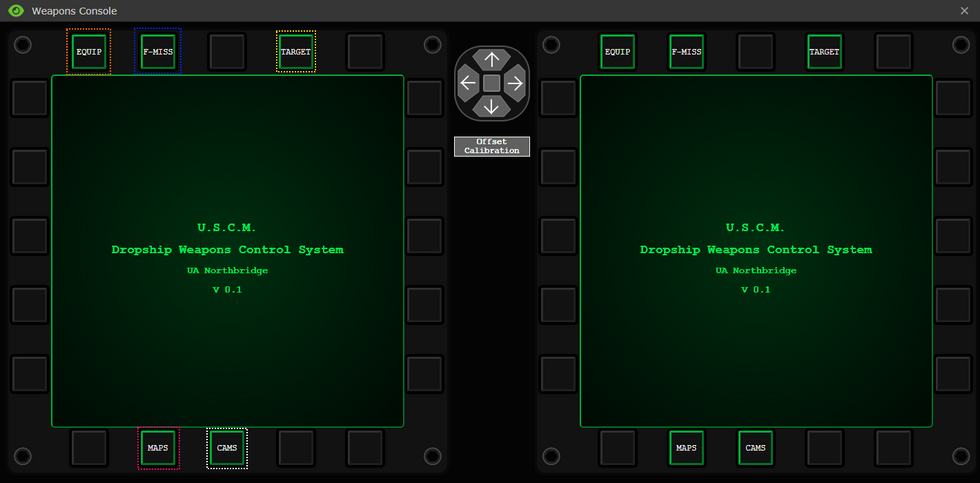
[[File:CAS-BaseFCMenu.png|980px]] | |||
This is the main menu. Any Exit buttons will return you to this Menu. | |||
* <span style="color:#FF0000">RED</span> - EQUIP - Equipment: All the modules and weapon systems loaded onto the dropship can be accessed here. Including Direct Firing weapons, activating sentries, using the Fulton, targeting Medevacs, and locking Paradrop JIMA flag/flares/lases. | |||
* <span style="color:#0026FF">BLUE</span> - F-MISS - Fire Mission: Viewing, editing, creating and deleting Fire Mission configurations. | |||
* <span style="color:#FFD800">YELLOW</span> - TARGET - Targeting: Direct firing Weapons, configuring attack runs, and selecting target JIMA flag/flares/lases. Selecting a target for paradrop must also be done using TARGET. | |||
* <span style="color:#FF006E">PINK</span> - MAPS - TacMap: Displays a live TacMap. | |||
* <span style="color:#FFFFFF">WHITE</span> - CAMS - Cameras: Allows you to view a Target JIMA flag/flare/lase/Medevac Bed. (You can check your camera to see if the target is underground) | |||
---- | |||
===Equipment Menu=== | |||
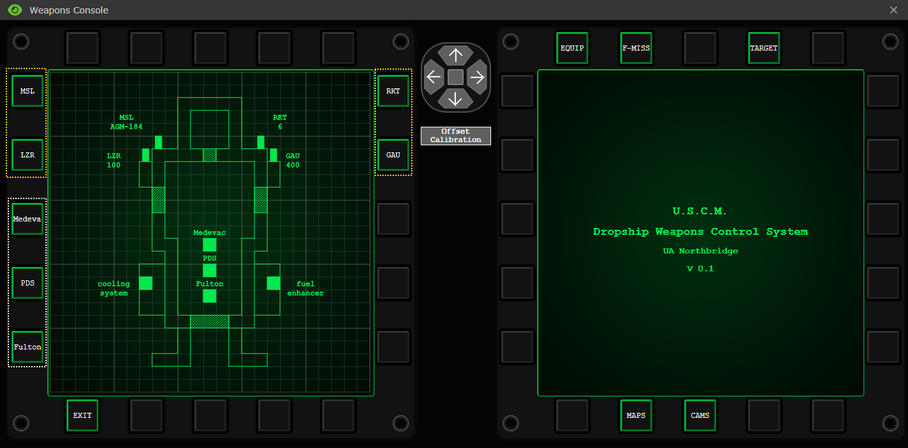
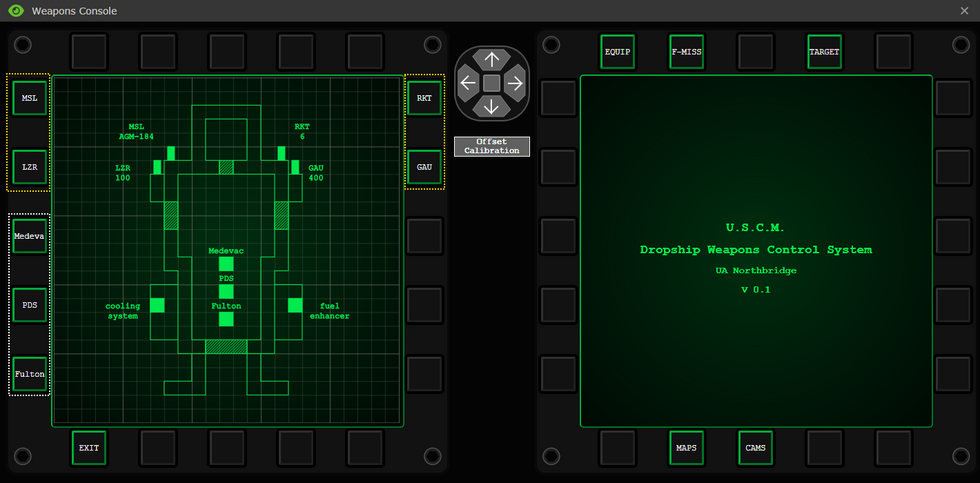
[[File:CAS-EquipMenu.png|908px]] | |||
* <span style="color:#FFD800">YELLOW</span> - External Hardpoints: Any module or weapon placed externally can be interacted/Fired from here. | |||
* <span style="color:#FFFFFF">WHITE</span> - Internal Hardpoints: Any module placed internally can all be interacted with from here. | |||
<center>'''Note:''' ''That whilst you can target the Medevac from this console you still have to go to the module to activate the winch''</center> | |||
---- | |||
===Target Menu=== | |||
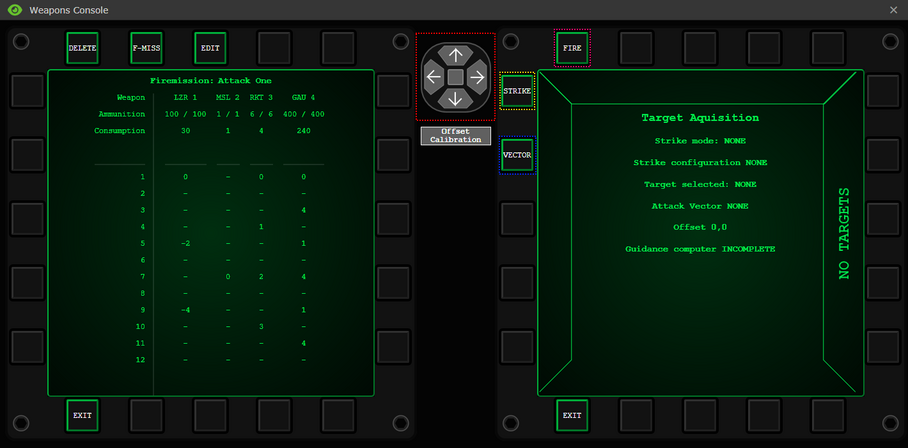
Also shown is the viewing screen for a configured Fire Mission. Focus on the right hand side screen for the Target Menu. | |||
= | [[File:CAS-TargetMenu.png|908px]] | ||
* <span style="color:#FF0000">RED</span> - Offset Calibration: Allows you to change the offset in X(East:+ and west:-) and Y(North:+ and South:-) With a maximum offset of 12. ''I.E 2,-4 Would be two tiles east of the laser, and four south of the laser'' | |||
* <span style="color:#0026FF">BLUE</span> - VECTOR - Attack Vector: Allows you to select the direction to attack '''TOWARD''' ''I.E: The end of the attack will be East of the initial starting point if East is selected.''. | |||
* <span style="color:#FFD800">YELLOW</span> - STRIKE - Strike Mode: Allows you to select the attack mode from Direct Weapon or Fire Mission | |||
* <span style="color:#FF006E">PINK</span> - FIRE - Fires your Weapon(s) in the current configuration if the Guidance computer is complete and '''READY'''. | |||
==Direct Bombardment== | |||
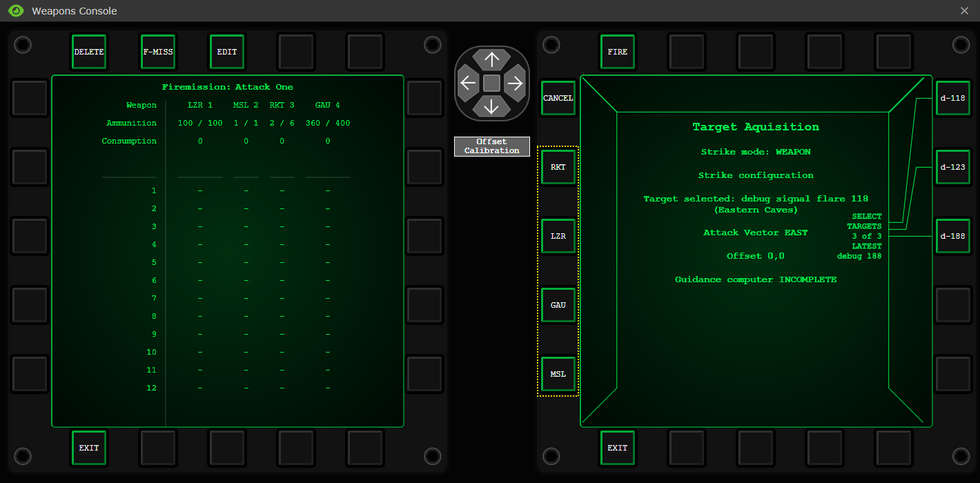
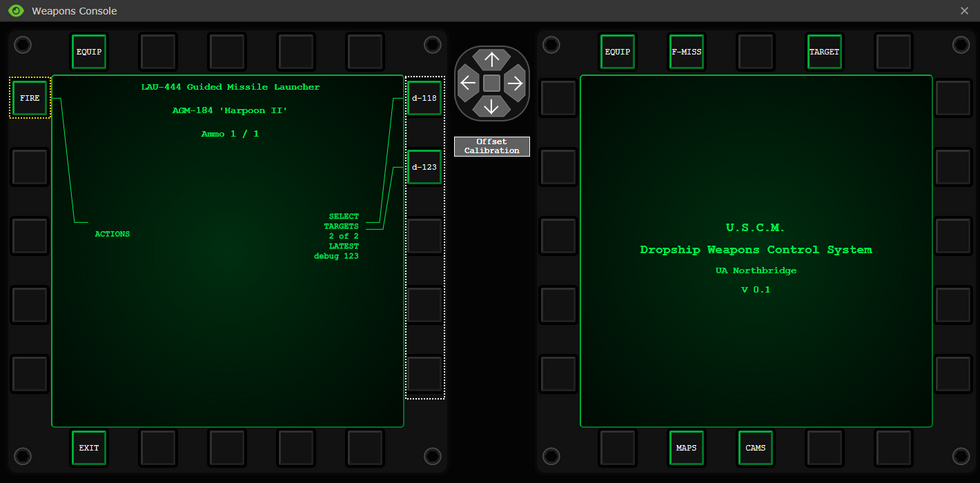
Direct bombardment is using only one weapon at a time and firing at lazes and signal flares. To be able to do so select Targets, then Strike, then Weapon, and then the weapon you wish to use. Alternatively you can use the Equipment Menu, and select the weapon from there. Finally select fire to initiate the attack. There is a delay between firing on the target and impact. Before impact, there will be a flashing green dot highlighting where the payload will land for a brief moment. Once it's gone, the payload will reach its target. | |||
Once you've fired your payload, there will be a short cool down before you're able to fire again. | |||
All weapons can fire using direct bombardment and certain munitions can only be fired using direct bombardment. | |||
<center><span style="color:#FF0000"><big>'''Important Note: Offsets do not function using Direct Bombardment!'''</big></span></center> | |||
{| class="mw-collapsible mw-collapsed" style="width:100%; text-align:center;" | |||
|+ '''Direct Bombardment Using the Strike Menu''' | |||
|[[File:CAS-TargetMenu.png|980px]] | |||
|- | |||
| Select <span style="color:#FFD800">YELLOW</span> - STRIKE | |||
|- | |||
|[[File:CAS-StrikeMenuBase.png|980px]] | |||
|- | |||
| Switch the mode to <span style="color:#FFFFFF">WHITE</span> - Weapon | |||
|- | |||
|[[File:CAS-TargetDirectWeapons.png|980px]] | |||
|- | |||
| Select the <span style="color:#FFD800">YELLOW</span> - Weapon you want to use for the Direct Bombardment. | |||
|- | |||
| [[File:CAS-TargetMenu.png|980px]] | |||
|- | |||
| Finally you can <span style="color:#FF006E">PINK</span> - FIRE the weapon. | |||
|- | |||
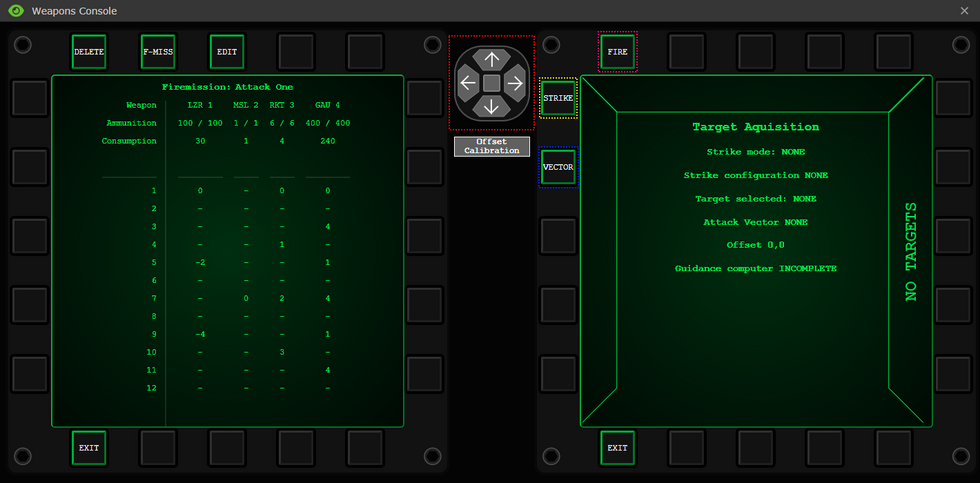
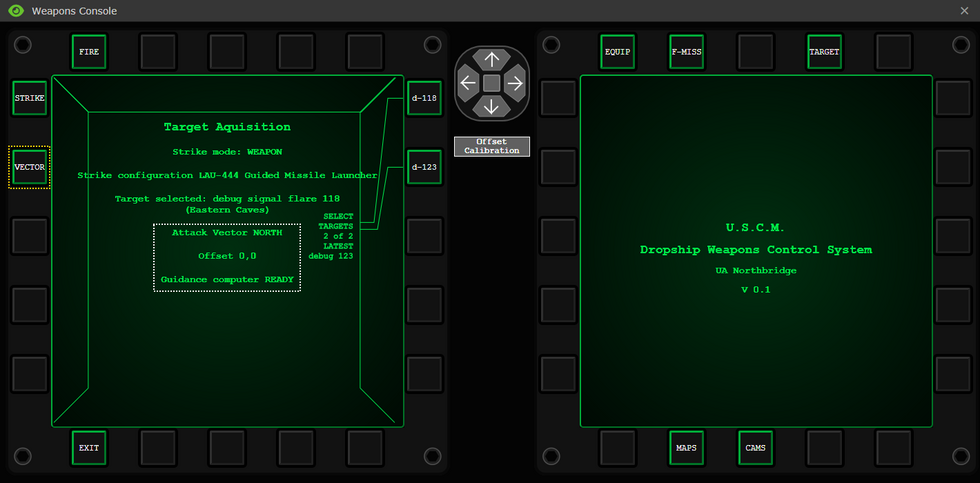
| [[File:CAS-TargetConfigured.png|980px]] | |||
|- | |||
| '''Note:''' you may need to set a <span style="color:#FFD800">YELLOW</span> - Vector before the <span style="color:#FFFFFF">WHITE</span> - Guidance Computer reads ready to fire as it must have a Vector and a Target to be Complete and '''READY'''. | |||
|- | |||
|} | |||
{| class="mw-collapsible mw-collapsed" style="width:100%; text-align:center;" | |||
|+ '''Direct Bombardment Using the Equipment Menu''' | |||
| Select a <span style="color:#FFD800">YELLOW</span> - Weapon from the Equipment Menu | |||
|- | |||
| [[File:CAS-EquipMenu.png|980px]] | |||
|- | |||
| | |||
Then select a <span style="color:#FFFFFF">WHITE</span> - Target from the right hand side of the screen. | |||
|- | |||
| [[File:CAS-EquipDirect.png|980px]] | |||
|- | |||
| | |||
And Finally hit the <span style="color:#FFD800">YELLOW</span> Fire button to initiate the attack. | |||
|} | |||
<center>'''Note:''' ''Mini-Rockets can not be fired using Direct Bombardment'' | |||
</center> | |||
==Fire Missions== | |||
Fire Missions are pre-made air strikes designed to fire in one direction that cover a configurable area. They allow the pilot to unleash a full arsenal of weapons on any targets that are near a laser/flare or JIMA flag. | |||
You have access to a special channel primarily dedicated to coordinating with the ground troops who are able to ask for airstrikes. These include Squad Leaders, Fireteam Leaders, Scout Specialist and any one who has a JTAC encryption key. Use ''':j''' to talk in that channel. | |||
<center>'''Note:''' ''Fire missions can only be used on flyby.''</center> | |||
{| class="mw-collapsible mw-collapsed" style="width:100%; text-align:center;" | |||
|+ '''Note:''' ''Larger missiles like the AGM-99 'Napalm' can not be fired in a Fire Mission.'' | |||
|- | |||
| And you will see this <span style="color:#FFD800">YELLOW</span> - Error in the Fire Mission Editor</center> | |||
|- | |||
| [[File:CAS-FMNapalmLoad.png|980px]] | |||
|} | |||
===Configuring a Fire Mission=== | |||
====Naming the Fire Mission==== | |||
[[File:CAS-FMMenu.png|980px]] | |||
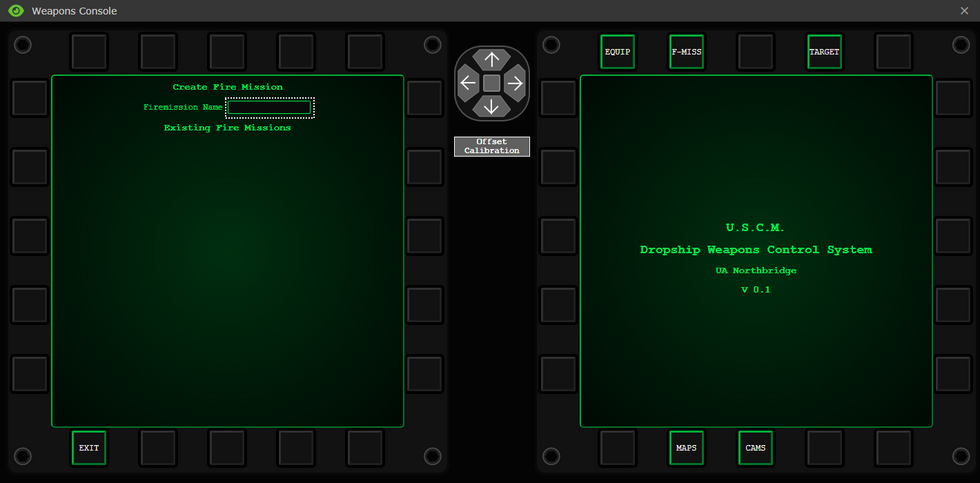
The first step in making a Fire Mission is to name it, click in the <span style="color:#FFFFFF">WHITE - TEXT BOX</span> and hit Enter to save it or use the Save button. For any button actions the name will appear as FM#Number, but will be visible in the Target menu to verify you have the selected the correct one. | |||
---- | |||
[[File:CAS-SavingFM.png|980px]] | |||
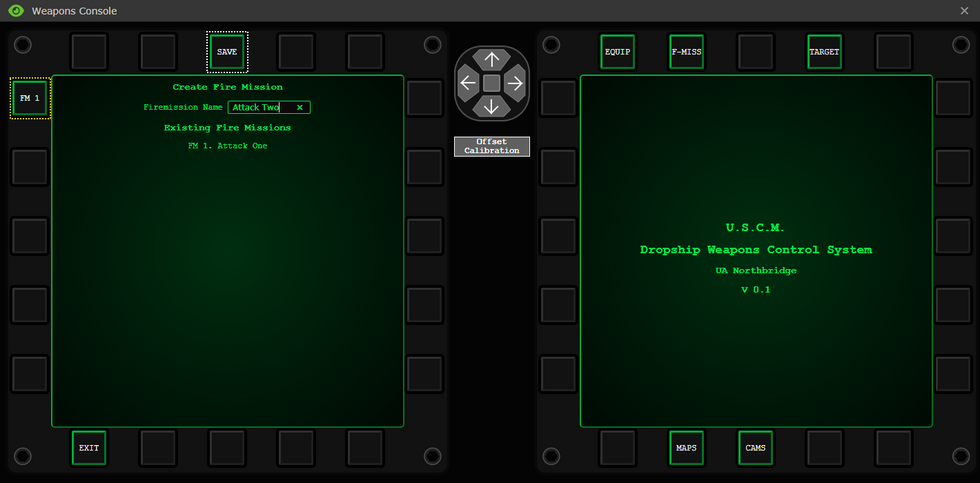
Once you have created the Fire Mission you'll see it in the list and be able to select it either on the left or right side depending on how many you have made. | |||
Shown above is the <span style="color:#FFFFFF">WHITE SAVE Button</span> if you don't want to press enter to finish naming your Firemission | |||
And one example of a <span style="color:#FFD800">YELLOW</span> - Fire Mission Button | |||
{| class="mw-collapsible mw-collapsed" style="width:100%; text-align:center;" | |||
|+ '''Note:''' ''If you somehow make lots of Fire missions there will be arrows to scroll the right hand side buttons through them.'' | |||
|- | |||
| <span style="color:#FFD800">YELLOW</span> for scrolling up. <span style="color:#FFFFFF">WHITE</span> for scrolling down. | |||
|- | |||
| [[File:CAS-ScrollingFMs.png|980px]] | |||
|} | |||
---- | |||
====Editing the Fire Mission==== | |||
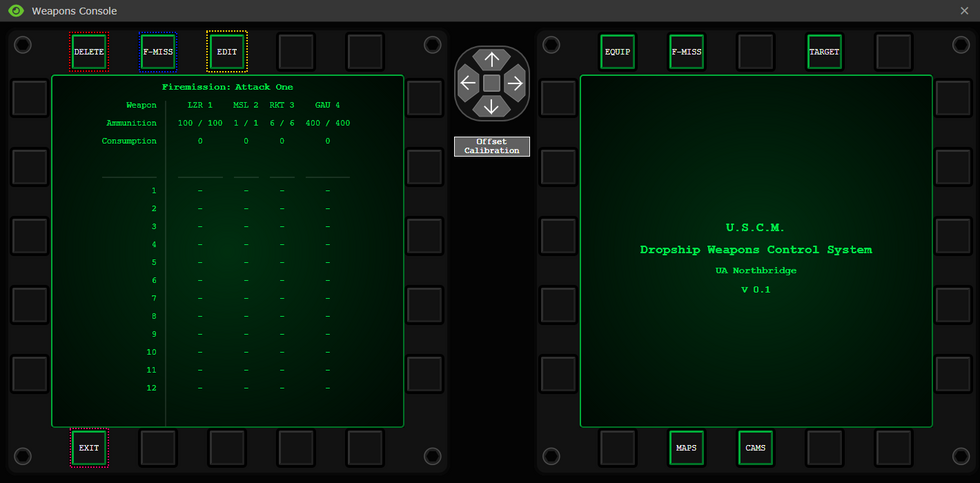
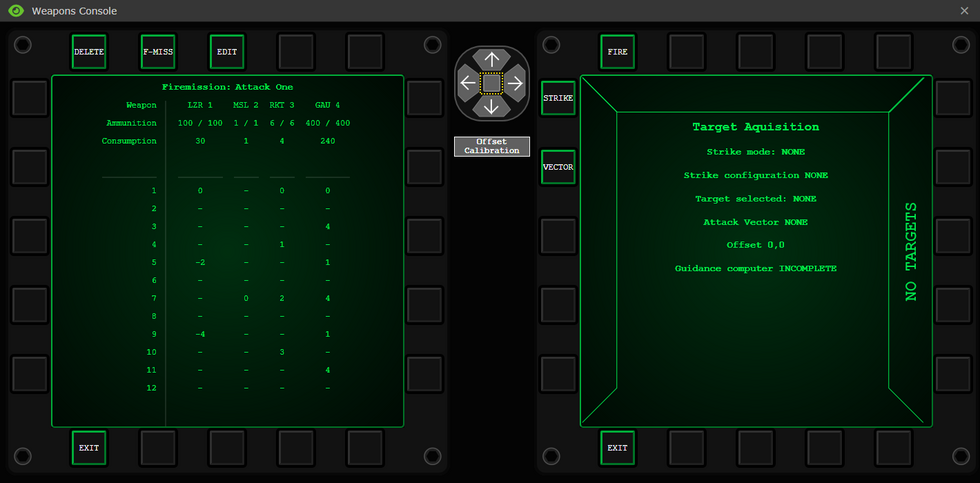
Now that you have selected a Fire Mission from the Menu, you'll be greeted with the Overview of that Fire Mission. As it's just created it will be empty. But will show you the Weapons equipped and their ammo state. | |||
[[File:CAS-ViewingFM.png|980px]] | |||
* <span style="color:#FF0000">RED</span> - DELETE: Deletes the current selected Fire Mission | |||
* <span style="color:#0026FF">BLUE</span> - F-MISS - Fire Mission: Returns to the list of Fire Missions | |||
* <span style="color:#FFD800">YELLOW</span> - EDIT: Allows you to edit when and where the weapons will fire. | |||
* <span style="color:#FF006E">PINK</span> - EXIT - An example of the Exit button that will exit to the main menu. | |||
To setup our Fire Mission you'll need to click on EDIT. And be greeted with the following screen. | |||
---- | |||
[[File:CAS-FMWeaponLayout.png|980px]] | |||
From this screen you need to select the <span style="color:#FFD800">YELLOW</span> - Weapons you are configuring for the Fire Mission. | |||
---- | |||
This will prompt a slightly different screen where you can configure the Gimbal of the weapons for each step of the Fire Mission. | |||
[[File:CAS-FMLeftsideWeapon.png|980px]] | |||
In <span style="color:#FFFFFF">WHITE</span> - Weapon Information: The currently selected Weapon. The Number of that weapon, 1 to 4, Starting from the port wing, going from left to right hardpoint wise. It's ammo state, it's gimbal limits determined by if it's on the port or starboard side. ''(Left: Port, Right: Starboard. This is relative to the front of the ship, I.E Starboard on the Almayer is North/Up)'' | |||
---- | |||
=====The Gimbal===== | |||
'''Note:''' ''The Gimbal will flip as seen below going from port to starboard or vice versa to represent the which side the weapon is on.'' | |||
[[File:CAS-FMRightSideWeapon.png|980px]] | |||
Each Fire Mission has a maximum step count of 12. On each step you can fire a weapon by selecting the Gimbal you want to fire said weapon at. Different weapons have different fire delays, which will control how many times you can fire it in one Fire Mission, ammo usage is also a consideration, even ammo usage. | |||
''Using half on one Fire Mission run and the other half on the next is a tactic you can use to keep yourself airborne longer before you need to re-arm.'' | |||
Imagine this 12 count step as a straight line from the start of the fire mission, and on each step you can step out to the side to a maximum of 6 steps away from the center. Using this you choose where your weapons will strike. There is an additional visual explanation below. | |||
{| class="mw-collapsible mw-collapsed" style="width:100%; text-align:center;" | |||
|+ '''Visual Gimbal Example''' | |||
|- | |||
| <center>An example of how Fire Missions works with a Mini-Rockets, would follow like this: | |||
|- | |||
| [[File:CAS-GimbalExample.png]] | |||
|- | |||
| | |||
|- | |||
| | |||
The numbers on the image above shows the off sets for the Mini-Rockets. The numbers shown in this image will offset the direction of the impact point. | |||
For example: The image above shows 5 - - 4 - - 1 - - 3 - -. This means if you are firing NORTH of your target, the impact point will be EAST 5 tiles away from the center. And the next one will be EAST 4 tiles away from the center etc. Zero will be directly in the center of the line. | |||
|- | |||
| | |||
This would technically be visualized like this: | |||
|- | |||
| [[File:CAS_Menu_2_2.2.png]] | |||
|- | |||
| | |||
The red <span style="color:#FF0000">'''Circles'''</span> indicate the impact points of where the fire mission will land in theory, at the target. Each red <span style="color:#FF0000">'''circle'''</span> corresponds with the example Mini-Rocket fire mission. Using a negative number would flip the red <span style="color:#FF0000">'''circles'''</span> onto the negative side. | |||
|} | |||
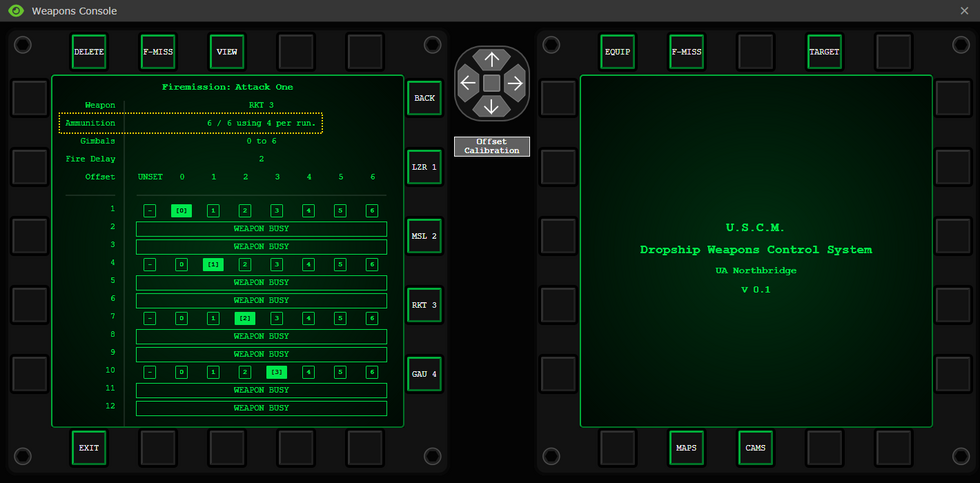
You just need to select the Numbers from the <span style="color:#FFD800">YELLOW</span> - Box, and it will update with the Fire Delay blocking out the steps you can't shoot on with '''[WEAPON BUSY]'''. You can select the '''[-]''' to reset that step to have the weapon not fire, if you need to have it fire somewhere else. | |||
{| class="mw-collapsible mw-collapsed" style="width:100%; text-align:center;" | |||
|+ '''Fire Delay Examples + Ammo usage Example''' | |||
|- | |||
|[[File:CAS-FMPingPong.png|980px]] | |||
|- | |||
|[[File:CAS-FMSequential.png|980px]] | |||
|- | |||
| Above you can also see <span style="color:#FFD800">YELLOW</span> - Ammo usage per run indicating that it would need to be reloaded after just one run because the remaining 2 Rockets aren't enough for the full fire mission. If there's not enough ammo for a full Fire Mission it will refuse to Fire. | |||
|- | |||
|} | |||
===Executing Fire Missions=== | |||
Once you've created your fire mission, move to the STRIKE menu, set it to Fire Mission mode, select your Fire Mission and wait for JTAC to call in some air support. Make sure you're launching in '''Fly-By''' mode to be able to use those fire missions. | |||
Be mindful of the ammunition you have remaining. You won't know you don't have enough ammo to complete a Fire Mission until you attempt one and you get a warning that one or more of your weapons doesn't have enough ammo to complete it. So you will need to keep an eye on you ammo, through either the Equipment screen or the Fire Mission overview screen of a selected Fire Mission. | |||
Refer back to the [[#Target Menu|Target Menu]] for coverage of the initial Menu. | |||
====Strike Mode: Fire Mission==== | |||
[[File:CAS-StrikeMenuFM.png|980px]] | |||
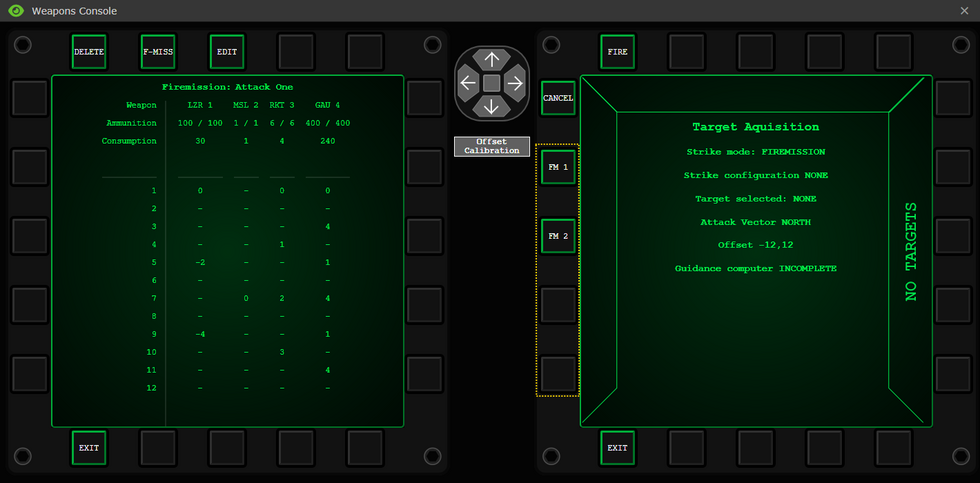
<span style="color:#FFD800">YELLOW</span> - The list of Fire Missions to choose from, arrows will be made available if there are many Fire Missions already made. | |||
For a Fire Mission to be ready to fire the Guidance Computer must read '''READY'''. So you'll need to do more than just select your Fire Mission. | |||
You'll at least need; a Vector: the direction your attack is going, and a Target: a flare,laser, or JIMA flag to originate the attack from. | |||
====Vector==== | |||
[[File:CAS-VectorSelection.png|980px]] | |||
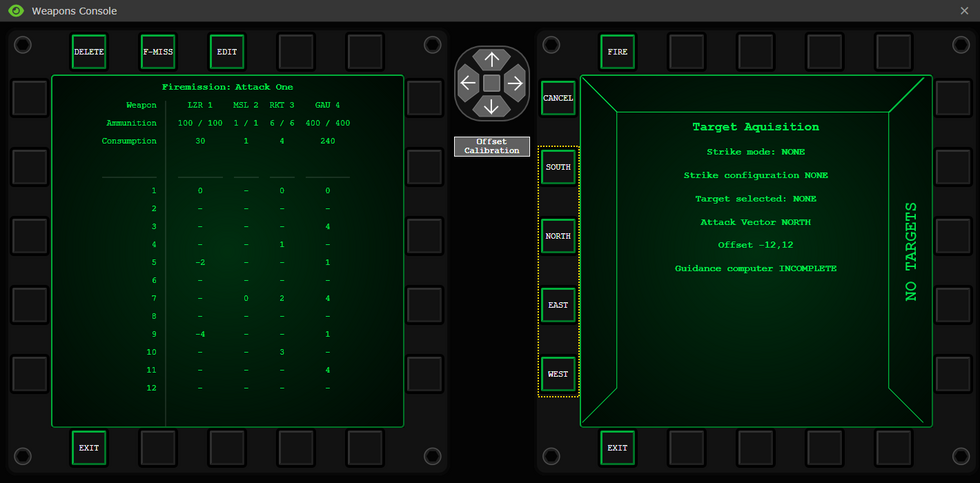
After selecting Vector you'll be greeted with the options of the four cardinal direction <span style="color:#FFD800">YELLOW</span> - North, East, South and West. This option dictates where the in which direction the Dropship will attack toward. And isn't tied to the offset. So you can be offset west but attack to the east, covering ground you offset past. This gives you a lot of flexiblity together with Offsets to strike a wide area near a CAS signal. | |||
---- | |||
====Offset==== | |||
For better effectiveness you'll also want an offset, you can view where your attack will start with the camera as long as it's not pitch-black, unless you have the Night Vision upgrade ''(Ask Research)'' or deep underground. The Offset allows you to move the Fire Mission away from the origin point a maximum of 12 tiles away in any two directions ''(Given that you can't offset both south and north because you can't duplicate yourself)'' | |||
You can use the arrows to offset in that direction. | |||
[[File:CAS-OffsetX.png|980px]] | |||
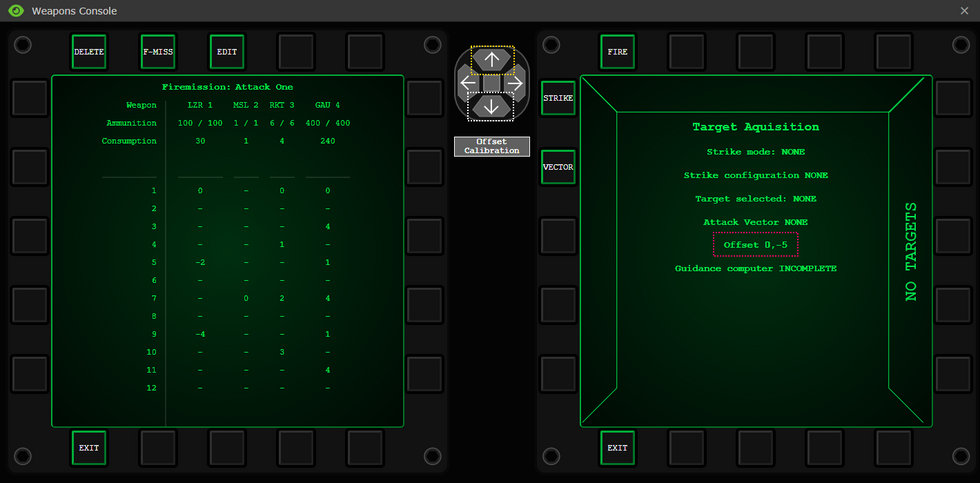
East''(Positive numbers)'' is <span style="color:#FFD800">YELLOW</span> - Right, and West''(Negative numbers)''is <span style="color:#FFFFFF">WHITE</span> - Left. In this <span style="color:#FF006E">PINK</span> - Example it is offset 5 Tiles East of the origin. | |||
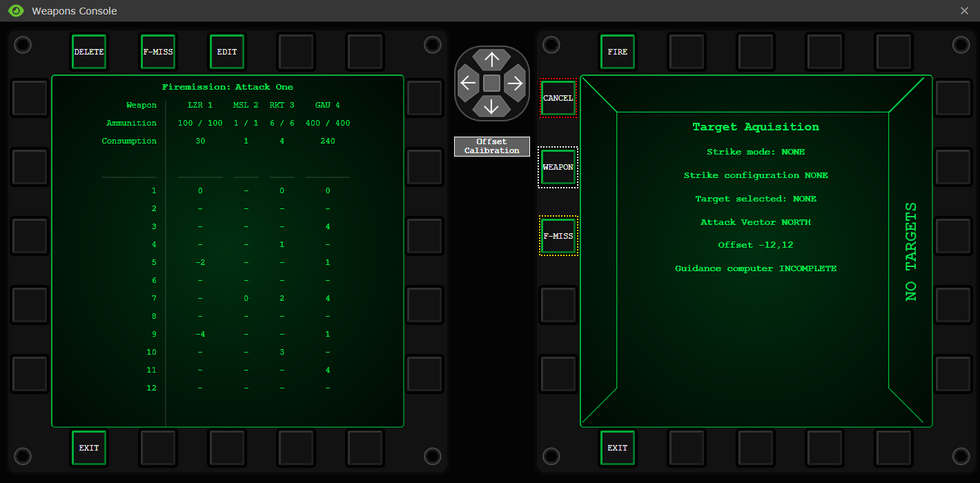
[[File:CAS-OffsetY.png|980px]] | |||
North''(Positive numbers)'' is <span style="color:#FFD800">YELLOW</span> - Up, South''(Negative numbers)'' is <span style="color:#FFFFFF">WHITE</span> - Down. In this <span style="color:#FF006E">PINK</span> - Example it is offset 5 Tiles South of the origin. | |||
[[File:CAS-OffsetReset.png|980px]] | |||
The <span style="color:#FFD800">YELLOW</span> - Center button is for resetting the offset to 0, 0. Thus having no offset. | |||
{| class="mw-collapsible mw-collapsed" style="width:100%; text-align:center;" | |||
|+ '''Offset Camera Examples''' | |||
|- | |||
|[[File:CAS-ViewingCameraNoOffset.png|980px]] | |||
|- | |||
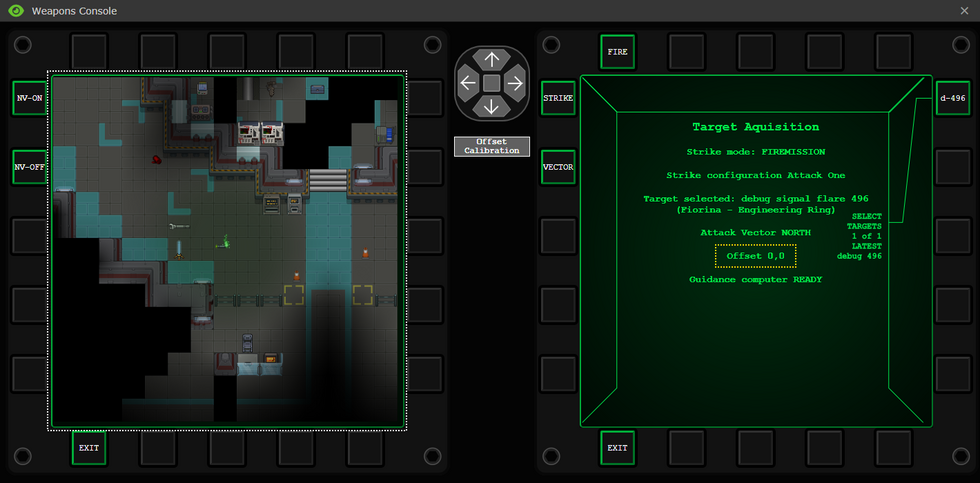
| In the example above you can see <span style="color:#FFD800">YELLOW</span> - Offset is 0, 0 No offset. And the camera is centered on the origin point the flare. This is were the Fire Mission would originate from if it was Step 0. But there is no Step 0 so it will start right next to it in the Vector direction. | |||
|- | |||
|[[File:CAS-ViewingCameraSmallOffset.png|980px]] | |||
|- | |||
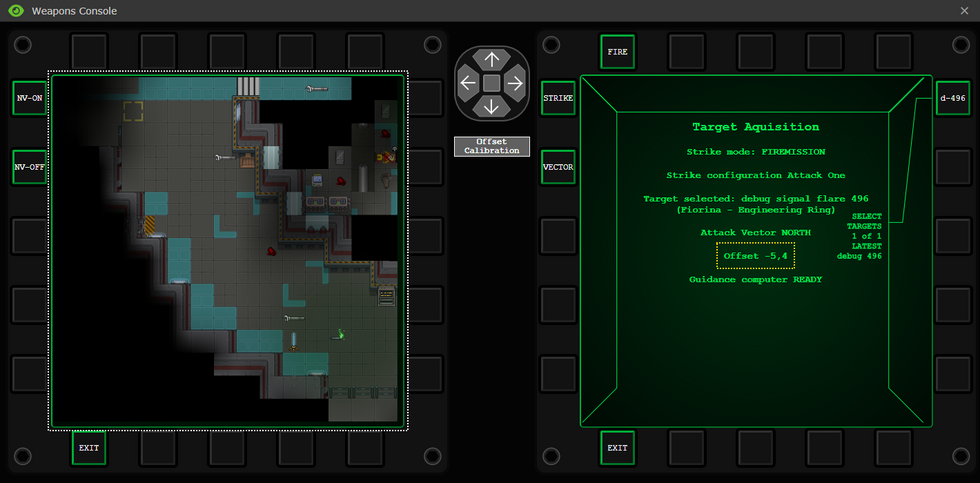
| In the example above you can see <span style="color:#FFD800">YELLOW</span> - Offset is -5, 4 This is the 5 tiles West and four North, and we can see the flare to the south east of the center of the view in the <span style="color:#FFFFFF">WHITE</span> - Camera view. | |||
|- | |||
|[[File:CAS-ViewingCamera.png|980px]] | |||
|- | |||
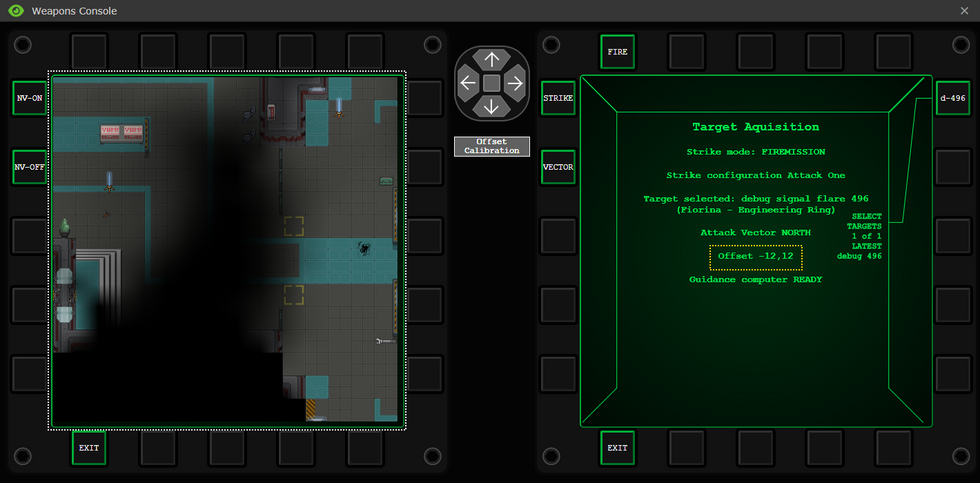
| In the example above you can see <span style="color:#FFD800">YELLOW</span> - Offset is -12, 12 This is the furthest West and North you can go, and we can no longer see the flare in the <span style="color:#FFFFFF">WHITE</span> - Camera view. | |||
|- | |||
|} | |||
---- | |||
'''Note:''' ''Both Vector and Offset do not reset after a completed FM so you will need to change them if needed for a new attack.'' | |||
'''Note:''' ''If the signal is under a metal ceiling or underground, you'll still be able to execute the fire mission and see the damage you caused when the fire mission is under way. But if it's deep underground, you won't be able to see anything or fire at all, yet still be able to Execute it without firing a single shot.'' | |||
====Target Selection==== | |||
The last component to discuss is the Target | |||
[[File:CAS-TargetFullyConfigured.png|980px]] | |||
The right hand side buttons are <span style="color:#FFD800">YELLOW</span> - Targets available to select they will come with a Squad letter A,B,C,D,E,F or sometimes X for command or auxiliary depending on who threw it and a number to identify which target you want. JIMA Flags will start with J. If you're being called in by a JTAC Make sure you have the right signal selected. | |||
Further verification of the right signal can be found with the <span style="color:#FFFFFF">WHITE</span> - Location Name. | |||
Once you're happy with your offsets and the Fire Mission you've selected, your vector, offset are all configured to your and the JTACs requirements the <span style="color:#0026FF">BLUE</span> - Guidance Computer will read '''READY''', and you can then execute your Fire Mission and watch your Camera to see the dropship unleash devastating firepower against anything in the strike zone. After the fire mission is completed, you'll return to a sub-orbital route that'll allow you to commence another fire mission provided you have the ammo and the time, or abort and land. | |||
=Example Weapon Loadouts= | |||
It's important to keep in mind what weapons you have installed on the dropship as all 4 weapons usually combine into one set up, for more organized and increased damage, some commonly used CAS weapons choices are: | |||
*4 Mini-Rocket Pods [[File:Minirocket_Pod.png|24px]] | |||
*2 Mini-Rocket Pods [[File:Minirocket_Pod.png|24px]], 2 Guided Missile Launchers [[File:Rocket_Pod.png|16px]] | |||
*2 Mini-Rocket Pods [[File:Minirocket_Pod.png|24px]], 1 Guided Missile Launcher [[File:Rocket_Pod.png|16px]], 1 Laser Cannon [[File:Laser.png|16px]] or GAU-21 30mm Cannon [[File:GAU.png|16px]] | |||
*2 Rocket Pods [[File:Minirocket_Pod.png|24px]], 2 Laser Cannons [[File:Laser.png|16px]] or GAU-21 30mm Cannons [[File:GAU.png|16px]] | |||
Each weapon has a different cool down on how fast you can fire it in firemission. Listed below will tell you the cool downs of each weapon available: | |||
{| style="border: 2px solid black;" | |||
! style="background-color:#A9A9A9;" |'''Equipment:''' | |||
! style="background-color:#A9A9A9;" |'''Cool down:''' | |||
|- | |||
| style="border: 2px solid black; border-bottom: 2px solid black; padding: 5px;" |'''Missile Launcher''' | |||
| style="border: 2px solid black; border-bottom: 2px solid black; padding: 5px;" |The Missile Launcher is a single shot weapon that can be placed anywhere on the gimbal. But due to it having only one missile available in the pod, you're going to need to reload it for every time you fire it. | |||
'''Fires only one Missile.''' | |||
An example of how this would be seen on a gimbal is presented like this: '''Fire.''' | |||
|- | |||
| style="border: 2px solid black; border-bottom: 2px solid black; padding: 5px;" |'''Mini-Rocket Pod''' | |||
| style="border: 2px solid black; border-bottom: 2px solid black; padding: 5px;" |The Mini-Rocket Pod has the ability to fire multiple small explosive rockets at a target. But they have a small cool down of two spaces. | |||
'''Fires 1 Mini-Rocket, per step.''' | |||
An example of how this would be seen on a gimbal is presented like this: '''Fire, wait, wait, fire.''' | |||
|- | |||
| style="border: 2px solid black; border-bottom: 2px solid black; padding: 5px;" |'''GAU-21 'Rattler' 30mm Cannon''' | |||
| style="border: 2px solid black; border-bottom: 2px solid black; padding: 5px;" |The GAU is an effective weapon that will be able to clear out large areas as well as do plenty of damage on a target. It has the smallest cool down (barring the rocket pod) which allows you to fire in quick succession against a target. | |||
'''Fires 20 rounds per step and 40 rounds with the Anti Tank rounds.''' | |||
An example of how this would be seen on a gimbal is presented like this: '''Fire, wait, fire.''' | |||
|- | |||
| style="border: 2px solid black; border-bottom: 2px solid black; padding: 5px;" |'''LWU-6B Laser Cannon''' | |||
| style="border: 2px solid black; border-bottom: 2px solid black; padding: 5px;" |The Laser Cannon is the most effective weapon available to the gunship pilots. It is perfectly suitable for the use of fire missions as it will shoot a line of extremely damaging fire against the target. But this weapon has the longest cool down of them all. Having to wait 3 steps before you can fire again, this weapon has a trade off of being extremely powerful for having a long cool down. | |||
'''Fires 10% of the battery's power per step.''' | |||
An example of how this would be seen on a gimbal is presented like this: '''Fire, wait, wait, wait, fire.''' | |||
|} | |||
---- | |||
=Dropship Weapons and Modules= | |||
The key way to customize your dropship is to slap new systems on it, such as weapons, electronics, or engine upgrades. Some of these systems are available in the repair bay at the north of the hangar, with ammo for the weapons to be printed from the dropship fabricator. | |||
Simply climb into a powerloader (''click-drag yourself onto it, or right click -> enter powerloader''), pick up your desired attachment, and slap it into the appropriate port on your dropship. Before they can be fired, weapons need to be reloaded using their appropriate ammo (Rockets, 30mm, etc); just collect some with an empty clamp and stuff it into the weapons system. If there's already expended ammo inside, just take it out with an empty clamp. Finally for the engine upgrades, simple click on the engine attachment point with said upgrade and you'll install it easily. | |||
There is also a matrix upgrade for your camera, an upgrade that only the research department can create for you which gives you night vision or extended field of view. Ask them to learn more. | |||
==Attachable Weapon and Utility Systems== | |||
If you want to pimp your ride, the USCM's got nothing but the best and most dangerous armaments. | |||
{| class="wikitable" | {| class="wikitable" | ||
! style="background-color:#A9A9A9;" width=150|Attachable Weapon System: | ! style="background-color:#A9A9A9;" width="150" |Attachable Weapon System: | ||
! style="background-color:#A9A9A9;" |Description: | ! style="background-color:#A9A9A9;" |Description: | ||
|- | |- | ||
![[File:Rocket_Pod.png|64px]]<br> | ![[File:Rocket_Pod.png|64px]]<br>LAU-444 Guided Missile Launcher | ||
| | |"If it ain't broke, don't fix it". A time-tested delivery system that's been refined over the ages, these suckers pack one missile at a time, but have the largest selection of flavors of death to choose from. | ||
{| class="mw-collapsible mw-collapsed" border="1" | |||
|+ style="text-align:left;" |'''Ammunition:''' | |||
|- | |||
![[File:Widowmaker_Rocket.png|64px]]<br>AIM-224B<br>'Widowmaker' | |||
| width="160" | | |||
'''Damage/Falloff''': 300/40 | |||
'''Fire/Burn:''' - | |||
'''Travel Time''': 3 seconds | |||
|One of the larger rockets, the Widowmaker is packed with high-grade explosives ready to make sure nothing it hits gets back up anytime soon. Basically a standard High Explosive Missile. An excellent option against large amounts of infantry. | |||
|- | |||
![[File:Keeper_Rocket.png|64px]]<br>GBU-67<br>'Keeper II' | |||
| | |||
'''Damage/Falloff''': 450/100 | |||
'''Fire/Burn:''' - | |||
'''Travel Time''': 2 seconds | |||
|A smaller casing, the Keeper delivers a strong, fast, concentrated blow. Put simply, your AP missile. While a direct hit obliterates armoured foes, don't expect it to be useful against large groups of hostiles due to its small area of effect. | |||
|- | |||
![[File:Banshee_Rocket.png|64px]]<br>AGM-227<br>'Banshee' | |||
| | |||
'''Damage/Falloff''': 175/20 | |||
'''Fire/Burn:''' 4/15 | |||
'''Travel Time''': 6 seconds | |||
|The Banshee will scream "Welcome to Vietnam" for you, scorching its impact zone with a custom Napthal mix. Essentially your incendiary rocket. Effective against both light armor and decent groups of hostiles. | |||
|- | |||
![[File:Fatty_Rocket.png|64px]]<br>BLU-200<br> 'Dragons Breath' | |||
| | |||
'''Fire/Burn:''' 4/25 | |||
'''Travel Time''': 5 seconds | |||
|If the Banshee wasn't hot enough for you, the BLU-200 Dragons Breath trades all of its explosive power for raw fire. '''Due to its thermobaric nature, it will pull in any target close to the blast.''' | |||
|- | |||
![[File:Napalm_Rocket.png|64px]]<br>AGM-99<br>'Napalm' | |||
| | |||
'''Damage/Falloff''': 200/25 | |||
'''Fire/Burn:''' 6/60 | |||
'''Travel Time''': 6 seconds | |||
|The XN-99 'Napalm' is an incendiary rocket used to engulf areas in giant fireballs. Exploding in a 9x9 fire ball, not much can survive the ensuing firestorm. '''Can not be fired during a Fire Mission. Must be fired using direct bombardment.''' | |||
|- | |- | ||
![[File: | ![[File:Harpoon_Rocket.png|80px]]<br>AGM-184<br>'Harpoon' | ||
|The | | | ||
'''Damage/Falloff''': 150/16 | |||
'''Fire/Burn:''' - | |||
'''Travel Time''': 5 seconds | |||
|The AGM-84 Harpoon is an Anti-Ship Missile, designed and used to effectively take down enemy ships with a huge blast wave with low explosive power. This one is modified to use ground signals. | |||
|- | |- | ||
![[File: | <!-- | ||
| | ![[File:Fatty_Rocket.png|64px]]<br>SM-17<br>'Fatty' | ||
|The SM-17 'Fatty' is a special ordnance rocket. Nicknamed 'Fatty' for its slow velocity and large payload, which splits into a large cluster of devastation preceded by a single centered hit. '''Can not be fired during a Fire Mission. Must be fired using direct bombardment.''' | |||
|- | |||
--> | |||
|} | |||
|- | |||
![[File:Minirocket_Pod.png|64px]]<br>LAU-229 Rocket Pod | |||
|Bigger rockets are all well and good, but when hostiles are right on top of your position, the last thing you want is to be lit up by a wide-area strafing run. The mini-rocket system steps in for these encounters by being a precise, moderate choice to soften up the enemy. | |||
{| class="mw-collapsible mw-collapsed" border="1" | |||
|+ style="text-align:left;" |'''Ammunition:''' | |||
|- | |||
! width="120" |[[File:Minirocket_Stack.png|64px]]<br>AGR-59 'Mini-Mike' | |||
| width="160" | | |||
'''Damage/Falloff''': 200/44 | |||
'''Fire/Burn:''' - | |||
'''Travel Time''': 8 seconds | |||
|A pack of 6 laser guided minirockets. | |||
|- | |- | ||
![[File: | ![[File:Minirocket_incin_Stack.png|64px]]<br>AGR-59-I 'Mini-Mike' | ||
| | |||
'''Damage/Falloff''': 200/44 | |||
'''Fire/Burn:''' 3/25 | |||
'''Travel Time''': 8 seconds | |||
|A pack of 6 laser guided incendiary minirockets. | |||
|- | |- | ||
|} | |} | ||
|- | |||
![[File:GAU.png|64px]]<br>GAU-21 'Rattler' 30mm Cannon | |||
|Military men and women know that the best solution for when brute force doesn't work, is to apply even more excessive amounts of brute force. The 'Rattler' system delivers bursts of 30mm rounds in a general area around the designated target, ensuring any and all targets will feel the BRRRRRRRT. | |||
'''This weapons system can be fired while in Transport mode.''' | |||
{| class="mw-collapsible mw-collapsed" border="1" | |||
|+ style="text-align:left;" |'''Ammunition:''' | |||
|- | |||
! width="100" |[[File:30mm_Ammo.png|64px]]<br>PGU-100 Multi-Purpose 30mm ammo crate | |||
| width="160" | | |||
'''Damage/Falloff''': 150/0 | |||
'''Fire/Burn:''' - | |||
'''Armour Penetration''': 10 | |||
'''Travel Time''': 10 seconds | |||
|PGU-100 30mm Multi-Purpose ammo designed to penetrate light (non reinforced) structures, and lightly armed targets. However, it lacks armor penetrating capabilities, for which Anti Tank 30mm ammo is needed. Contains 400 rounds per crate and uses 40 rounds per burst. | |||
|- | |||
![[File:30mm_Highvelocity_Ammo.png|64px]]<br>PGU-105 30mm Anti-tank ammo crate. | |||
| width="160" | | |||
'''Damage/Falloff''': 95/0 | |||
'''Fire/Burn:''' - | |||
== | '''Armour Penetration''': 40 | ||
'''Travel Time''': 6 seconds | |||
|PGU-105 Specialized 30mm APFSDS Titanium-Tungsten alloy penetrators, made for countering heavily armoured targets. It is much less effective against soft targets however, in which case 30mm Multi-Purpose ammunition is recommended. Contains 400 rounds per crate and uses 30 rounds per burst | |||
|- | |||
|} | |||
|- | |||
![[File:Laser.png|64px]]<br>LWU-6B Laser Cannon | |||
|The LWU-6B Laser Cannon has been recently developed by the USCM for dropship armament use. It fires a burst of battery-fed laser beams at lightspeed, perfect for roasting anyone who disagrees with the boots on the ground policy. Basically a souped up GAU if high-velocity ammunition was not enough for you. Note that this armament is still undergoing field testing during active operations. | |||
'''This weapons system can be fired while in Transport mode.''' | |||
{| class="mw-collapsible mw-collapsed" border="1" | |||
|+ style="text-align:left;" |'''Ammunition:''' | |||
|- | |||
! width="100" |[[File:Laser_Ammo.png|64px]]<br>HBTU-17/LW Hi-Cap Laser Battery | |||
| width="160" | | |||
'''Damage/Falloff''': 0/0 | |||
'''Fire/Burn:''' 5/75 | |||
'''Travel Time''': 1 second | |||
! | |A high-capacity laser battery used to power laser beam weapons. | ||
|- | |||
|} | |||
|- | |||
![[File:Sentry_Deployable.png|64px]]<br>A/A-32-P Sentry Defense System | |||
|This handy-dandy system comes pre-packaged with one UA-577 Gauss Turret, an upgraded version of the standard UA-571-C Sentry Guns that stops would-be dropship assailants dead in their tracks. Can be repaired and reloaded just like standard Sentry Gun. | |||
|- | |- | ||
![[File: | ![[File:Machinegun_Deployable.png|64px]]<br>MTU-4B Door Gunner Hardpoint System | ||
| | |This container holds a modified M56D smart-gun attached to a sandbag nest, and goes in the crew served attach point in the back of the drop-ship or on the weapon attachment points on the wings of the dropship, providing a solid barrier against anyone sneaking in from the backyard and sides. Loaded with 1500 rounds and given an enhanced scope for extra range with IFF. | ||
|- | |- | ||
![[File: | ![[File:Med_Evac_System.png|64px]]<br>RMU-4M Medevac System | ||
| | |A winch system to lift injured marines on medical stretchers onto the dropship. Attaches to the crew served attach point at the back of the drop-ship.. You can recover them in '''Flyby mode''' AND '''transport mode.''' '''One spawns at the start of a round.''' | ||
---- | |||
'''Usage:''' | |||
*Listen out over squad comms and medical comms for a squad corpsman requesting a Medevac. | |||
*Fly in either '''Flyby''' or '''Transport'''. | |||
*Acquire lift targets through the dropship weapons and utilities console. | |||
*Once a target has been found go to the Medevac system at the back and click on it to winch up the injured marine. | |||
'''Note:''' ''that the winch system has a cooldown of 1 minute between each use and only a pilot or dropship crew chief can use it.'' | |||
|- | |- | ||
![[File: | ![[File:Fulton_System.png|64px]]<br>RMU-19 Fulton Recovery System | ||
|This container holds a Fulton recovery system that allows you to collect objects attached to Fulton recovery balloons. You can recover them in '''Flyby mode''' AND '''transport mode.''' You can recover crates and unreviveable dead bodies. '''One spawns at the start of a round.''' | |||
---- | |||
'''Usage:''' | |||
*Listen out over any communications channel for someone to state a Fulton balloon is up. | |||
*Fly in either '''Flyby''' or '''Transport'''. | |||
*Acquire targets with the weapons and utilities console. | |||
*Once a target has been found, the Fulton Recovery System will automatically retrieve the package. | |||
*This has small cool down once collected. | |||
|- | |- | ||
![[File: | ![[File:Launchbay.png|64px]]<br>LAG-14 Internal Sentry Launcher | ||
| A | |A standard issue launch bay, Primary used to launch area-of-denial sentries. You can use it in '''Flyby mode''' AND '''transport mode.''' | ||
---- | |||
'''Usage:''' | |||
*Load in a sentry into the launch bay. | |||
*Fly in either '''Flyby''' or '''Transport'''. | |||
*Acquire targets with the weapons and utilities console. | |||
*Once a target has been found, You may launch the sentry to the location. | |||
|- | |- | ||
![[File: | ![[File:Rappel_System.png|64px]]<br>RHPU-1 Paradrop Deployment System | ||
| | |This container holds electronic systems which allows marines to tactically paradrop right into combat. '''One spawns at the start of a round.''' | ||
---- | |||
'''Usage:''' | |||
*Fly in '''Flyby'''. | |||
*Make sure you pack enough parachutes. | |||
*Target a flare or laser from the Target Menu. | |||
*Lock the flare from the Paradrop Deployment System's Equipment Menu. | |||
*The rear door will open automatically and the marines can now run out the back. | |||
*That's it! Marines can now paradrop by simply clicking on the rappel deployment system. | |||
|- | |- | ||
|} | |} | ||
==Attachable Electronics== | ==Attachable Electronics== | ||
Want to improve the accuracy of your weapon systems? Or perhaps you'd rather install a couple spotlights to ensure no LZ goes un-lit, either way keep in mind you've only got 2 electronic slots when Detective Gadget'ing up your ship with these fancy gubbinz: | Want to improve the accuracy of your weapon systems? Or perhaps you'd rather install a couple spotlights to ensure no LZ goes un-lit, either way keep in mind you've only got 2 electronic slots when Detective Gadget'ing up your ship with these fancy gubbinz: | ||
{| class="wikitable" | {| class="wikitable" | ||
! style="background-color:#A9A9A9;" width=150|Attachable Electronic System: | ! style="background-color:#A9A9A9;" width="150" |Attachable Electronic System: | ||
! style="background-color:#A9A9A9;" |Description: | ! style="background-color:#A9A9A9;" |Description: | ||
|- | |- | ||
![[File:Spotlight.png| | ![[File:Spotlight.png|64px]]<br>AN/LEN-15 Spotlight | ||
|A high-powered spotlight with a protective glass casing ensures you'll always have an illuminated landing zone, plus a bit extra. | |A high-powered spotlight with a protective glass casing ensures you'll always have an illuminated landing zone, plus a bit extra. | ||
|- | |- | ||
![[File:Targeting_System.png|64px]]<br>Targeting System | ![[File:Targeting_System.png|64px]]<br>AN/AAQ-178 Weapon Targeting System | ||
|An advanced system that's much better at tracking laser-guided beacons than the standard equipment the drop-ships come with | |An advanced system that's much better at tracking laser-guided beacons than the standard equipment the drop-ships come with. Calculates optional firing patterns to minimize traveling time. Essential for drop-ships planning on making accurate and fast missile strikes or a few GAU strafing runs. '''Not necessary for Fire Missions'''. | ||
'''Speeds up traveling time of the missile as well as improves accuracy on direct strikes''' | |||
|- | |||
![[File:Landing_detector.png|64px]]<br>AN/AVD-60 LZ Detector | |||
|Camera system that lets a pilot observe all available landing zones via a long range camera. Can help the pilot assess the situation on the ground. | |||
|} | |} | ||
==Attachable Engine Upgrades== | ==Attachable Engine Upgrades== | ||
Not getting enough thrust out of the standard engines? Tired of waiting so damn long for the suckers to cooldown before you can take-off again? Well here's a couple solutions to your problems | Not getting enough thrust out of the standard engines? Tired of waiting so damn long for the suckers to cooldown before you can take-off again? Well here's a couple solutions to your problems. Using two of the '''same''' engine upgrades will '''not''' enhance your dropship. Two different engine upgrades '''will''' work however. (Double cooling systems or double fuel enhancers won't be more efficient, only one is counted for this purpose) | ||
{| class="wikitable" | {| class="wikitable" | ||
! style="background-color:#A9A9A9;" width=150|Attachable Electronic System: | ! style="background-color:#A9A9A9;" width="150" |Attachable Electronic System: | ||
! style="background-color:#A9A9A9;" |Description: | ! style="background-color:#A9A9A9;" |Description: | ||
|- | |- | ||
![[File:Cooling_System.png| | ![[File:Cooling_System.png|64px]]<br>Cooling System | ||
| | |A more efficient cooling system then the default one. Attach this in your engines and you'll see a huge decrease in engine cooldown times, ensuring you'll be ready to take-off at the drop of a hat, even if you just landed. '''One spawns at the start of a round.''' | ||
|- | |||
![[File:Fuel_Enhancer.png|64px]]<br>Fuel Enhancer | |||
|Improves thrust produced by fuel combustion, decreasing the time it takes to get from Point A to Point B and provides that extra bit of maneuverability when avoiding hostile fire. Additionally on flyby, it extends the amount of time you have for undertaking fire missions as well as using the Medevac system. '''One spawns at the start of a round.''' | |||
|} | |||
==Dropship Part Fabricator== | |||
[[File:Dropship_part_fabricator.png|thumb]]The dropship part fabricator is the primary way for you to get equipment for your dropships, or to replace ammunition that you've completely run out of. It works by a point system, with '''one point being earned every two seconds'''. Points can be spent on the below items if you have enough of them, and the part will usually print after a dozen seconds or more. | |||
[[File:CAS_Partfab_1.1.png|600px]] | |||
<br>Highlighted in '''<span style="color:#00FF00">Green</span>''' is equipment for all your needs including Engine Upgrades, Weapons, and Support modules, and highlighted in '''<span style="color:#FF0000">red</span>''' is the ammo to supply all the weaponry at your disposal. To print something, simply click "Fabricate" and, if it has enough points, it will start printing. Below are detailed prices and estimated time to accumulate that much points. | |||
{| class="wikitable" | |||
!Equipment | |||
!Cost in points | |||
!Amount of time required to generate that many points | |||
|- | |||
|A/A-32-P Sentry Defense System | |||
|500 | |||
|17 minutes | |||
|- | |||
|MTU-4B Door Gunner Hardpoint System | |||
|300 | |||
|10 minutes | |||
|- | |||
|- | |||
|LAG-14 Internal Sentry Launcher | |||
|400 | |||
|13 minutes | |||
|- | |||
|Fuel enhancer | |||
|800 | |||
|27 minutes | |||
|- | |||
|Cooling system | |||
|800 | |||
|27 minutes | |||
|- | |||
|AN/LEN-15 Spotlight | |||
|300 | |||
|10 minutes | |||
|- | |||
|AN/AAQ-178 Weapon Targeting System | |||
|800 | |||
|27 minutes | |||
<!---|- | |||
|Laser detector | |||
|400 | |||
|13 minutes---> | |||
|- | |||
|AN/AVD-60 LZ Detector | |||
|400 | |||
|13 minutes | |||
|- | |||
|GAU-21 30mm cannon | |||
|400 | |||
|13 minutes | |||
|- | |||
|LAU-444 Guided Missile Launcher | |||
|600 | |||
|20 minutes | |||
|- | |||
|LAU-229 Rocket Pod | |||
|600 | |||
|20 minutes | |||
|- | |||
|LWU-6B Laser Cannon | |||
|500 | |||
|17 minutes | |||
|} | |||
{| class="wikitable" | |||
!Ammo | |||
!Cost in points | |||
!Amount of time required to generate that many points | |||
|- | |||
|PGU-105 30mm Anti-tank ammo crate. | |||
|325 | |||
|Around 11 minutes | |||
|- | |||
|PGU-100 Multi-Purpose 30mm ammo crate | |||
|275 | |||
|Around 9 minutes | |||
|- | |- | ||
|BTU-17/LW Hi-Cap Laser Battery | |||
| | |200 | ||
|6 minutes | |||
|- | |||
|AIM-224B 'Widowmaker' | |||
|300 | |||
|10 minutes | |||
|- | |||
|AGM-227 'Banshee' | |||
|300 | |||
|10 minutes | |||
|- | |||
|BLU-200 'Dragons Breath' | |||
|300 | |||
|10 minutes | |||
|- | |||
|GBU-67 'Keeper II' | |||
|300 | |||
|10 minutes | |||
|- | |||
|AGM-99 'Napalm' | |||
|500 | |||
|17 minutes | |||
|- | |||
|AGR-59-I 'Mini-Mike' | |||
|500 | |||
|17 minutes | |||
|- | |||
|AGR-59 'Mini-Mike' | |||
|300 | |||
|10 minutes | |||
|- | |||
|AGM-184 'Harpoon II' | |||
|200 | |||
|6 minutes | |||
|- | |||
|A/C-49-P Air Deployable Sentry | |||
|800 | |||
|27 minutes | |||
|} | |} | ||
=Communication= | =Communication= | ||
It's all well and good to know how your dropship works, but at the end of the day you're also an officer with a duty to plan, coordinate, and share information regarding your flights. The key to being a successful Pilot Officer is to use your downtime wisely to communicate with others on the various channels to ensure everything goes as smooth as possible. | |||
==Command channel (''':v''')== | |||
As the PO, you'll want to reach out over the command channel to inform them of the status of your dropship, flights, and the LZ, as well as communicate with Squad Leaders lasing targets on the ground. The most effective fire missions are the ones that communicate clearly to determine the purpose of the mission, and use the appropriate payload. | |||
==JTAC channel (''':j''')== | |||
In case you choose to do CAS ( Close Air Support ) Instead of transport, you will be communicating more in this channel as Squad leaders and JTAC kit users will be calling you for fire support and you have to provide it to ensure the victory on the ground. They will laze targets for you and sometimes specifying which type of ammo they want to be dropped. You can also watch the effect of your fire support by watching the cameras in the weapons console. | |||
Ex: " Alpha lead here, Requesting CAS 6 west of my laze, Fire when ready ! " | |||
==Intel channel (''':t''')== | |||
The Intel channel is good to liaise with RTO's or marines who have decided to take the fulton recovery device to recover xeno corpses, or with Intelligence Officers who have intel to deliver and load, unload or fulton onto and from your dropship. | |||
==Medical Channel (''':m''')== | |||
The medical channel is good to communicate with medics that try to Medevac their patients up to your dropship, usually they will ask if you installed the Medevac module, and if you about to Medevac someone, ask injuries with the patient so you know how to stabilize the patient and if you need to land immediately(e.g. infected with xenomorph larva.) | |||
=== | =Your Skillset= | ||
{{MarineSkills | |||
|firearms=1 | |||
|endurance=1 | |||
|leadership=1 | |||
|medical=2 | |||
|surgery=1 | |||
|piloting=2 | |||
|powerloader=2 | |||
|jtac=2 | |||
|fireman=1 | |||
}} | |||
To find out about how the skill system works head over to the [http://cm-ss13.com/wiki/The_Skill_System skills system page]. | |||
=Tips= | |||
*Try to wait a bit for the marines to load up the wounded and late comers to load up in the shuttle before making a trip. Announce on the Squad's frequency when you've just arrived and are about to depart. You want to be efficient with your trips as much as possible. | |||
*A special benefit to being a Pilot Officer is that you're allowed to boss around marines while they're on your shuttle. Don't tolerate rowdy and loud marines but be ready if they fight back. Follow proper escalation procedures. Remember, you out rank them and its your ship (and the USCM's ship and thus the Commanding Officer's ship). | |||
*Leaving the dropship is not recommended unless you have just landed. Try not to stray too far from your craft. Retrieving marines is okay but if it leaves without you then you are in deep shit. You have a high chance of being 1. killed, 2. maimed, 3. captured, 4. killed again, 5. wounded. Although competent command staff will ask for you in the radio before manually piloting your craft. | |||
*If there is damage to your craft, be sure to request for a Maint Tech or the Chief Engineer to come repair it, the next time you're on the Almayer. | |||
*If you want to run CAS using direct bombardment while on trasport, consider using the fuel efficiency module. More time in the air is good if you want to maximize your chances of being airborne when a CAS request comes through. | |||
*You can combine partially used mini rocket racks/30mm ammo boxes together with the power loaders. Simply take one of them into one claw and click on the other one. It will either combine or transfer ammunition to the other one. | |||
*You can install two Medevac systems onto the same dropship to allow you to recover more wounded. | |||
<!--* You cannot launch the dropship if the APC is blocking the rear door. --> | |||
*Grabbing a more heavy gun than your side arm when you are on the transport dropship to deal with hostiles that try to get a ride up to the ship more reliably is usually a good choice | |||
=Guides= | |||
* | Below are user made guides for more in-depth learning. '''Information may be outdated''' | ||
* | *[http://forum.cm-ss13.com/t/cas-whats-good-whats-bad-i-dont-know-but-heres-a-arbitrary-opinionated-guide-on-it/401 CAS, what’s good? what’s bad? I don’t know but here’s a arbitrary opinionated guide on it.] by Jam March 8th 2023 | ||
* | *[http://cm-ss13.com/viewtopic.php?f=135&t=16939 Smashing that motherfucking lockdown button] by Bronimin on 19 Apr 2018 | ||
* | *[http://cm-ss13.com/viewtopic.php?f=94&t=15560 CAS Weaponry, Loadouts, and You] by Tisx on 22 Nov 2017 | ||
*[http://cm-ss13.com/viewtopic.php?f=94&t=15341 Guide to being "Death From Above" -A PO CAS Guide] by mizolo on 02 Nov 2017 | |||
*[http://cm-ss13.com/viewtopic.php?f=94&t=13902 How to have great CAS] by Roland410 on 11 Jul 2017 | |||
*[http://cm-ss13.com/viewtopic.php?f=94&t=11874 What makes a good PO?] by liltiptop on 22 Mar 2017 | |||
Latest revision as of 09:22, 3 January 2026
 |
Difficulty: Medium Supervisors: Auxiliary Support Officer Rank: Second Lieutenant Duties: Pilot and maintain the dropships. Guides: Located at the bottom of the page. Unlock Requirements: Two hours as Dropship Crew Chief Detailed Description: Your job is to fly, protect, and maintain the ship's dropship. While you are an officer, your authority is limited to the dropship, where you have authority over the enlisted personnel. If you are not piloting, there is an autopilot fallback for command, but don't leave the dropship without reason. As the pilot officer you answer to the auxiliary support officer and the acting commander. Special circumstances may change this.|__________| |
"We're in the pipe, five by five." ― Cpl. Ferro, Aliens
The Pilot Officer, is split into two roles; Dropship Pilot and Gunship Pilot, as the name indicates, pilots the ships of USS Almayer. They transport marines between the Almayer and the Landing Zones (LZ), protect and maintain their AUD-25 dropships, and provide Close Air Support (CAS) for those marines who want a fireworks show earlier than the 4th of July. Either can take on the others role should they be unavailable to do so.
Overview
Congratulations lieutenant! You finished your pilot training, got yourself a shiny commissioned rank, and have a badass ship to fly in the frontiers of space. Report to your fellow officers and command staff over the command channel (:v). Your Pilot's Bunks (east of CIC), and your Office (north of lower medbay and directly east of the pilot workshop), should have everything you need for the mission, If you're going somewhere cold, grab a coif!
The two dropships assigned to the piloting team at the hangar are the Alamo, and the Normandy, Both can go to any Landing Zone(LZ). They can fly two different kinds of missions: Transport and Fly By. The Alamo is conventionally the Dropship, and the Normandy the Gunship. You can jump in the Powerloaders at the repair bay to install specialized equipment and ammo onto the dropships to support these missions, You can also ask the engineering department(:n) to give you a hand and help you.
Attaching the parts and loading weapons
To attach modules onto your dropship, you will first need to know how to operate a cargo loader. To board this iconic piece of hardware, simply drag your sprite onto it. Now, only people who are trained in the powerloaders skill can board and operate a cargoloader.
Notice how you have 2 clamps on that thing? That means you can hold 2 items at the same time without having to drop anything. To pick up a module, weapon or ammunition, simply click on it with an empty clamp and you will collect it with your loader.
- To install the module, click on one of the available slots on the dropship that corresponds to the module type with the module in your clamp to install it.
- To load ammunition into a module you need to click on the installed weapon with its corresponding ammunition type in the clamp to load it. To drop a module, simply click on an empty tile next to you. You can additionally combine ammunition by having both stacks of ammo in both clamps of the powerloader, and then just clicking on the other clamp holding one set of ammunition to combine them.
- To remove a weapon from a slot, simply click on the weapon or the slot that it's in with an empty clamp.
Different Mounting Points
The Essentials of Piloting
The lions' share of your piloting is orchestrated in the exclusive cockpit of your AUD-25 Cheyenne dropship. Seating two, it offers three consoles with plenty of buttons for you and your co-pilot to push while the autopilot does all the work:
- The camera console on the left allows you to watch over the dropship's cameras as well as any extra sights provided by the installable LZ detector system, which allows you to see where will you inevitably land.
- The flight console in the middle lets you launch the dropship, toggle the flight mode between transport and fly-by, and lock the shutters and doors. It also lets you optimize the flight path - only available to trained pilots like you - to cut down on transport and cooldown time at no cost.
- The weapons console at the right allows you to fire externally mounted weapons and deploy sentries and paradrop marines to locations designated by a laser designator or signal flare. In the case of firing weapons, both via fire mission or direct fire, you are able to use a camera to view the area you are interested in firing upon before you commit to firing if there is no opaque roofing over head. If there is opaque roofing over head, the camera may not see anything at all. The console is also where you activate the fulton recovery module, Medevac winch, and deploy external hardpoint mounted sentry guns.
So with that in mind, what are the differences between your two flight modes, transport and flyby? Well, in short, transport mode lets you move marines and supplies between the hangar and LZ, but sacrifices your ability to fire the bigger guns, while flyby mode lets you use the most deadly weaponry you can load, but your dropship will only return to where it launched from.
| Transport | Flyby ("Close Air Support and Med Evac") | |
|---|---|---|
| Where does the dropship go? | Moves you from A to B, or B to A. If you take off from the Almayer, you move to the LZ, and if you take off from the LZ, you move to the Almayer. | Moves you from A to A, or B to B. If you take off from the Almayer, you return to the Almayer. |
| Which weapons and utilities can the dropship use mid-air? | GAU-21 30mm Cannon, LWU-6B Laser Cannon, RMU-19 Fulton Recovery System, and RMU-4M Medevac System. | All weapons that are available to you at the printer. |
| How long does the dropship stay in the air? | Depends on engine upgrades and whether the flight plan was optimized, to move men and supplies as fast as possible. | Also depends on the engine upgrade which extends your flight time by a good bit. |
Close Air Support
The Weapons Control Console
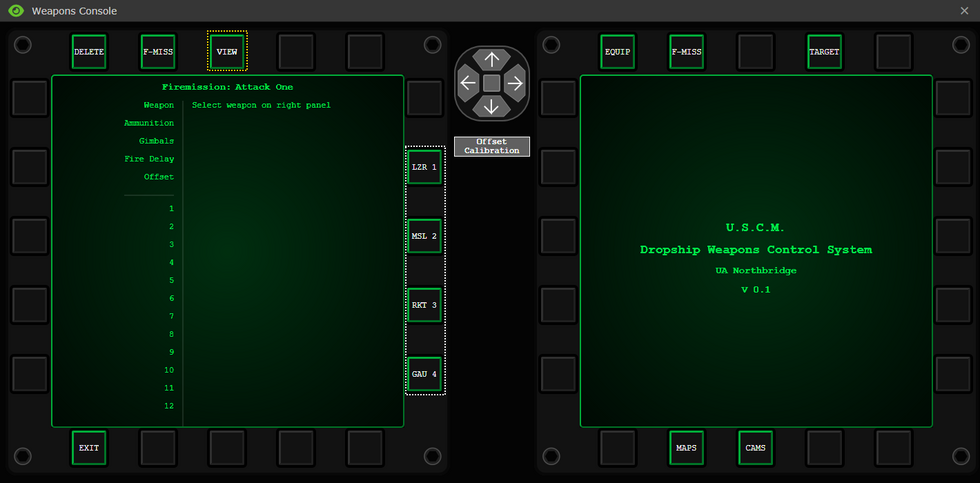
The console has a dual 'Multi Function Display' system so you have have two screens side by side using them both at the same time. The buttons themselves are multi function and will change depending on the Menu selected.
Main Menu
This is the main menu. Any Exit buttons will return you to this Menu.
- RED - EQUIP - Equipment: All the modules and weapon systems loaded onto the dropship can be accessed here. Including Direct Firing weapons, activating sentries, using the Fulton, targeting Medevacs, and locking Paradrop JIMA flag/flares/lases.
- BLUE - F-MISS - Fire Mission: Viewing, editing, creating and deleting Fire Mission configurations.
- YELLOW - TARGET - Targeting: Direct firing Weapons, configuring attack runs, and selecting target JIMA flag/flares/lases. Selecting a target for paradrop must also be done using TARGET.
- PINK - MAPS - TacMap: Displays a live TacMap.
- WHITE - CAMS - Cameras: Allows you to view a Target JIMA flag/flare/lase/Medevac Bed. (You can check your camera to see if the target is underground)
Equipment Menu
- YELLOW - External Hardpoints: Any module or weapon placed externally can be interacted/Fired from here.
- WHITE - Internal Hardpoints: Any module placed internally can all be interacted with from here.
Target Menu
Also shown is the viewing screen for a configured Fire Mission. Focus on the right hand side screen for the Target Menu.
- RED - Offset Calibration: Allows you to change the offset in X(East:+ and west:-) and Y(North:+ and South:-) With a maximum offset of 12. I.E 2,-4 Would be two tiles east of the laser, and four south of the laser
- BLUE - VECTOR - Attack Vector: Allows you to select the direction to attack TOWARD I.E: The end of the attack will be East of the initial starting point if East is selected..
- YELLOW - STRIKE - Strike Mode: Allows you to select the attack mode from Direct Weapon or Fire Mission
- PINK - FIRE - Fires your Weapon(s) in the current configuration if the Guidance computer is complete and READY.
Direct Bombardment
Direct bombardment is using only one weapon at a time and firing at lazes and signal flares. To be able to do so select Targets, then Strike, then Weapon, and then the weapon you wish to use. Alternatively you can use the Equipment Menu, and select the weapon from there. Finally select fire to initiate the attack. There is a delay between firing on the target and impact. Before impact, there will be a flashing green dot highlighting where the payload will land for a brief moment. Once it's gone, the payload will reach its target.
Once you've fired your payload, there will be a short cool down before you're able to fire again. All weapons can fire using direct bombardment and certain munitions can only be fired using direct bombardment.
Fire Missions
Fire Missions are pre-made air strikes designed to fire in one direction that cover a configurable area. They allow the pilot to unleash a full arsenal of weapons on any targets that are near a laser/flare or JIMA flag.
You have access to a special channel primarily dedicated to coordinating with the ground troops who are able to ask for airstrikes. These include Squad Leaders, Fireteam Leaders, Scout Specialist and any one who has a JTAC encryption key. Use :j to talk in that channel.
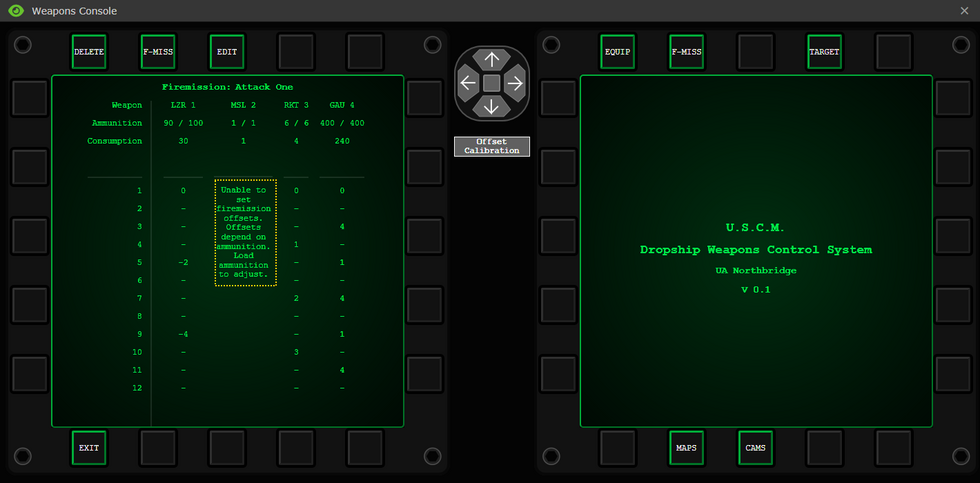
| And you will see this YELLOW - Error in the Fire Mission Editor |
|
Configuring a Fire Mission
Naming the Fire Mission
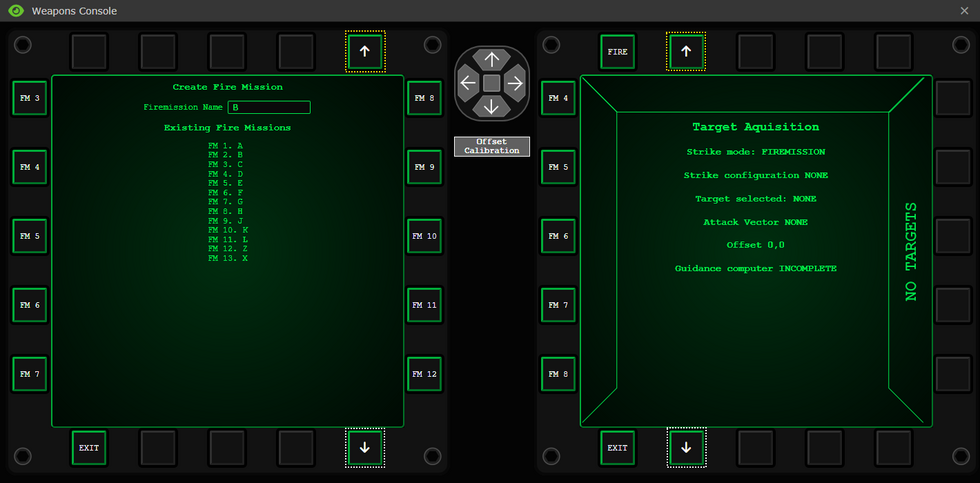
The first step in making a Fire Mission is to name it, click in the WHITE - TEXT BOX and hit Enter to save it or use the Save button. For any button actions the name will appear as FM#Number, but will be visible in the Target menu to verify you have the selected the correct one.
Once you have created the Fire Mission you'll see it in the list and be able to select it either on the left or right side depending on how many you have made. Shown above is the WHITE SAVE Button if you don't want to press enter to finish naming your Firemission And one example of a YELLOW - Fire Mission Button
| YELLOW for scrolling up. WHITE for scrolling down. |
|
Editing the Fire Mission
Now that you have selected a Fire Mission from the Menu, you'll be greeted with the Overview of that Fire Mission. As it's just created it will be empty. But will show you the Weapons equipped and their ammo state.
- RED - DELETE: Deletes the current selected Fire Mission
- BLUE - F-MISS - Fire Mission: Returns to the list of Fire Missions
- YELLOW - EDIT: Allows you to edit when and where the weapons will fire.
- PINK - EXIT - An example of the Exit button that will exit to the main menu.
To setup our Fire Mission you'll need to click on EDIT. And be greeted with the following screen.
From this screen you need to select the YELLOW - Weapons you are configuring for the Fire Mission.
This will prompt a slightly different screen where you can configure the Gimbal of the weapons for each step of the Fire Mission.
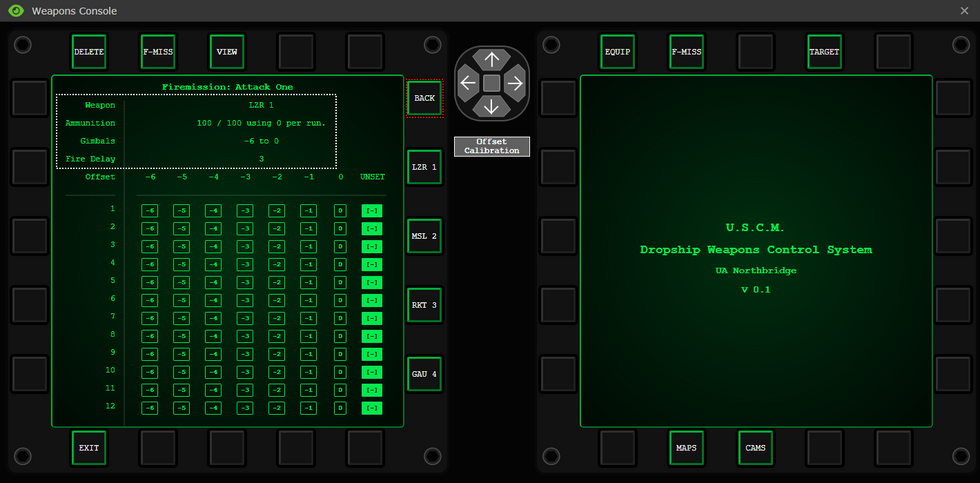
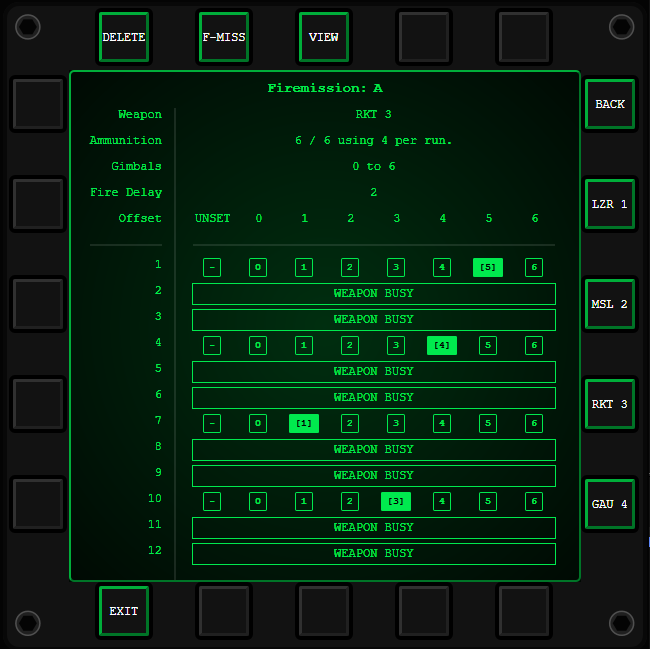
In WHITE - Weapon Information: The currently selected Weapon. The Number of that weapon, 1 to 4, Starting from the port wing, going from left to right hardpoint wise. It's ammo state, it's gimbal limits determined by if it's on the port or starboard side. (Left: Port, Right: Starboard. This is relative to the front of the ship, I.E Starboard on the Almayer is North/Up)
The Gimbal
Note: The Gimbal will flip as seen below going from port to starboard or vice versa to represent the which side the weapon is on.
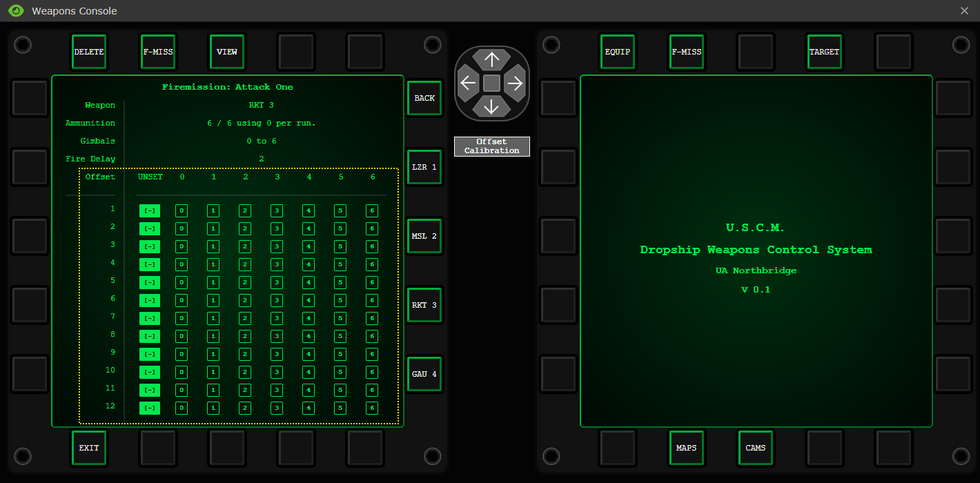
Each Fire Mission has a maximum step count of 12. On each step you can fire a weapon by selecting the Gimbal you want to fire said weapon at. Different weapons have different fire delays, which will control how many times you can fire it in one Fire Mission, ammo usage is also a consideration, even ammo usage. Using half on one Fire Mission run and the other half on the next is a tactic you can use to keep yourself airborne longer before you need to re-arm.
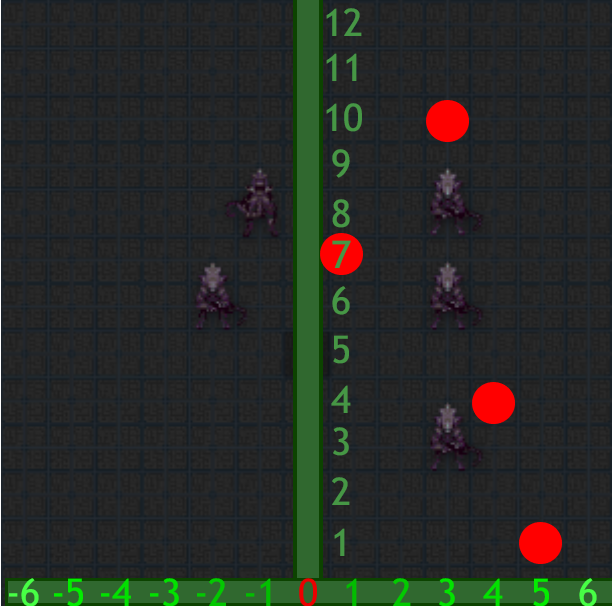
Imagine this 12 count step as a straight line from the start of the fire mission, and on each step you can step out to the side to a maximum of 6 steps away from the center. Using this you choose where your weapons will strike. There is an additional visual explanation below.
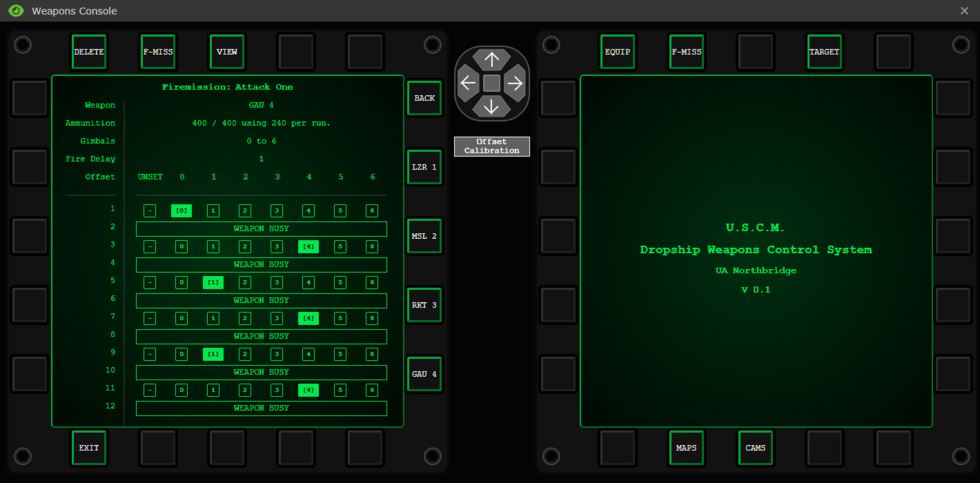
You just need to select the Numbers from the YELLOW - Box, and it will update with the Fire Delay blocking out the steps you can't shoot on with [WEAPON BUSY]. You can select the [-] to reset that step to have the weapon not fire, if you need to have it fire somewhere else.
Executing Fire Missions
Once you've created your fire mission, move to the STRIKE menu, set it to Fire Mission mode, select your Fire Mission and wait for JTAC to call in some air support. Make sure you're launching in Fly-By mode to be able to use those fire missions.
Be mindful of the ammunition you have remaining. You won't know you don't have enough ammo to complete a Fire Mission until you attempt one and you get a warning that one or more of your weapons doesn't have enough ammo to complete it. So you will need to keep an eye on you ammo, through either the Equipment screen or the Fire Mission overview screen of a selected Fire Mission.
Refer back to the Target Menu for coverage of the initial Menu.
Strike Mode: Fire Mission
YELLOW - The list of Fire Missions to choose from, arrows will be made available if there are many Fire Missions already made.
For a Fire Mission to be ready to fire the Guidance Computer must read READY. So you'll need to do more than just select your Fire Mission. You'll at least need; a Vector: the direction your attack is going, and a Target: a flare,laser, or JIMA flag to originate the attack from.
Vector
After selecting Vector you'll be greeted with the options of the four cardinal direction YELLOW - North, East, South and West. This option dictates where the in which direction the Dropship will attack toward. And isn't tied to the offset. So you can be offset west but attack to the east, covering ground you offset past. This gives you a lot of flexiblity together with Offsets to strike a wide area near a CAS signal.
Offset
For better effectiveness you'll also want an offset, you can view where your attack will start with the camera as long as it's not pitch-black, unless you have the Night Vision upgrade (Ask Research) or deep underground. The Offset allows you to move the Fire Mission away from the origin point a maximum of 12 tiles away in any two directions (Given that you can't offset both south and north because you can't duplicate yourself)
You can use the arrows to offset in that direction.
East(Positive numbers) is YELLOW - Right, and West(Negative numbers)is WHITE - Left. In this PINK - Example it is offset 5 Tiles East of the origin.
North(Positive numbers) is YELLOW - Up, South(Negative numbers) is WHITE - Down. In this PINK - Example it is offset 5 Tiles South of the origin.
The YELLOW - Center button is for resetting the offset to 0, 0. Thus having no offset.
Note: Both Vector and Offset do not reset after a completed FM so you will need to change them if needed for a new attack.
Note: If the signal is under a metal ceiling or underground, you'll still be able to execute the fire mission and see the damage you caused when the fire mission is under way. But if it's deep underground, you won't be able to see anything or fire at all, yet still be able to Execute it without firing a single shot.
Target Selection
The last component to discuss is the Target
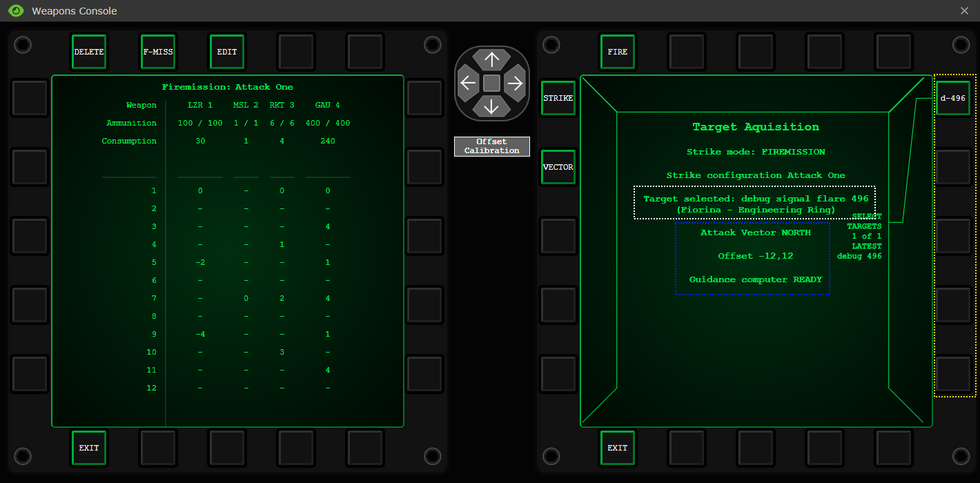
The right hand side buttons are YELLOW - Targets available to select they will come with a Squad letter A,B,C,D,E,F or sometimes X for command or auxiliary depending on who threw it and a number to identify which target you want. JIMA Flags will start with J. If you're being called in by a JTAC Make sure you have the right signal selected. Further verification of the right signal can be found with the WHITE - Location Name.
Once you're happy with your offsets and the Fire Mission you've selected, your vector, offset are all configured to your and the JTACs requirements the BLUE - Guidance Computer will read READY, and you can then execute your Fire Mission and watch your Camera to see the dropship unleash devastating firepower against anything in the strike zone. After the fire mission is completed, you'll return to a sub-orbital route that'll allow you to commence another fire mission provided you have the ammo and the time, or abort and land.
Example Weapon Loadouts
It's important to keep in mind what weapons you have installed on the dropship as all 4 weapons usually combine into one set up, for more organized and increased damage, some commonly used CAS weapons choices are:
- 4 Mini-Rocket Pods

- 2 Mini-Rocket Pods
 , 2 Guided Missile Launchers
- 2 Mini-Rocket Pods
 , 1 Guided Missile Launcher
  , 1 Laser Cannon
  or GAU-21 30mm Cannon
- 2 Rocket Pods
 , 2 Laser Cannons
  or GAU-21 30mm Cannons
Each weapon has a different cool down on how fast you can fire it in firemission. Listed below will tell you the cool downs of each weapon available:
| Equipment: | Cool down: |
|---|---|
| Missile Launcher | The Missile Launcher is a single shot weapon that can be placed anywhere on the gimbal. But due to it having only one missile available in the pod, you're going to need to reload it for every time you fire it.
Fires only one Missile. An example of how this would be seen on a gimbal is presented like this: Fire. |
| Mini-Rocket Pod | The Mini-Rocket Pod has the ability to fire multiple small explosive rockets at a target. But they have a small cool down of two spaces.
Fires 1 Mini-Rocket, per step. An example of how this would be seen on a gimbal is presented like this: Fire, wait, wait, fire. |
| GAU-21 'Rattler' 30mm Cannon | The GAU is an effective weapon that will be able to clear out large areas as well as do plenty of damage on a target. It has the smallest cool down (barring the rocket pod) which allows you to fire in quick succession against a target.
Fires 20 rounds per step and 40 rounds with the Anti Tank rounds. An example of how this would be seen on a gimbal is presented like this: Fire, wait, fire. |
| LWU-6B Laser Cannon | The Laser Cannon is the most effective weapon available to the gunship pilots. It is perfectly suitable for the use of fire missions as it will shoot a line of extremely damaging fire against the target. But this weapon has the longest cool down of them all. Having to wait 3 steps before you can fire again, this weapon has a trade off of being extremely powerful for having a long cool down.
Fires 10% of the battery's power per step. An example of how this would be seen on a gimbal is presented like this: Fire, wait, wait, wait, fire. |
Dropship Weapons and Modules
The key way to customize your dropship is to slap new systems on it, such as weapons, electronics, or engine upgrades. Some of these systems are available in the repair bay at the north of the hangar, with ammo for the weapons to be printed from the dropship fabricator.
Simply climb into a powerloader (click-drag yourself onto it, or right click -> enter powerloader), pick up your desired attachment, and slap it into the appropriate port on your dropship. Before they can be fired, weapons need to be reloaded using their appropriate ammo (Rockets, 30mm, etc); just collect some with an empty clamp and stuff it into the weapons system. If there's already expended ammo inside, just take it out with an empty clamp. Finally for the engine upgrades, simple click on the engine attachment point with said upgrade and you'll install it easily.
There is also a matrix upgrade for your camera, an upgrade that only the research department can create for you which gives you night vision or extended field of view. Ask them to learn more.
Attachable Weapon and Utility Systems
If you want to pimp your ride, the USCM's got nothing but the best and most dangerous armaments.
Attachable Electronics
Want to improve the accuracy of your weapon systems? Or perhaps you'd rather install a couple spotlights to ensure no LZ goes un-lit, either way keep in mind you've only got 2 electronic slots when Detective Gadget'ing up your ship with these fancy gubbinz:
| Attachable Electronic System: | Description: |
|---|---|
 AN/LEN-15 Spotlight |
A high-powered spotlight with a protective glass casing ensures you'll always have an illuminated landing zone, plus a bit extra. |
 AN/AAQ-178 Weapon Targeting System |
An advanced system that's much better at tracking laser-guided beacons than the standard equipment the drop-ships come with. Calculates optional firing patterns to minimize traveling time. Essential for drop-ships planning on making accurate and fast missile strikes or a few GAU strafing runs. Not necessary for Fire Missions.
Speeds up traveling time of the missile as well as improves accuracy on direct strikes |
 AN/AVD-60 LZ Detector |
Camera system that lets a pilot observe all available landing zones via a long range camera. Can help the pilot assess the situation on the ground. |
Attachable Engine Upgrades
Not getting enough thrust out of the standard engines? Tired of waiting so damn long for the suckers to cooldown before you can take-off again? Well here's a couple solutions to your problems. Using two of the same engine upgrades will not enhance your dropship. Two different engine upgrades will work however. (Double cooling systems or double fuel enhancers won't be more efficient, only one is counted for this purpose)
| Attachable Electronic System: | Description: |
|---|---|
 Cooling System |
A more efficient cooling system then the default one. Attach this in your engines and you'll see a huge decrease in engine cooldown times, ensuring you'll be ready to take-off at the drop of a hat, even if you just landed. One spawns at the start of a round. |
 Fuel Enhancer |
Improves thrust produced by fuel combustion, decreasing the time it takes to get from Point A to Point B and provides that extra bit of maneuverability when avoiding hostile fire. Additionally on flyby, it extends the amount of time you have for undertaking fire missions as well as using the Medevac system. One spawns at the start of a round. |
Dropship Part Fabricator

The dropship part fabricator is the primary way for you to get equipment for your dropships, or to replace ammunition that you've completely run out of. It works by a point system, with one point being earned every two seconds. Points can be spent on the below items if you have enough of them, and the part will usually print after a dozen seconds or more.
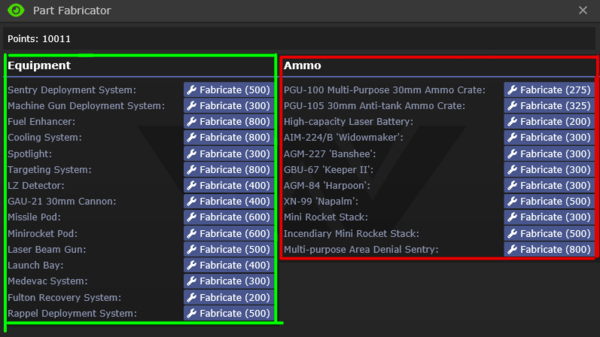
Highlighted in Green is equipment for all your needs including Engine Upgrades, Weapons, and Support modules, and highlighted in red is the ammo to supply all the weaponry at your disposal. To print something, simply click "Fabricate" and, if it has enough points, it will start printing. Below are detailed prices and estimated time to accumulate that much points.
| Equipment | Cost in points | Amount of time required to generate that many points |
|---|---|---|
| A/A-32-P Sentry Defense System | 500 | 17 minutes |
| MTU-4B Door Gunner Hardpoint System | 300 | 10 minutes |
| LAG-14 Internal Sentry Launcher | 400 | 13 minutes |
| Fuel enhancer | 800 | 27 minutes |
| Cooling system | 800 | 27 minutes |
| AN/LEN-15 Spotlight | 300 | 10 minutes |
| AN/AAQ-178 Weapon Targeting System | 800 | 27 minutes |
| AN/AVD-60 LZ Detector | 400 | 13 minutes |
| GAU-21 30mm cannon | 400 | 13 minutes |
| LAU-444 Guided Missile Launcher | 600 | 20 minutes |
| LAU-229 Rocket Pod | 600 | 20 minutes |
| LWU-6B Laser Cannon | 500 | 17 minutes |
| Ammo | Cost in points | Amount of time required to generate that many points |
|---|---|---|
| PGU-105 30mm Anti-tank ammo crate. | 325 | Around 11 minutes |
| PGU-100 Multi-Purpose 30mm ammo crate | 275 | Around 9 minutes |
| BTU-17/LW Hi-Cap Laser Battery | 200 | 6 minutes |
| AIM-224B 'Widowmaker' | 300 | 10 minutes |
| AGM-227 'Banshee' | 300 | 10 minutes |
| BLU-200 'Dragons Breath' | 300 | 10 minutes |
| GBU-67 'Keeper II' | 300 | 10 minutes |
| AGM-99 'Napalm' | 500 | 17 minutes |
| AGR-59-I 'Mini-Mike' | 500 | 17 minutes |
| AGR-59 'Mini-Mike' | 300 | 10 minutes |
| AGM-184 'Harpoon II' | 200 | 6 minutes |
| A/C-49-P Air Deployable Sentry | 800 | 27 minutes |
Communication
It's all well and good to know how your dropship works, but at the end of the day you're also an officer with a duty to plan, coordinate, and share information regarding your flights. The key to being a successful Pilot Officer is to use your downtime wisely to communicate with others on the various channels to ensure everything goes as smooth as possible.
Command channel (:v)
As the PO, you'll want to reach out over the command channel to inform them of the status of your dropship, flights, and the LZ, as well as communicate with Squad Leaders lasing targets on the ground. The most effective fire missions are the ones that communicate clearly to determine the purpose of the mission, and use the appropriate payload.
JTAC channel (:j)
In case you choose to do CAS ( Close Air Support ) Instead of transport, you will be communicating more in this channel as Squad leaders and JTAC kit users will be calling you for fire support and you have to provide it to ensure the victory on the ground. They will laze targets for you and sometimes specifying which type of ammo they want to be dropped. You can also watch the effect of your fire support by watching the cameras in the weapons console. Ex: " Alpha lead here, Requesting CAS 6 west of my laze, Fire when ready ! "
Intel channel (:t)
The Intel channel is good to liaise with RTO's or marines who have decided to take the fulton recovery device to recover xeno corpses, or with Intelligence Officers who have intel to deliver and load, unload or fulton onto and from your dropship.
Medical Channel (:m)
The medical channel is good to communicate with medics that try to Medevac their patients up to your dropship, usually they will ask if you installed the Medevac module, and if you about to Medevac someone, ask injuries with the patient so you know how to stabilize the patient and if you need to land immediately(e.g. infected with xenomorph larva.)
Your Skillset
|
| ||||||||||||||||||||||||||||||||||||||||||||||||||||||
|
| ||||||||||||||||||||||||||||||||||||||||||||||||||||||
|
|
To find out about how the skill system works head over to the skills system page.
Tips
- Try to wait a bit for the marines to load up the wounded and late comers to load up in the shuttle before making a trip. Announce on the Squad's frequency when you've just arrived and are about to depart. You want to be efficient with your trips as much as possible.
- A special benefit to being a Pilot Officer is that you're allowed to boss around marines while they're on your shuttle. Don't tolerate rowdy and loud marines but be ready if they fight back. Follow proper escalation procedures. Remember, you out rank them and its your ship (and the USCM's ship and thus the Commanding Officer's ship).
- Leaving the dropship is not recommended unless you have just landed. Try not to stray too far from your craft. Retrieving marines is okay but if it leaves without you then you are in deep shit. You have a high chance of being 1. killed, 2. maimed, 3. captured, 4. killed again, 5. wounded. Although competent command staff will ask for you in the radio before manually piloting your craft.
- If there is damage to your craft, be sure to request for a Maint Tech or the Chief Engineer to come repair it, the next time you're on the Almayer.
- If you want to run CAS using direct bombardment while on trasport, consider using the fuel efficiency module. More time in the air is good if you want to maximize your chances of being airborne when a CAS request comes through.
- You can combine partially used mini rocket racks/30mm ammo boxes together with the power loaders. Simply take one of them into one claw and click on the other one. It will either combine or transfer ammunition to the other one.
- You can install two Medevac systems onto the same dropship to allow you to recover more wounded.
- Grabbing a more heavy gun than your side arm when you are on the transport dropship to deal with hostiles that try to get a ride up to the ship more reliably is usually a good choice
Guides
Below are user made guides for more in-depth learning. Information may be outdated
- CAS, what’s good? what’s bad? I don’t know but here’s a arbitrary opinionated guide on it. by Jam March 8th 2023
- Smashing that motherfucking lockdown button by Bronimin on 19 Apr 2018
- CAS Weaponry, Loadouts, and You by Tisx on 22 Nov 2017
- Guide to being "Death From Above" -A PO CAS Guide by mizolo on 02 Nov 2017
- How to have great CAS by Roland410 on 11 Jul 2017
- What makes a good PO? by liltiptop on 22 Mar 2017


