So you've just joined for the first time as a Marine? No idea what you're doing? This Starter Guide to Space Station 13 is pretty good as an introduction to the interface! Otherwise, let this guide get you up to scratch!
As a foreword, rounds on this server usually last between two to three hours! Make sure you have the time commitment to sit a full round.
The Rules
Read the rules! Colonial Marines is a medium role-play server and you are expected to abide by the rules established by the server staff. If a staff member says do something, do it. If they tell you to stop doing something, stop. It will save both you and the staff a lot of trouble and effort. There is no excuse for not reading the rules. If you have been banned, fairly or unfairly, you may appeal on the ban appeal section of the forums. You have been warned. Thank you and enjoy the game.
Character Setup
This is simple for the most part. You'll create your character on the setup character page.
Do take note of the 'occupation' roles. For now you'll just want to set 'Marine' to your highest role. All other roles require a more robust knowledge of the game. For your first round, try and join a round before it starts. It's no big deal to join in the middle, but starting a round will ensure you aren't kicked out of the freezer into a difficult or deadly situation. First, we'll discuss some basics.
Who Orders Who
As a Standard Marine you're on the bottom rung of the chain of command. You take your orders directly from your Squad Leader, who takes his or her orders from the Commander, Executive Officer, and Staff Officers, respectively. At round start you are assigned to one of four Marine squads. Alpha (Red), Bravo (Yellow), Charlie (Purple) or Delta (Blue). As such, outside of extraordinary circumstances, you only take orders from your team's Squad Leader. The only hope your squad has of winning is either a well coordinated marine platoon or an even more incompetent xeno team. That means following your orders to the letter.
Should your Squad Leader die, or otherwise be incapacitated, you'll be taking your orders from either your team's Specialist (the second highest ranked soldier in a squad) or whoever the Squad Leader or Commander names to take over.
You are to obey any orders given to you by your Squad Leader at all times. The only exception is if your given orders violate Marine law or the rules. Instances of illegal orders being given are rare, but common enough to warrant a mention. Marine laws have some leeway, but the server rules come first when you're making a decision. It's better to be thrown in the brig for insubordination because you wouldn't murder someone your Squad Leader didn't like, than to be given a ban for what the moderators will probably see as grief.
NOTE: There is a BIG difference between an order that violates MARINE LAW versus one that violates the RULES. Orders that break Marine Law are considered an In Character (IC) issue and are thus something you may resolve in game so long as the situation is role played, orders that break the server rules are a Out Of Character (OOC) affair. Should you be given orders that would violate the rules then you should contact the staff via A-Help.
Waking Up
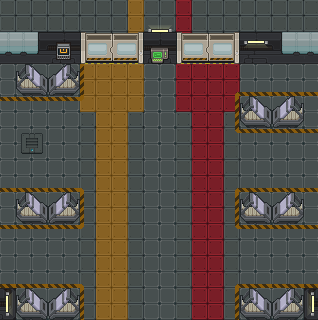
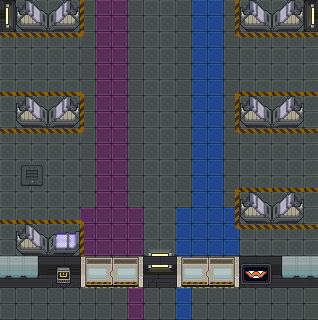
At the start of a deployment, you'll wake up in the ship's cryosleep quarters alongside all the other Marines aboard the USS Almayer (Click here for a map of the Almayer). The first thing you'll want to do is examine your identification card (right-click -> examine, or shift-click). This will let you know which squad you're in. The colour-coded arrows on the floor guide the Alphas and Bravos north, and the Charlies and Deltas south.
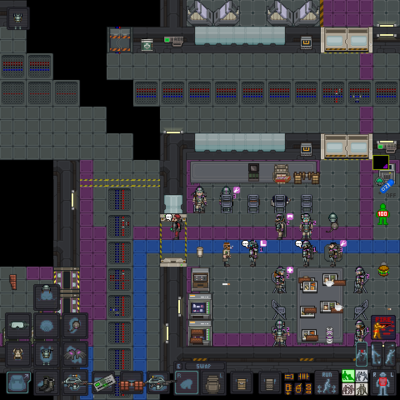
The below image shows us the southern canteen, which is identical to the northern canteen. There are some vending machines at the south-west of the room. Click on the food vendors and vend some food for yourself, then click on the food to hold it in your active hand, and finally eat the food by clicking on your character in the middle of the screen. Once you've eaten your fill, you'll want to head out the door on the left to the prep rooms to get geared.
Marine Equipment
One key to success is ensuring that you are well equipped. Attacking without a weapon may result in catastrophe. These next steps should prepare you for combat.
- Since you've just joined, go down to an equipment locker in your squad's room and equip your marine uniform, combat boots, combat gloves, M3 armor, helmet, ammo load rig and a radio headset.
- Go west to the Armanents Dispenser. In case there are too many marines and all gears in lockers are gone, you can get your gear from the Surplus Vender, except you need to get helmet and armour at Armanents Dispenser.
 Get a M41A Pulse Rifle. Load it with an M41A magazine
  by clicking on the rifle with the magazine. Then equip the rifle in the exosuit slot. Armanents Dispenser offers a good basic attachment, Rail Flashlight. Attach it to your rifle just like you reload then click
  Toggle Rail Flashlight to turn it on. Put it into your waist.
 Fill your ammo rig of magazines for your primary long arm.
 Get a M4A3 Service Pistol. Load it with an M4A3 magazine. Attach a Rail Flashlight, turn it on then place the M4A3 pistol in your Satchel.
 Get a Flare Pouch to one of your two belt slots. They have five flares, you can refill the pouch with a M94 Flare Pack.
 Get a First-Aid Pouch to one of your two belt slots.
 Get a M5 Survival Knife. Sheath it inside your combat boots.
 There are two slot in your armour, you can put more magazines in it.
 Fill your Satchel with M94 Flares Packs.
Alternatively you can exchange your M41A for a Combat Shotgun or an SMG. You can even decide to not take your backpack and instead use it to hold a second weapon, such as an M41A and a Shotgun. You can also ditch the belt for a holster, or wear a sidearm directly on your belt. However, these are risky loadouts and will lead to less ammo and items being stored.
Attachments
After gearing up, go to the requisitions office - west of cryo, east of briefing - and get in line to receive your attachments. These are items you can attach to your weapons to either enhance their capabilities or to add new unique functions.
Because you are a Standard Marine and have the rank of Private First Class, you will normally be issued up to two attachments. The attachments page can give you a guide on what attachments you should consider getting. The Standard Marine page also has a small guide on useful attachment loadouts. Being polite to the Requisitions staff might get you extra stuff. Remember to say please and thank you.
Briefing Room
Once you've geared up, your last task is to head to the briefing room, which is opposite requisitions to the west. Find a seat in your squad's color-coded seating area. The acting Commander will be along soon to describe the situation and his overall game plan, and will issue your squad their initial orders.
Listen to what your Commander has to say, listen to your Squad Leader, and overall watch your fellow Marines' backs. Stay with the team and you'll do fine.
The Dropships to the Surface
Once briefing ends, head west of the briefing room with the rest of your squad. There are two ways to get to the surface. Dropship One (Nicknamed the Alamo) which goes down to Landing Zone 1 (LZ1) and Dropship Two (Nicknamed the Normandy) which goes down to Landing Zone 2 (LZ2). Get on whichever ship your squad is using or whichever Dropship drops you to the closest Landing Zone to them. The ride isn't smooth, so you'll want to sit down and buckle in by standing on top of a chair and dragging your Marine's sprite to the chair. To unbuckle yourself, click the chair.
Combat
It's highly recommended you read this guide so that you understand how the bullet mechanics work on this server.
Light and vision are vital, turn on your shoulder lamp by clicking the armour icon at top left corner.
The pulse rifle takes two hands to shoot. If it's in one hand, you're just carrying it around. To ready it for firing, click on the rifle in your active hand. You'll know you've wielded your rifle when your other hand shows that it's occupied, your character's graphic readies the rifle, and you move a bit slower. To shoot the rifle, just point the cursor at a spot and click. Be very careful not to shoot fellow Marines. Avoid shooting yourself (which pretty much everybody's done). To lower the rifle again, click it in your active hand.
To avoid hitting other Marines, and maximize the squad's firepower, it's recommended to move in a dispersed group. This means your squad's Marines should stay at least 2 tiles away from each other, with the Squad Leader staying in the center or forward center of the formation. This allows weapons to be fired even from the center of the squad. Additionally, it's advised to move in a straight, predictable pattern while engaging in combat. It's hard for shooters to concentrate on both aiming at hostiles and avoiding friendlies crossing the firing line.
To change magazines, you will want to eject the current magazine and then place a new one. Eject magazines using the special weapon button ![]() in the bottom right, or by clicking the weapon with the empty other hand. Load a new magazine, by clicking on the weapon with a magazine in your hand. One of the special weapon buttons lets you fire the pulse rifle's grenade launcher. Be careful, they're dangerous and you only have two.
in the bottom right, or by clicking the weapon with the empty other hand. Load a new magazine, by clicking on the weapon with a magazine in your hand. One of the special weapon buttons lets you fire the pulse rifle's grenade launcher. Be careful, they're dangerous and you only have two.
Solo Marines are pretty ineffective against aliens, especially if you're new. Unless you want to get taken out into the darkness, stick with as many other Marines as you can. For your first game, don't move around the map much unless somebody gives you an order. Find something useful to guard and guard it, preferably in good cover and good light. There's no shame in being terrified of the Xenomorphs, as they will usually overpower any Marine if they get into melee range. Keep your distance!
Communication is very important! Use your headset to talk to everyone in your squad. Alpha are .q and :q, Bravo are .b and :b, Charlie are .c and :c, Delta are .d and :d. You can also use the Almayer radio using ;.
Squad Marine Roleplaying Guide and Expectations
- You are a "reasonable person". Preventing MP arrests verbally or arguing is OK, interfering is NOT. (Unless you have a VERY good RP reason and "MPs are shitlers" or "He's my best Bro" are not good reasons by themselves unless you've been RPing it).
- Respect the Chain of Command. If someone above you gives you an order, FOLLOW IT.
- If you're a Marine, act like it. Don't break laws or disobey orders and expect nothing to happen. You can object to "questionable" orders and break laws in RP situations, but you wouldn't be "rioting" just because the RO is a shitler.
- Relationships are restricted to friends and girl/boyfriends AT THE MOST. Marriages between marines is FORBIDDEN. You're still part of the military and you're subject to military rules. The military would NEVER deploy a husband/wife couple on the same ship or unit, let alone the same battalion. Also, don't use your relationship as an excuse to grief or cause problems. You would probably LOUDLY object to your best friend getting arrested, but you wouldn't gun-down the MP or interfere without a VERY good reason. (You wouldn't tackle a cop in real life because he was arresting your friend for being stupid, especially since it's like, 5-20 minutes in jail. Be REASONABLE.)
- All Marines and personnel on board the Almayer initially know nothing about the Alien infestation, or even that Aliens exist. All they know is that they received a distress signal from the planet.
- Survivors are allowed to know everything about the Aliens, such as how facehuggers work and the Aliens themselves.
- There are no restrictions in knowing how to operate any firearm. However, non-marine personal cannot carry a firearm larger than a handgun unless directly in danger.
- Combat Medics do not know how to perform surgery. Only Medical Doctors or the Chief Medical Officer know how to perform surgery.
- Marines DO NOT initially know what Facehuggers do. And only a body scanner can reveal that something is inside one's chest.
- DO NOT perform tasks your round start role would not know how to do, such as a Squad Leader hacking a door or a Cargo Technician operating a over-watch console.
- Command (CO, XO, Bridge Officer), Medical (MD, CMO) and Engineering staff (CE, Maint Tech) on board the Almayer cannot leave the Almayer UNLESS they have authorization from their department head, XO or CO or they are abandoning ship.
- Military Police can not leave the Almayer unless they are doing so to track down a rogue Marine who is not on the Almayer or they are escorting/piloting a Dropship. Military Police are expected to return to the Almayer ASAP.
- Roleplaying Guide
Tips
- Check out the FAQ for more information.
- Don't panic.
- Follow orders.
- Stay with the Squad Leader unless otherwise ordered.
- Never go anywhere alone.
- Communicate as much as possible with your squad. It would be hard to talk too much.
- Report all enemy contact.
- Damage is realistic and getting wounded sucks. Don't rambo around or charge in.
- The stationary side usually has the advantage. Be still and force the enemy to come to you.
- Be safe, fall back, stay alive.
Additional Reading
The following are some links that go further into explaining details and some other Marine roles:
- Roleplaying Guide
- Standard Marine Wiki Page: Provides some quick tips.
- Marine Equipment Wiki Page: Allows you to see all weapons and attachments the game has to offer.
- World of Guns: Descriptions of weapons
- Firefight Conduct: How to kill aliens and not each other
- USCMC Standard: Boot Camp: How not to be a Boot.
- Learn our lingo Boot: Marine lingo.
- The Guide of Xur Part One: Guide to Job Expectations
- Specialist Guide by Steelpoint: A guide on the Specialist role, provides a overview of the role's weapons, loadout and expectations.
- Comprehensive Combat Medic Guide by Jess: Provides a very in depth examination of the Combat Medic and a optimal load out and examination of the Medics tools and items, as well as procedures to triage casualties.
- How Not To Suck At Combat Engineer by Surrealistik: A questionable but nevertheless ok guide to being a Combat Engineer.
If you have any more questions, just A-help and one of the server's mentors will be happy to help you.


