More actions
HungerJames (talk | contribs) m (adds decryption info) |
|||
| (7 intermediate revisions by 4 users not shown) | |||
| Line 38: | Line 38: | ||
! width=100 |Highlighted Colour: | ! width=100 |Highlighted Colour: | ||
! Description: | ! Description: | ||
|- | |- | ||
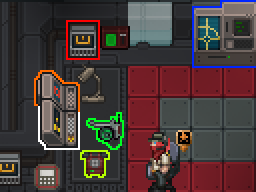
| [[File:Overwatch_Console.png|64px]]<br>'''Overwatch <br> Console''' | | [[File:Overwatch_Console.png|64px]]<br>'''Overwatch <br> Console''' | ||
| White | | <span style="color:#FFFFFF;">White</span> | ||
| '''The overwatch console allows the user to:''' | | '''The overwatch console allows the user to:''' | ||
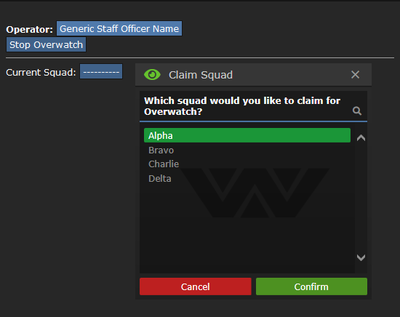
* Choose which squad to overwatch for. | * Choose which squad to overwatch for. | ||
| Line 53: | Line 49: | ||
* Monitor the lifesigns of all squad members. | * Monitor the lifesigns of all squad members. | ||
* Promote a squad member in the field to squad leader. | * Promote a squad member in the field to squad leader. | ||
|- | |||
|[[File:Security_Camera_Console.png|64px]]<br>'''Security Camera Console''' | |||
| <span style="color:#FF6A00;">Orange</span> | |||
| The security camera console allows the user to cycle through the security cameras located around the map, useful for locating escaped prisoners or aliens. | |||
|- | |- | ||
| [[File:Wall_Intercomms.png]]<br>'''Wall Intercomms''' | | [[File:Wall_Intercomms.png]]<br>'''Wall Intercomms''' | ||
| Red | | <span style="color:#FF0000;">Red</span> | ||
| The wall intercomms unit allows the user to send out messages over the general radio. | | The wall intercomms unit allows the user to send out messages over the general radio. | ||
|- | |- | ||
| [[File:CMP_II.png]]<br>'''Tech Control Console''' | | [[File:CMP_II.png]]<br>'''Tech Control Console''' | ||
| Blue | | <span style="color:#0026FF;">Blue</span> | ||
| The Tech Control Console controls who is currently in command of purchasing and unlock Techwebs. | | The Tech Control Console controls who is currently in command of purchasing and unlock Techwebs. | ||
|- | |- | ||
| [[File:MedicHud.png]]<br>'''MedHud''' | | [[File:MedicHud.png]]<br>'''MedHud''' | ||
|Green | | <span style="color:#00FF21;">Green</span> | ||
|A MedHud to see the health status of any marine through a camera or in person. Useful to determine how many combat effective marines are available. | |A MedHud to see the health status of any marine through a camera or in person. Useful to determine how many combat effective marines are available. | ||
|- | |- | ||
| [[File:Telephone.png]]<br>'''OW Telephone''' | | [[File:Telephone.png]]<br>'''OW Telephone''' | ||
|Yellow | | <span style="color:#B6FF00;">Yellow</span> | ||
|Allows you to call and take calls from members of the crew across the ship and planetside. | | Allows you to call and take calls from members of the crew across the ship and planetside. | ||
|} | |} | ||
| Line 140: | Line 140: | ||
The most important job for a SO is to communicate! Over-talking is vastly better than under-talking. The CO should give orders to the SOs (:v channel), who then relay these orders to the Squad Leaders (SL) and squads. The SLs should communicate everything to the SOs, who then relay this information to the CO. It's important that squads coordinate with one another. If the CO isn't forming an overall plan, try to talk to your other officers to get something working. SOs and SLs work closely together as a team, so it's important to form a good relationship. It's just as important to talk to the individual marines using the headset and make sure they're getting what they need to be effective. Remember that you're going to have some combat veterans and some rookies right out of boot camp. You can help the [[Squad Marine|boots]] along via radio. A helpful SO might also relay important information or ask questions of medical staff (:m), requisitions (:u), or engineering (:n). | The most important job for a SO is to communicate! Over-talking is vastly better than under-talking. The CO should give orders to the SOs (:v channel), who then relay these orders to the Squad Leaders (SL) and squads. The SLs should communicate everything to the SOs, who then relay this information to the CO. It's important that squads coordinate with one another. If the CO isn't forming an overall plan, try to talk to your other officers to get something working. SOs and SLs work closely together as a team, so it's important to form a good relationship. It's just as important to talk to the individual marines using the headset and make sure they're getting what they need to be effective. Remember that you're going to have some combat veterans and some rookies right out of boot camp. You can help the [[Squad Marine|boots]] along via radio. A helpful SO might also relay important information or ask questions of medical staff (:m), requisitions (:u), or engineering (:n). | ||
If there is important information multiple squads or groups should know you can use multi-broadcast by using the prefix (,) and adding up to four channels E.g. (,abcd) will transmit the same message to Alpha, Bravo, Charlie and Delta. | |||
=Tactical Map= | =Tactical Map= | ||
| Line 173: | Line 174: | ||
===Supply Drop=== | ===Supply Drop=== | ||
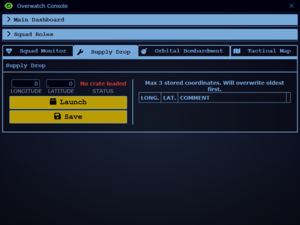
[[File:Supply_Drop_Ready.png|thumb]] | [[File:Supply_Drop_Ready.png|thumb]] | ||
# | # Receive coordinates from someone with Range Finders/Laser Designator or have them relayed from Requisitions. | ||
# Input the coordinates. | # Input the coordinates. | ||
# Requisitions Staff moves the crate full of supplies onto the squad's launch pad, the overwatch '''Launch Pad Status''' will then update to Crate Ready. | # Requisitions Staff moves the crate full of supplies onto the squad's launch pad, the overwatch '''Launch Pad Status''' will then update to Crate Ready. | ||
| Line 221: | Line 222: | ||
Remember the importance of your role so leave the killing part for other marines while you lead them. | Remember the importance of your role so leave the killing part for other marines while you lead them. | ||
Staff Officers require permission from the Commander to leave the ship. | |||
= List of Combat Information Center Electronics = | = List of Combat Information Center Electronics = | ||
| Line 234: | Line 237: | ||
| [[File:Dropship_console.png]] | | [[File:Dropship_console.png]] | ||
'''Dropship Console''' | '''Dropship Console''' | ||
| White - 1 | | <span style="color:#FDFFFC;">White</span> - 1 | ||
| Allows remote launching of either of the two Dropships. | | Allows remote launching of either of the two Dropships. | ||
|- | |- | ||
| Line 240: | Line 243: | ||
| [[File:Communications_console.png]] | | [[File:Communications_console.png]] | ||
'''Groundside Operations Console''' | '''Groundside Operations Console''' | ||
| | | <span style="color:#FFD800;">Orange</span> - 2 | ||
| | | '''As a Staff Officer you have limited access to this console''', however feel free to ask your superior to use it to call in an ERT or to make a shipwide announcement. Also allows you to make a groundside announcement and view the tactical map. Additionally can activate echo squad. | ||
More about the Groundside Operations Console covered later. | |||
|- | |- | ||
| [[File:Security_Cameras.png]] | | [[File:Security_Cameras.png]] | ||
'''Security Cameras Console''' | '''Security Cameras Console''' | ||
| Cyan - | | <span style="color:#00FFFF;">Cyan</span> - 3 | ||
| Useful to check the ship for uninvited guests and escaped prisoners. Additionally you can check each departments areas for SSD personnel. | | Useful to check the ship for uninvited guests and escaped prisoners. Additionally you can check each departments areas for SSD personnel. | ||
|- | |- | ||
| [[File:CIC_lockdowns.png]] | | [[File:CIC_lockdowns.png]] | ||
'''CIC Lockdown Buttons''' | '''CIC Lockdown Buttons''' | ||
| Red - | | <span style="color:#FF0000;">Red</span> - 4 | ||
| | | | ||
'''From Top To Bottom the buttons are: | '''From Top To Bottom the buttons are: | ||
*CIC Lockdown | *CIC Lockdown | ||
| Line 269: | Line 264: | ||
|- | |- | ||
| [[File:Telephone.png]]<br>'''CIC Telephone''' | | [[File:Telephone.png]]<br>'''CIC Telephone''' | ||
| | | <span style="color:#FF00DC;">Pink</span> - 5 | ||
| Allows you to call and take calls from members of the crew across the ship and planetside. | | Allows you to call and take calls from members of the crew across the ship and planetside. | ||
|- | |- | ||
| [[File:Crew Monitoring Console.png]] | | [[File:Crew Monitoring Console.png]] | ||
''' Crew Monitoring Console''' | ''' Crew Monitoring Console''' | ||
| Green - | | <span style="color:#00FF21;">Green</span> - 6 | ||
| Crew monitoring console. Used to view the health and location of certain crewmembers planetside and shipside. | | Crew monitoring console. Used to view the health and location of certain crewmembers planetside and shipside. | ||
|} | |} | ||
| Line 321: | Line 316: | ||
!<center>[[File:Issue_Orders-Focus.png]]<br>'''Focus!'''</center> | !<center>[[File:Issue_Orders-Focus.png]]<br>'''Focus!'''</center> | ||
|Increased gun accuracy and effective range. | |Increased gun accuracy and effective range. | ||
|} | |||
{{M540-B ARC}} | |||
{{Rolling Encryption}} | |||
=The Tech Tree= | |||
You can access the techtree by using the consoles in the Combat Information center - both are near the overwatch consoles. | |||
{| style="border: 2px solid black; width:60%" | |||
! style="background-color:#84987A;"|'''Tech:''' | |||
! style="background-color:#84987A;"|'''Description:''' | |||
! style="background-color:#84987A;"|'''Cost:''' | |||
|- | |||
|style="width:125px; border: 2px solid black; border-bottom: 2px solid black; padding: 5px;" |[[File:Tech tier1.png]] | |||
[[#Tech Tier 1|'''Tech Tier 1''']] | |||
|style="border: 2px solid black; border-bottom: 2px solid black; padding: 5px;" |Enables the first tier of the tech tree, usually is already unlocked at operation start. Tier 1 techs include: an increase in dropship fabricator points and an increase in the requisition budget. | |||
|style="border: 2px solid black; border-bottom: 2px solid black; padding: 5px;" | '''Free (one time purchase)''' | |||
|- | |||
|style="width:125px; border: 2px solid black; border-bottom: 2px solid black; padding: 5px;" |[[File:Tech tier1 dropship.png]] | |||
[[#Dropship Budget Increase|'''Dropship Budget Increase''']] | |||
|style="border: 2px solid black; border-bottom: 2px solid black; padding: 5px;" |This tier 1 tech supplies 2500 points to the dropship fabricator. (For what they can fabricate with these points see [[Pilot_Officer#Dropship_Part_Fabricator|the dropship fabricator list in the PO's page.]]) | |||
|style="border: 2px solid black; border-bottom: 2px solid black; padding: 5px;" | '''12 (+1 every purchase)''' | |||
|- | |||
|style="width:125px; border: 2px solid black; border-bottom: 4px solid black; padding: 5px;" |[[File:Tech tier1 dropship.png]] | |||
[[#Requisitions Budget Increase|'''Requisitions Budget Increase''']] | |||
|style="border: 2px solid black; border-bottom: 4px solid black; padding: 5px;" |This tier 1 tech supplies (roughly) 10,000 requisition points for every 30 marines as it varies depending on marine count during an operation. For what it can buy see [https://cm-ss13.com/wiki/Requisitions#Supply_Crates|the supply crates buy list in the requisitions page.] | |||
|style="border: 2px solid black; border-bottom: 4px solid black; padding: 5px;" | '''15 (+1 every purchase)''' | |||
|- | |||
|style="width:125px; border: 2px solid black; border-bottom: 2px solid black; padding: 5px;" |[[File:Tech tier1.png]] | |||
[[#ARC Acquisition|'''ARC Acquisition''']] | |||
|style="border: 2px solid black; border-bottom: 2px solid black; padding: 5px;" |Requisitions the [[#M540-B Armored Recon Carrier|'''M540-B Armored Recon Carrier''']]. A lightly armored reconnaissance and intelligence vehicle. | |||
|style="border: 2px solid black; border-bottom: 2px solid black; padding: 5px;" | '''5 (one time purchase)''' | |||
|- | |||
|style="width:125px; border: 2px solid black; border-bottom: 2px solid black; padding: 5px;" |[[File:Tech tier2.png]] | |||
[[#Tech Tier 2|'''Tech Tier 2''']] | |||
|style="border: 2px solid black; border-bottom: 2px solid black; padding: 5px;" |Enables the second tier of the tech tree. The only tier 2 techs are for resupplying any and all OB warheads. | |||
|style="border: 2px solid black; border-bottom: 2px solid black; padding: 5px;" | '''5 (one time purchase)''' | |||
|- | |||
|style="width:125px; border: 2px solid black; border-bottom: 2px solid black; padding: 5px;" |[[File:Tech tier2 warhead inc.png]] | |||
[[#Additonal OB Projectiles - Incendiary|'''Additional OB Projectiles - Incendiary''']] | |||
|style="border: 2px solid black; border-bottom: 2px solid black; padding: 5px;" |This tier 2 tech supplies the USS Almayer with an incendiary orbital cannon warhead. | |||
|style="border: 2px solid black; border-bottom: 2px solid black; padding: 5px;" | '''10 (+2 every purchase)''' | |||
|- | |||
|style="width:125px; border: 2px solid black; border-bottom: 2px solid black; padding: 5px;" |[[File:Tech tier2 warhead cluster.png]] | |||
[[#Additonal OB Projectiles - Cluster|'''Additional OB Projectiles - Cluster''']] | |||
|style="border: 2px solid black; border-bottom: 2px solid black; padding: 5px;" |This tier 2 tech supplies the USS Almayer with a cluster orbital cannon warhead. | |||
|style="border: 2px solid black; border-bottom: 2px solid black; padding: 5px;" | '''10 (+2 every purchase)''' | |||
|- | |||
|style="width:125px; border: 2px solid black; border-bottom: 2px solid black; padding: 5px;" |[[File:Tech tier2 warhead he.png]] | |||
[[#Additonal OB Projectiles - HE|'''Additional OB Projectiles - HE''']] | |||
|style="border: 2px solid black; border-bottom: 2px solid black; padding: 5px;" |This tier 2 tech supplies the USS Almayer with a high explosive orbital cannon warhead. | |||
|style="border: 2px solid black; border-bottom: 2px solid black; padding: 5px;" | '''10 (+2 every purchase)''' | |||
|- | |||
|style="width:125px; border: 2px solid black; border-bottom: 2px solid black; padding: 5px;" |[[File:Tech Tier3.png]] | |||
[[#Tech Tier 3|'''Tech Tier 3''']] | |||
|style="border: 2px solid black; border-bottom: 2px solid black; padding: 5px;" |Enables the third tier of the tech tree. The only tier 3 techs are for awakening additional marines out of cryogenics. | |||
|style="border: 2px solid black; border-bottom: 2px solid black; padding: 5px;" | '''5 (one time purchase)''' | |||
|- | |||
|- | |||
|style="width:125px; border: 2px solid black; border-bottom: 2px solid black; padding: 5px;" |[[File:Cryorines.png]] | |||
[[#Wake up Additional Troops|'''Wake up Additional Troops''']] | |||
|style="border: 2px solid black; border-bottom: 2px solid black; padding: 5px;" |Wakes up additional troops to fight any threat. Includes a squad leader, combat technicians, corpsmen, and riflemen, scaling off population and number of ghosts who said yes. | |||
|style="border: 2px solid black; border-bottom: 2px solid black; padding: 5px;" | '''10 (+5 per purchase)''' | |||
|- | |||
|} | |} | ||
| Line 347: | Line 412: | ||
* [https://cm-ss13.com/forums/showthread.php?5020-Guide-to-the-Staff-Officer-Your-Eyes-in-the-Sky Guide to the Staff Officer: Your Eyes in the Sky] by naut » 21 March 2020 | * [https://cm-ss13.com/forums/showthread.php?5020-Guide-to-the-Staff-Officer-Your-Eyes-in-the-Sky Guide to the Staff Officer: Your Eyes in the Sky] by naut » 21 March 2020 | ||
* [https://forum.cm-ss13.com/t/guide-to-the-staff-officer-eyes-in-the-sky/918 Updated guide to the Staff Officer: Your Eyes in the Sky] by naut » 21 March 2023 | * [https://forum.cm-ss13.com/t/guide-to-the-staff-officer-eyes-in-the-sky/918 Updated guide to the Staff Officer: Your Eyes in the Sky] by naut » 21 March 2023 | ||
*[https://forum.cm-ss13.com/t/guide-to-decoding-encrypting-encoding/17991 Decryption Guide] by HungerJames » 25 November 2025 | |||
Latest revision as of 13:24, 15 December 2025
 |
Difficulty: Medium Supervisors: Executive Officer, Commanding Officer Rank: Second Lieutenant Duties: Provide overwatch, assist the Commanding Officer. Guides: Marine Law Unlock Requirements: One hour as a Squad Leader. Fifteen hours as any human role. Detailed Description: Your job is to monitor the marines, man the CIC, and listen to your superior officers. You are in charge of logistics and the overwatch system. You may also be called upon to run CIC in certain circumstances. |__________| |
Overview
Staff Officers (SO) are sixth in command after the Auxiliary Support Officer (ASO), Chief MP (CMP) and Chief Medical Officer (CMO). Despite being the 6th in line for Command, generally when there is no CO, XO or ASO, the Command of the Operation will pass down to you since other department heads are too busy in their own department, this does not make you a Commander or Duty Officer. A SO's primary objective is to support the marine squads using the Overwatch Consoles and to communicate with your squads and the crew of the ship so that key information can be relayed to all personnel, an example for this would be relaying to the doctors that there are injured about to land on the Almayer aboard the Normandy. Overwatch allows for you and the other command personnel to oversee squad operations from the safety of the Combat Information Centre (CIC). Overwatch is a potent tool in the hands of a competent (or even semi-competent) officer, but a poor one can lead their squad to disaster in a hurry. If you like knowing what's going on all over the map, the SO role is for you. Make sure you know the maps well before taking on the SO role - or learn on the job.
A good SO will:
- Know the map.
- Talk to their squad(s).
- Communicate and coordinate with other CIC staff as well as the ship's crew.
- Build a good rapport with their (Acting) Squad Leader.
- Try to coordinate with other Staff Officers to send them Help/ask for Manpower, etc...
Note: As a staff Officer you are rather flexible when it comes to orders, so that being said, you may order your squad to perform certain duties without asking the Commanding Officer for permission, but you will be held responsible for your actions in case things go for the worse.
Staff Officer Area
The staff officer area is where you will spend most of your round coordinating with the other command staff and the boots on the ground. Note that there are three other areas in CIC where a staff officer can set up for the round, all of which have the same layout and are in close proximity to the CICs Command bubble so that relaying orders can be done without a radio.
- If CIC's power is out, all the electronic equipment will be unusable so make sure the issue is taken care of by an MT or a Combat Technician, failing those two, you also have the skills to fix any power issues.
The Overwatch Console
Communication
The most important job for a SO is to communicate! Over-talking is vastly better than under-talking. The CO should give orders to the SOs (:v channel), who then relay these orders to the Squad Leaders (SL) and squads. The SLs should communicate everything to the SOs, who then relay this information to the CO. It's important that squads coordinate with one another. If the CO isn't forming an overall plan, try to talk to your other officers to get something working. SOs and SLs work closely together as a team, so it's important to form a good relationship. It's just as important to talk to the individual marines using the headset and make sure they're getting what they need to be effective. Remember that you're going to have some combat veterans and some rookies right out of boot camp. You can help the boots along via radio. A helpful SO might also relay important information or ask questions of medical staff (:m), requisitions (:u), or engineering (:n).
If there is important information multiple squads or groups should know you can use multi-broadcast by using the prefix (,) and adding up to four channels E.g. (,abcd) will transmit the same message to Alpha, Bravo, Charlie and Delta.
Tactical Map
| Object: | Description: |
|---|---|

Map Table |
By examining the Map table (Shift Click or right click "examine") a tactical minimap will appear of the Outpost/Colony/Prison which will update in real time the locations of squads, and other USCM personnel.
|
Quickstart Guide
Change Your Headset!
Once you've picked a squad to Overwatch, it's very important to make sure your command headset is turned on to your squad's channel. To do so, hold the headset in one of your hands and under Object > Activate Held Object, you will open the frequency tuner for your headset. Your command headset can listen to any squad Alpha (:a) , Bravo (:b), Charlie (:c), or Delta (:d) - or every squad at once. It starts off disengaged from these channels, so you have to do it yourself. Just click on it (or Z) to engage/disengage the channels you want to hear and how much information you can handle.
Messaging the Squad
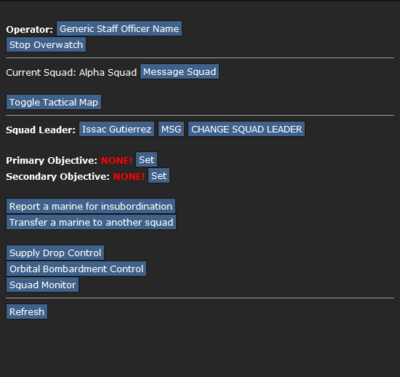
You can send a direct message to all squad members via the [Message Squad] button. This circumvents your normal radios and shows up as a much more obvious message. Use it if you really need to get the point across. You can also send an SL a message similar to the squad-wide message, but it's sent only to them. This is good for getting their attention.
This method is specially useful when comms are not up and you need to relay orders to your squad.
Objectives
Objectives are another important aspect of the Overwatch console. The Primary and Secondary Objectives will show up on any squad member's Status pane (the top panes, like IC and OOC buttons). It's good to ensure your squad is staying cohesive. Bear in mind a good knowledge of the ground map is essential for giving objectives. Saying "gather up in Engineering" is not as good as saying "gather up in Engineering, southwest of the main complex."
Supply Drop and Orbital Bombardment
Squad Leaders and Fire Team Leaders begin the game with a Laser Designator, other than relaying a laser point for CAS, it can also be used to find out the coordinates for mortar, supply drop and orbital bombardment. Other roles can acquire them from Requisitions. Range Finders can only be used for coordinates.
Supply Drop
- Receive coordinates from someone with Range Finders/Laser Designator or have them relayed from Requisitions.
- Input the coordinates.
- Requisitions Staff moves the crate full of supplies onto the squad's launch pad, the overwatch Launch Pad Status will then update to Crate Ready.
- Launch the crate.
- The crate will then be dropped on the coordinates, so it's best to make sure the coordinates are located in an open area.
- Supply drops can penetrate up to glass ceilings (examine the floor tile to see the ceiling type).
- 5-minute cooldown between launches.
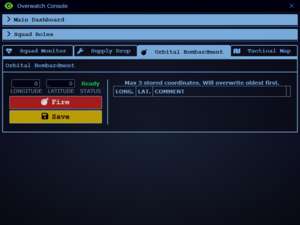
Orbital Bombardment
- Squad Leader or any JTAC operators, uses the Range Finders/Laser Designator to find out the coordinates for bombardment and relay it to the CIC
- Get information from the JTAC on where exactly these coordinates are targeted so you can warn the rest of the marines.
- Input the coordinates
- Fire upon the JTAC operator's request. (Good idea to get permission from Commander, or who ever is in charge of CIC at the time)
- Announce the OB has been fired and where it's intended to hit.
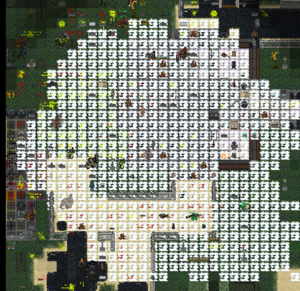
- Orbital bombardments can penetrate up to underground and resin (but not deep underground or thick resin) ceilings (examine the floor tile to see the ceiling type).
| Orbital Warhead: | Description: | Radius: |
|---|---|---|

High Explosive |
Causes a devastating explosion in a large radius upon impact with it's designated target. | 18 tiles |

Incendiary |
Releases a fiery payload over the targeted area. | 18 tiles |

Cluster |
Releases a cluster of explosives over the targeted area for 30 seconds, firing 6 bombs each second. To suppress any enemies advancing as well as pulverising and terrorising anything within range . | 12 tiles |
When triggered, the Almayer will fire its Orbital Cannon after a short delay and target roughly the position of the co-ordinates. It's very dangerous within the radius of the coordinates, depending on the munition in the cannon. It is advised to see the ground situation via helmet camera in case of danger close fire missions. The Orbital Cannon will then need to be reloaded by the maintenance technicians or ordnance technicians.
Deploying to the Area of Operations
In case you are deploying to the AO, you shouldn't be acting like a regular squad marine. You are there to support marines, by giving them orders, using your order boosts to give them more endurance/aim or holding instances, and inform command regarding appropriate courses of action since you have direct eyes on the AO.
Remember the importance of your role so leave the killing part for other marines while you lead them.
Staff Officers require permission from the Commander to leave the ship.
List of Combat Information Center Electronics
Commanding Officer's/XO's Area
| Object: | Highlighted Color And Number: | Description: |
|---|---|---|

Dropship Console |
White - 1 | Allows remote launching of either of the two Dropships. |

Groundside Operations Console |
Orange - 2 | As a Staff Officer you have limited access to this console, however feel free to ask your superior to use it to call in an ERT or to make a shipwide announcement. Also allows you to make a groundside announcement and view the tactical map. Additionally can activate echo squad.
More about the Groundside Operations Console covered later. |

Security Cameras Console |
Cyan - 3 | Useful to check the ship for uninvited guests and escaped prisoners. Additionally you can check each departments areas for SSD personnel. |
CIC Lockdown Buttons |
Red - 4 |
From Top To Bottom the buttons are:
As a Staff Officer you don't have access to use these buttons. |
 CIC Telephone |
Pink - 5 | Allows you to call and take calls from members of the crew across the ship and planetside. |

Crew Monitoring Console |
Green - 6 | Crew monitoring console. Used to view the health and location of certain crewmembers planetside and shipside. |
Other consoles
- Crew Monitoring Console. Checks the status of any member of the crew.
- Medical Records. Access marines' medical records, little actual use.
- Supply Ordering Console. Access and order supplies to be sent up from ARSR.
Security Level Alerts
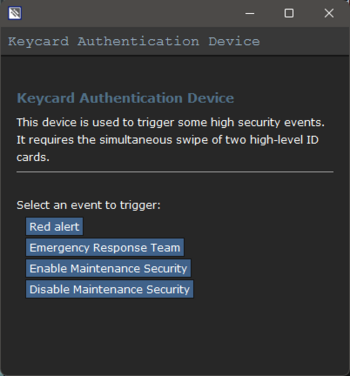
 Keycard Authentication Device - Allows changing the Security Level to Red. Allowing shipwide evacuation and self-destruct.
Identification consoles
Sometimes you will need to change the ID's of certain people, to do so you use the following terminals to complete this task:
- Squad Distribution Computer. You can use this to change someone's squad. For this to happen, you have to use "Grab" intent on the person you want to change the squad and click on the console. After that, you will be able to change his/her squad as long as the ID is input in the console.
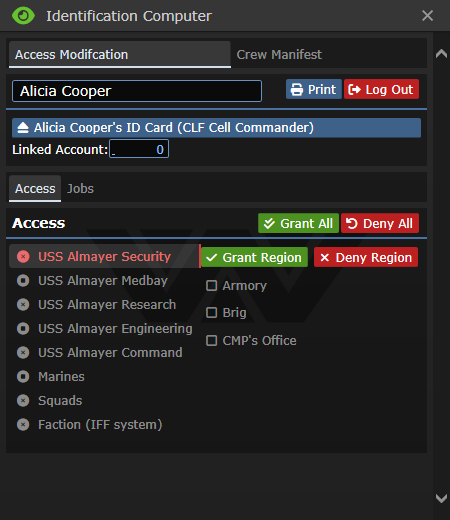
- Identification Computer. It is the Terminal for programming company employee's ID card access.
|
Abilities: Orders
Orders are a timed active ability that characters trained in leadership can activate. The duration of the ability is related to how high the characters leadership skill is, an example being that the Commanding Officer's order will last longer than a squad leads. The leadership skill also determines the intensification of the ability, the higher it is, the more intense the effects of the orders are on surrounding players. Note that these abilities do not stack and that the abilities cover your visual view range and no further.
| Orders: | Description: |
|---|---|
 Move! |
Increased mobility and chance to dodge projectiles. |
 Hold! |
Increased resistance to pain and combat wounds. |
 Focus! |
Increased gun accuracy and effective range. |
M540-B Armored Recon Carrier
| Armored Recon Carrier: | Description: |
|---|---|
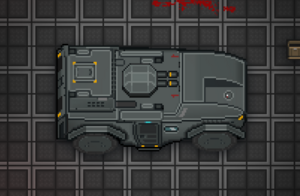 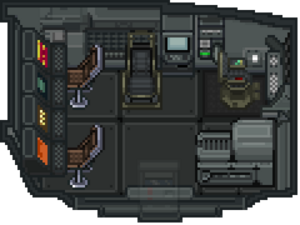 |
An M540-B Armored Recon Carrier (ARC). A lightly armored reconnaissance and intelligence vehicle. Entrances on the sides. Only SOs, XOs and COs can operate the ARC, although the SEA and Synthetic can drive it. Accessible by requisitioning it in the Tech Tree. EQUIPMENT
ABILITIES
HARDPOINTS
|
| Problem: | Repairing and Replacing: |
|---|---|
 Broken M540-B Armored Recon Carrier |
|
| Repairing the vehicle frame | Repair the frame with a welder and use a wrench. |
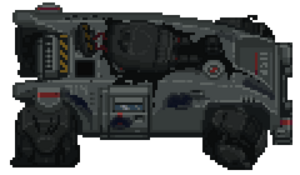
| Removing Modules from Hardpoints | Use a Crowbar to uninstall any modules from the their hardpoints. If fully broken (Entirely black), the hardpoint will be lost. The only spares that come along with the ARC are the Wheels. |
| Removing/Replacing the ARCs Turret | To replace the ARCs turret, you'll need a powerloader. Get in the powerloader and click on the ARC. Remove the turret and pickup the replacement turret. Click on the ARC once more with the turret in the powerloader's clamp. |
Rolling Encryption for Groundside Announcements
|
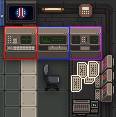
When the groundside comms relays are offline, squad and command announcements will become increasingly garbled over time. You can use the encryption computers to restore the announcement clarity; however, clarity once restored will still decay over time until the comms relays are brought back online.
|
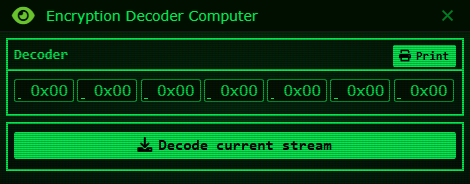 |
This generates a challenge token from the current encryption stream.
| |
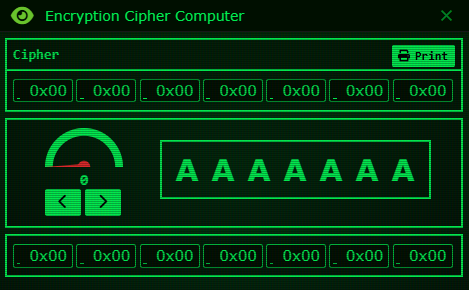 |
This decrypts codes using a cipher phrase to create an encoded challenge phrase.
| |
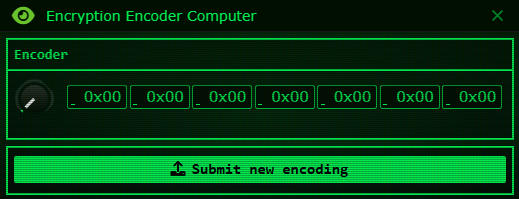 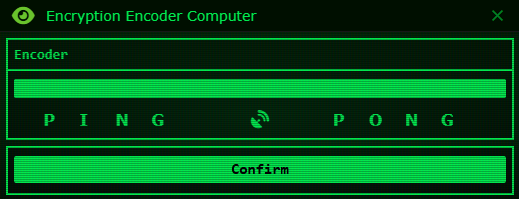 |
This uploads encoded phrases to restore announcement clarity.
| |
 |
|
Hex to Dec Converters
| As a Hexcode | As a Decimal |
|---|---|
| 0x00 | 0 |
| 0x01 | 1 |
| 0x02 | 2 |
| 0x03 | 3 |
| 0x04 | 4 |
| 0x05 | 5 |
| 0x06 | 6 |
| 0x07 | 7 |
| 0x08 | 8 |
| 0x09 | 9 |
| 0x0A | 10 |
| 0x0B | 11 |
| 0x0C | 12 |
| 0x0D | 13 |
| 0x0E | 14 |
| 0x0F | 15 |
| 0x10 | 16 |
| 0x11 | 17 |
| 0x12 | 18 |
| 0x13 | 19 |
| 0x14 | 20 |
| 0x15 | 21 |
| 0x16 | 22 |
| 0x17 | 23 |
| 0x18 | 24 |
| 0x19 | 25 |
| 0x1A | 26 |
| [h2]How to Convert a Hex to a Decimal[/h2]
[table][row][cell][b]Hex[cell][b]Decimal |
The Tech Tree
You can access the techtree by using the consoles in the Combat Information center - both are near the overwatch consoles.
| Tech: | Description: | Cost: |
|---|---|---|

|
Enables the first tier of the tech tree, usually is already unlocked at operation start. Tier 1 techs include: an increase in dropship fabricator points and an increase in the requisition budget. | Free (one time purchase) |

|
This tier 1 tech supplies 2500 points to the dropship fabricator. (For what they can fabricate with these points see the dropship fabricator list in the PO's page.) | 12 (+1 every purchase) |

|
This tier 1 tech supplies (roughly) 10,000 requisition points for every 30 marines as it varies depending on marine count during an operation. For what it can buy see supply crates buy list in the requisitions page. | 15 (+1 every purchase) |

|
Requisitions the M540-B Armored Recon Carrier. A lightly armored reconnaissance and intelligence vehicle. | 5 (one time purchase) |

|
Enables the second tier of the tech tree. The only tier 2 techs are for resupplying any and all OB warheads. | 5 (one time purchase) |

|
This tier 2 tech supplies the USS Almayer with an incendiary orbital cannon warhead. | 10 (+2 every purchase) |

|
This tier 2 tech supplies the USS Almayer with a cluster orbital cannon warhead. | 10 (+2 every purchase) |

|
This tier 2 tech supplies the USS Almayer with a high explosive orbital cannon warhead. | 10 (+2 every purchase) |

|
Enables the third tier of the tech tree. The only tier 3 techs are for awakening additional marines out of cryogenics. | 5 (one time purchase) |

|
Wakes up additional troops to fight any threat. Includes a squad leader, combat technicians, corpsmen, and riflemen, scaling off population and number of ghosts who said yes. | 10 (+5 per purchase) |
Your Skillset
|
| ||||||||||||||||||||||||||||||||||||||||||||||||||||||
|
| ||||||||||||||||||||||||||||||||||||||||||||||||||||||
|
|
To find out about how the skill system works head over to the skills system page.
Guides
- How To Overwatch by Abbysynth » 30 Jul 2015
- Rhi's Guide to SO by Rhicora » 30 May 2017
- The SO life.
- Guide to the Staff Officer: Your Eyes in the Sky by naut » 21 March 2020
- Updated guide to the Staff Officer: Your Eyes in the Sky by naut » 21 March 2023
- Decryption Guide by HungerJames » 25 November 2025

