Toggle menu
Toggle personal menu
Not logged in
Your IP address will be publicly visible if you make any edits.

User:Sargeantmuffinman: Difference between revisions

5,448 editsJoined 29 May 2015
Line 11: Line 11:


* Remove all the mutators from the alien page that isn't the key stones.
* Make a better Fire Mission guide. Done!
* <span style="text-decoration: line-through;">Make a better Fire Mission guide.</span> Done!
* Implement research paper work.
* Add the armaments and ammunition list to requisitions.

Revision as of 00:13, 21 February 2019

Who am I?

Hi, I'm Sargeantmuffinman, the current wiki maintainer that will add various things to areas of the wiki. I mainly work on the marine side of things and will do general grammar changes to here and there. If other more things are needed then I'll usually be the person for it.

This will also be a place for where I test wiki code.

To-Do List

  • Remove all the mutators from the alien page that isn't the key stones.
  • Make a better Fire Mission guide. Done!
  • Implement research paper work.
  • Add the armaments and ammunition list to requisitions.
  • Oversee the medic rework page.
  • Make more tea.
  • Look through the alien page and update it.

Proving grounds

The areas below are usually the place where I test and learn wiki code. Hopefully it might be useful to others if anyone actually reads this.


Section 1

Equipment: Cool down:
Rocket pod The rocket pod is a single shot weapon that can be placed anywhere on the gimbal. But due to it having only one rocket available in the rocket pod, you're going to need to reload it for every time you fire it.

An example of how this would be seen on a gimbal is presented like this: Fire.

Mini-Rocket Pod The Mini-Rocket Pod has the ability to fire multiple small explosive rockets at a target. But they are have a small cool down of two spaces.

An example of how this would be seen on a gimbal is presented like this: Fire, wait, wait, fire.

GAU-21 'Rattler' 30mm Cannon The GAU is an effective weapon that will be able to clear out a large areas as well as do sustained damage on a target. It has the smallest cool down (barring the rocket pod) which allows you to fire in quick succession against a target.

An example of how this would be seen on a gimbal is presented like this: Fire, wait, fire.

Laser Beam Gun The laser beam gun is the most effective weapon available to the dropship pilots. It is perfectly suitable for the use of fire missions as it will shoot a line of extremely damaging fire against the target. But this weapon has the longest cool down of them all. Having to wait 4 steps before you can fire again, this weapon has a trade off of being extremely powerful and having a long cool down.

An example of how this would be seen on a gimbal is presented like this: Fire, wait, wait, wait, wait, fire.

<xspan style="color:#HTML Colour here"> COLOURS

[x[The page where it is#The Subtitle of where it is|Words]x] Just without the Xs. Flamer Pack

Example link


Equipment: Description:
64.px
2X Flamethrower
This is the mighty weapon is used to burn through all that stands before it.
M41a.png

M41A Mk2 Pulse Rifle

This is the standard issue pulse rifle used by the Colonial Marines. A reliable, robust and overall effective standard issue weapon, the M41A must be held in two hands to accurately fire.


Ammunition:
M41Amag.png

M41A Magazine

Holds forty (40) 10x24mm rifle rounds.
M41Amag.png

M41A Extended Magazine

Holds sixty (60) 10x24mm rifle rounds. Holds more ammunition than the standard magazines.
M41A-AP-mag.png

M41A Armor Piercing Magazine

Holds forty (40) 10x24mm AP rifle rounds. Has better armor penetration, but lower overall damage.
M41A-Incen-mag.png

M41A Incendiary Magazine

Holds forty (40) 10x24mm Incendiary rifle rounds. Will set ablaze any and all targets hit with this round.
Equipment: Description:
64.px
M34A2 Longstreet light tank
A giant piece of armor with a big gun, you know what to do.
Name: Description:
SL.png
Testing Zone
A generic description would be here.


Contents:
Item goes here
Example heading: Description:
File:Image Goes Here.png

Name of Image goes here

Generic description goes here. This will extend the box so there's no need for extra spaces.
File:Image Goes Here.png

Name of Image goes here

Generic description goes here. This will extend the box so there's no need for extra spaces.
File:Image Goes Here.png

-

Generic description goes here. This will extend the box so there's no need for extra spaces.
Example Heading: Description:
File:Image Goes Here.png

Name of Image goes here

Generic description goes here. This will extend the box so there's no need for extra spaces.
File:Image Goes Here.png

Name of Image goes here

Generic description goes here. This will extend the box so there's no need for extra spaces.
File:Image Goes Here.png

Name of Image goes here

Generic description goes here. This will extend the box so there's no need for extra spaces.


Requisition's Armament and Ammunition Vendor

Armaments: Description:
USCM infantry backpack.png

Lightweight IMP backpack

The standard-issue backpack of the USCM. Designed to slug gear into the battlefield.

Has to be held in one hand to access items inside. Holds 7 normal size items.

Welderpack.png

USCM technician welderpack

A specialized backpack worn by USCM technicians. It carries a fuel tank for quick welder refueling and use. Has to be held in one hand to access items inside. Holds 5 normal size items and 260 units of welder fuel.
M276 Pattern Ammo Load Rig.png

M276 pattern ammo load rig

The M276 is the standard load-bearing equipment of the USCM. It consists of a modular belt with various clips. This version is the standard variant designed for bulk ammunition-carrying operations. This holds 5 various magazines or handfuls of shotgun shells.

It is the standard rig for most of the USCM combat personnel, excluding Engineers and Medics. It is one of the belt options of the ColMarTech Automated Closet.

Shotgun belt.png

Shotgun shell load rig

An ammunition belt designed to hold shotgun shells or individual bullets. This holds 10 handfuls of shells. It is one of the belt options of the ColMarTech Automated Closet.
Webbing.png

Webbing

Sturdy mess of synthcotton belts and buckles, ready to share your burden. Holds 3 normal sized items.

It is the standard webbing for most of the USCM support personnel. Standard Marines can acquire them through their ColMarTech Automated Closet. Can be issued out by Requisitions.

Brown webbing vest.png

Brown Webbing vest

Worn brownish synthcotton vest with lots of small pockets to unburden your hands. Holds 5 small sized items.

Can be ordered via crate in Requisitions, but not carried typically.

M276 pattern M4A3 holster rig.png

M276 pattern M4A3 holster rig

The M276 is the standard load-bearing equipment of the USCM. It consists of a modular belt with various clips. This version has a holster assembly that allows one to carry the M4A3 or the MK88 comfortably secure. It also contains side pouches that can store 9mm or .45 magazines.

It is one of the uncommon rigs inside USCM Vendors. It is also the standard rig for both Cargo Technicians, Staff Officers and Pilot Officers.

G18-Utility-Pouch.png

G8 general utility pouch

A small, lightweight pouch that can be clipped onto Armat Systems M3 Pattern armor to provide additional storage. Unfortunately, this pouch uses the same securing system as most Armat platform weaponry, and thus only one can be clipped to the M3 Pattern Armor's suit storage. It is one of the rarer pouches inside the ColMarTech automated armaments vendor in Requisitions. They can hold 3 items.
M276 pattern M44 holster rig.png

M276 pattern M44 holster rig

The M276 is the standard load-bearing equipment of the USCM. It consists of a modular belt with various clips. This version is for the M44 magnum revolver, along with three pouches for speedloaders. It faintly smells of hay.

It is one of the uncommon rigs inside USCM Cargo Vendors or Some Marine Prep Vendors, and is standard issue for the Requisitions Officer.

M276 pattern M39 holster rig.png

M276 pattern M39 holster rig

The M276 is the standard load-bearing equipment of the USCM. It consists of a modular belt with various clips. This version is designed for the M39 SMG and features a larger frame to support the gun. Due to its unorthodox design, it isn't a very common sight and is only specially issued.

It is one of the uncommon rigs inside USCM Cargo Vendors and can also be found in the standard marine prep, and some of the specialized squad role vendors..

Medium-gen-pouch.png

Medium general pouch

A general purpose pouch used to carry more small items and also magazines. Contains 2 slots. It is one of the pouch options of the ColMarTech Automated Closet and can be found inside the ColMarTech automated armaments vendor in Requisitions.
Const-pouch.png

Construction pouch

Designed to holster construction materials. Issued to Engineers, or found inside the ColMarTech automated armaments vendor in Requisitions.

Metal.png

Metal Sheets

Plasteel.png

Plasteel Sheets

Sandbag Empty.png

Empty Sandbags

Planks.png

Wooden Planks

Rods.png

Metal Rods

CableCoils.png

Cable Coil

Barbed Wire.png

Barbed Wire

Entrenching Tool Unfolded.png

Entrenching Tool

Document-pouch.png

Document pouch

A pouch used to hold documents for safe keeping. Can hold 7 items.
Tool Pouch.png

Tools Pouch

Designed to hold all your different types of tools. Issued to Engineers, or found inside the ColMarTech automated armaments vendor in Requisitions.

Screwdriver.png

Screwdriver

Welder.gif

Blowtorch

Crowbar.png

Crowbar

Wrench.png

Wrench

CableCoils.png

Cable Coil

Multitool.png

Multitool

Wirecutters.png

Wirecutters

Entrenching Tool Unfolded.png

Entrenching Tool

Explarge-pouch.png

Explosive pouch

Container designed to hold up to three grenades or other explosives. Issued to Engineers, or found inside the ColMarTech automated armaments vendor in Requisitions.
Syringe-pouch.png

Syringe pouch

Uncommon issue pouch, able to hold an array of syringes. Issued to Medics, or found inside the ColMarTech automated armaments vendor in Requisitions. Contains 6 slots.
Medic-pouch.png

Medical pouch

Large pouch able to hold a wide array of medical supplies. Issued to Medics, or found inside the ColMarTech automated armaments vendor in Requisitions.

Contains 4 slots.

Dexalin.png

Autoinjectors

Ointment.png

Ointment

Gauze.png

Gauze

Advtraumakit.pngAdvburnkit.png

Advanced Kits

Healthanalyzer.png

Health Analyzer

PillBottle.png

Pill Bottles

Hypospray.png

Hyposprays

Medkit-pouch.png

Medkit pouch

Special issue pouch, able to hold a medkit. Issued to Medics, or found inside the ColMarTech automated armaments vendor in Requisitions.
First-aid kit.png

Medkits

Medmag-pouch.png

Magazine pouch

Uncommon issue pouch that can hold two magazines and/or handfuls of shotgun shells. Issued to Medics and Engineers, or found inside the ColMarTech automated armaments vendor in Requisitions. Contains 2 slots.
Flare-pouch.png

Flare pouch

Can hold 5 flares (including activated flare). Refillable with a M94 Flare Pack. Useful for lighting the way for your comrades. It is one of the pouch options of the ColMarTech Automated Closet.
Aid-pouch.png

First-aid pouch

Standard issue field aid for all soldiers. Comes pre-loaded with basic medical supplies. Expended autoinjectors can be restocked at a NanoMed NanoMed.png on the Almayer and Dropships. It is one of the pouch options of the ColMarTech Automated Closet.
Pistol-pouch.png

Sidearm pouch

A holster to carry pistols, typically a standard issue M4A3 handgun, or 88M4 Pistol. It is one of the common pouches inside the ColMarTech automated armaments vendor in Requisitions.
Pistol-mag-pouch-large.png

Large pistol magazine pouch

Pouch able to hold 6 pistol magazines. It is one of the uncommon pouches inside the ColMarTech automated armaments vendor in Requisitions.
M4A3 Variants.gif

M4A3 service pistol

This is one of two handguns that the marines have stocked in their combat prep vendors. The M4A3 Service Pistol is a reliable fallback weapon that uses 9mm handgun ammunition in a 12 round magazine.

All Cargo Technicians start with one, including 3 Extended Magazines (One loaded) and a Hollowpoint Magazine.

To learn more about the weapon's attachments and ammunition click here

M4a3 45.png

M4A3 service pistol (.45)

One of the standard USCM service pistols chambered in .45 caliber. But only issued in small numbers and reserved for high military personnel. It functions similar to the standard-issue M4A3, but deals greater damage with a smaller magazine size of 7 rounds.

To learn more about the weapon's attachments and ammunition click here

44magnum.png

M44 combat revolver

Generic description goes here. This will extend the box so there's no need for extra spaces.
M39 Variants.gif

M39 sub machine gun

Generic description goes here. This will extend the box so there's no need for extra spaces.
M41A Variants.gif

M41A pulse rifle MK2

Generic description goes here. This will extend the box so there's no need for extra spaces.
M37 Variants.gif

M37A2 pump shotgun

Generic description goes here. This will extend the box so there's no need for extra spaces.
M20Claymore.png

M20 Claymore anti-personnel mine

The M20 Claymore is a directional proximity triggered anti-personnel mine designed by Armat Systems for use by the United States Colonial Marines. Used for killing or heavily wounding any would be trouble makers who dare attempt to invade your base.
M40 HEDP box.png

M40 HEDP grenade box

Contains 25 Grenades. A secure box holding 25 M40 High-Explosive Dual-Purpose grenades. Highly explosive, don't store near flamer fuel. Has a colored stripe indicating which type of grenade is in the box at a glance.

M40 HEFA box.png

M40 HEFA grenade box

Contains 25 Grenades. A secure box holding 25 M40 High-Explosive Fragmenting-Antipersonnel grenades. Highly explosive, don't store near flamer fuel. Has a colored stripe indicating which type of grenade is in the box at a glance.

Grenade.png

M15 fragmentation grenade

Explodes in a 5x5 blast radius with a large shrapnel range. An outdated USCM Fragmentation Grenade. With decades of service in the USCM, the old M15 Fragmentation Grenade is slowly being replaced with the slightly safer M40 HEDP. It is set to detonate in 4 seconds. Better radius than the M40 HEDP.
Incingrenade.png

M40 HIDP incendiary grenade

Exploding in a 5 tile diameter and a 3x3 tile square, incendiary grenades are a powerful area of denial weapon that can deal immense damage to a hostile target if it's caught in the fire. Difference with this grenade is that its effects linger for a while making it useful in keeping Xenomorphs back.
Smoke grenade.png

M40 HSDP smoke grenade

Standard issue USCM smoke grenade, does what it says on the tin. Primarily useful to deal with insurgents in colonies or potential hostile boarders.
M94FlarePack.png

M94 marking flare pack

A packet of five M94 Marking Flares. Carried by USCM soldiers to light dark areas that cannot be reached with the usual TNR Shoulder Lamp.
M89 Signal FlarePack.png

M89-S signal flare pack

A packet of five M89-S Signal Marking Flares. Used for signaling close air support dropships to strafe an area.
Flashlight.png

Combat flashlight

It's a flashlight, can be held, thrown or turned into a Rail Flashlight attachment.
Gasmask.png

Gas Mask

Gas masks are available in ColMarTech Automated Closets for all marines. It is useful for resisting gas-based weaponry and bombardment at the cost of vision. Also works alongside an oxygen tank to distribute oxygen in areas that are lacking in oxygen for proper breathing.
Kit.png

Mini JTAK Kit

Generic description goes here. This will extend the box so there's no need for extra spaces.
Ammunition: Description:
File:Image Goes Here.png

Name of Image goes here

Generic description goes here. This will extend the box so there's no need for extra spaces.
File:Image Goes Here.png

Name of Image goes here

Generic description goes here. This will extend the box so there's no need for extra spaces.
File:Image Goes Here.png

Name of Image goes here

Generic description goes here. This will extend the box so there's no need for extra spaces.
Surplus Uniforms: Description:
File:Image Goes Here.png

Name of Image goes here

Generic description goes here. This will extend the box so there's no need for extra spaces.
File:Image Goes Here.png

Name of Image goes here

Generic description goes here. This will extend the box so there's no need for extra spaces.
File:Image Goes Here.png

Name of Image goes here

Generic description goes here. This will extend the box so there's no need for extra spaces.


Fire Missions

Fire Missions are custom made air strikes designed to fire in one direction that cover a wide or narrow area. They allow the pilot to unleash a full arsenal of democracy on any would be trouble maker that dares try to harm your marines.


You have access to a special channel primarily dedicated to coordinating with the ground troops who are able to ask for airstrikes. These include the Scout Specialist, Squad Leader and any one who has the JTAC kit or encryption key. Use :j to talk in that channel.


CAS Menu 1.png

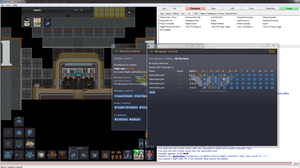
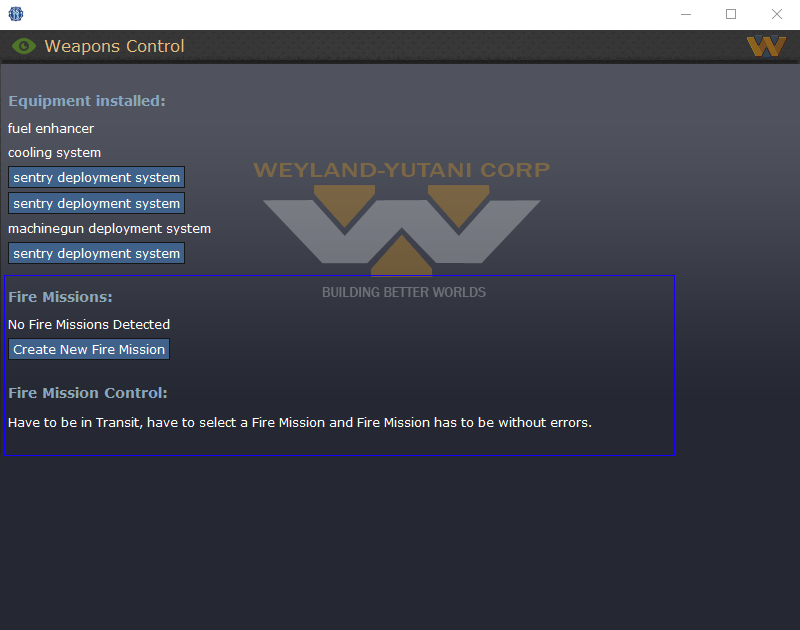
In this menu, there's a new subset of buttons and menus you need to utilize. Highlighted in blue is the new fire mission creator as well as the switch to the fire mission. It's where you'll create fire missions with the weapons you have installed on the dropship.


Once you have clicked on create new fire mission you will be prompted to name your fire mission and then how long the fire mission will be in tiles. 12 being the maximum and 1 being the bare minimum. The fire mission length determines how much fire power you're gonna dispense within those tiles. For example, having a fire mission length of 12 means you're gonna be firing what every you have for 12 tiles and firing at a length of 6 means you're gonna be shooting at things for 6 tiles. (Provided you actually setup your gimbal on those weapons, more on that in the next image).

Once you do so, click to edit the fire mission on this screen and you'll be faced with a whole new set of buttons.

CAS Menu 2.png

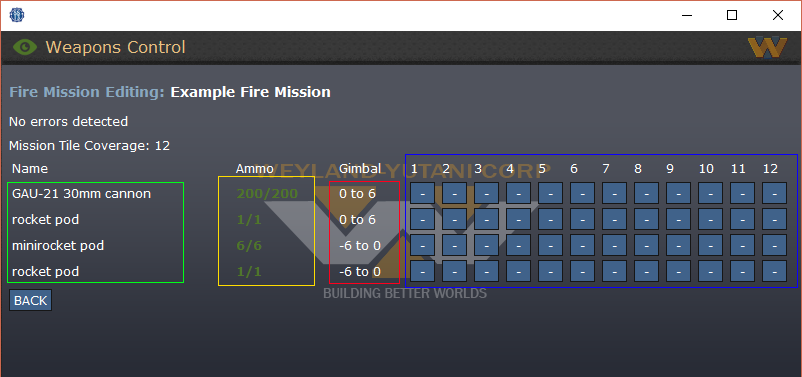
In this menu, you'll be greeted with the gimbal. This new system allows you to off set your weapons on a fire mission to shoot further away from the designated target. Zero being the center and -6/6 being the farthest away you can shoot. This is directly linked to how the weapons are installed. For example, in the green box above it shows which weapons are installed. The first two are installed on the right side of the dropship as the corresponding gimbals in the red box shows they can only fire from 0 to 6. Vice versa with the bottom two in the negative form. This means they're installed on the left side of the dropship.


Moving over to the actual gimbal highlighted in the blue box. This is where you'll setup your fire missions. Each row corresponds with the weapon on the left. Clicking on any of the boxes will prompt a small menu to open, allowing you to input the off set of the weapon. If you want to cancel where you're going to fire because of an error or you want to change it, simply put a hyphen ( - ) instead of a number to cancel it. An example of how to setup a fire mission would be something like this for the GAU: File:CAS GAU gimbal.png.


Be mindful of the ammunition you have remaining. In the fire mission editor, highlighted in the yellow box, it shows the ammunition you have left in each weapon. The color will change, indicating the how much ammo you have left for a fire mission. If the ammo counter is green, that means you have enough ammo for the fire mission. If it's orange, that means you only have enough ammunition for 1 fire mission. And lastly when it's red, that means you don't have enough ammo at all to go on a fire mission.

A fire mission can't be used if any of the weapons don't have enough ammunition for it. You mustn't have any errors in the fire mission for it to be usable.


It's important to keep in mind what weapons you have installed on the dropship as each weapon has a cool down on how fast you can fire it. Listed below will tell you the cool downs of each weapon available:

Equipment: Cool down:
Rocket pod The rocket pod is a single shot weapon that can be placed anywhere on the gimbal. But due to it having only one rocket available in the rocket pod, you're going to need to reload it for every time you fire it.

An example of how this would be seen on a gimbal is presented like this: Fire.

Mini-Rocket Pod The Mini-Rocket Pod has the ability to fire multiple small explosive rockets at a target. But they are have a small cool down of two spaces.

An example of how this would be seen on a gimbal is presented like this: Fire, wait, wait, fire.

GAU-21 'Rattler' 30mm Cannon The GAU is an effective weapon that will be able to clear out a large areas as well as do sustained damage on a target. It has the smallest cool down (barring the rocket pod) which allows you to fire in quick succession against a target.

An example of how this would be seen on a gimbal is presented like this: Fire, wait, fire.

Laser Beam Gun The laser beam gun is the most effective weapon available to the dropship pilots. It is perfectly suitable for the use of fire missions as it will shoot a line of extremely damaging fire against the target. But this weapon has the longest cool down of them all. Having to wait 3 steps before you can fire again, this weapon has a trade off of being extremely powerful and having a long cool down.

An example of how this would be seen on a gimbal is presented like this: Fire, wait, wait, wait, fire.

Once you've created your custom fire mission, move back to the start up menu and await for one of your ground work colleges to call in some air support. Make sure you're in flyby mode to be able to use those fire missions. Once you're in the skies above, there will be a new button available to you at the bottom of the menu. Clicking on it will send you to the weapons control menu.

CAS Menu 3.png

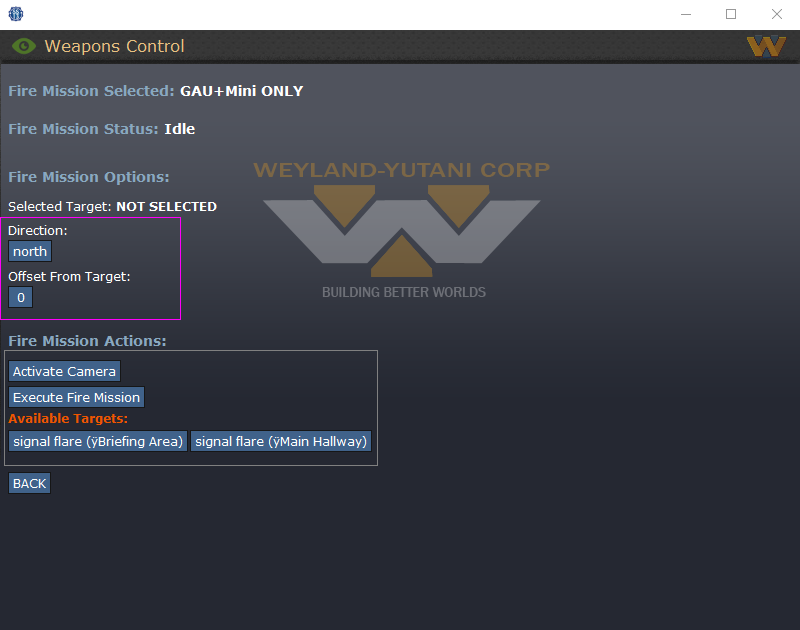
This brings up the buttons where you will see all the action and determined the off sets for the fire mission. In the grey box, the signals for where you can launch a fire mission from is displayed there. It's either from a signal flare or it's from a marine lazing an area to be strafed. Clicking on one of them will select it and you'll be able to Activate Camera on the signal flare. This allows you to see what is around the signal flare which will help you adjust your off sets to better lay waste to any hostile. Changing your off set will also place the camera to where the off set is. In the purple box this is where the fire mission will fire. From the off sets in the menu above, it will fire from the signal's point of origin to the north by however many tiles the fire mission allows. It's better to off set your fire mission by how ever many tiles needed. You can set a maximum of 12 tiles off set from the signal in the cardinal direction (North, East, South, West).


Once you're happy with your off sets and the fire mission you've selected, Execute your Fire Mission and Activate your Cameras to watch the dropship unleash FURY against anything standing in its way. After the fire mission is completed, you'll return to a sub-orbital route that'll allow you to commence another fire mission, provided you have the ammo and the time.


  1. Tile coverage is the number you gave while making the fire mission and represents the number of tiles you pass over from start to finish
  2. Every fire mission has 12 "steps" (represented by the columns numbered 1-12 that make up most of the screen) regardless of length that weapons can fire during.
  3. Each Step is 0.3 seconds long, so a fire mission lasts 4 seconds from first shot to completion.
  4. Weapons can fire during any step so long as they aren't on "cool down." For GAUs, this means one step between fire commands (fire-wait-fire), two for minis (fire-wait-wait-fire), three for lasers (fire-wait-wait-wait-fire) and zero for rocket pods (which can only fire one shot).
  5. Weapons have a gimbal. Ones mounted on the left can fire at an offset from -6 to 0 and ones on the right from 0 to 6, with zero being dead center on the tile you're flying over.
  6. To cancel a weapon from firing with the gimbal, simply replace the number with a hyphen. ( - )
  7. The number of steps you spend of a tile depends on the tile coverage. If it's 12, it's one step per tile. If it's two, it's six steps per tile. The way to figure this out is simply 12 divided by tile coverage (which is set when making the fire mission).
  8. Weapons can fire simultaneously or in succession. This makes multi-GAU runs powerful for staggered fire or parallel lines
  9. A fire mission cannot be launched if you don't have enough ammo in every weapon to complete it. If the ammo count is you can only use it once with your current ammo supply and if you don't have enough ammo for a run.


Once a fire mission is set up, it can be launched while in flyby mode. To do so, you select the fire mission and click "go to fire mission" at the bottom of the screen. After this you do the following:

  1. Select a flare or lase target.
  2. Activate Camera to view location or request offset information if the camera doesn't work
  3. Select a direction. You can only offset in one direction and you will travel in that direction once you start.
  4. Input an offset from 0 to 12. If you're viewing through the camera, it will recenter on the starting point of your fire mission.
  5. Confirm that the fire mission is a safe distance from Marines and will hit hostiles. Remember that many weapons have a large area of effect that can easily wound or kill Marines.
  6. Engage the Fire Mission. Once you do so, you have approximately five seconds to make final adjustments before the dropship is locked in.