More actions
SaltyGhost (talk | contribs) |
|||
| Line 418: | Line 418: | ||
|} | |} | ||
== | ==Attaching the parts and loading weapons== | ||
To attach modules onto your dropship, you will first need to know how to operate a cargo loader. To board this iconic piece of hardware, simply drag your sprite onto it. Now, only people who are trained in the powerloaders skill can board and operate a cargoloader. | To attach modules onto your dropship, you will first need to know how to operate a cargo loader. To board this iconic piece of hardware, simply drag your sprite onto it. Now, only people who are trained in the powerloaders skill can board and operate a cargoloader. | ||
Revision as of 18:34, 17 March 2021
"We're in the pipe, five by five." ― Cpl. Ferro, Aliens
The Pilot Officer, as the name indicates, pilots the ships of USS Almayer. They transport marines between the Almayer and the Landing Zones (LZ), protect and maintain their dropships, and provide Close Air Support (CAS) for those marines who want a fireworks show earlier than the 4th of July.
Overview
Congratulations Ensign! You finished your pilot training, got yourself a shiny commissioned rank, and have a badass ship to fly in the frontiers of space. Report to your fellow officers and command staff over the command channel (:v). Your Pilot's Bunks (near the CIC), and your Office (south of medbay), should have everything you need for the mission. If you're going somewhere cold, grab a coif!
The two dropships assigned to the piloting team at the hangar are the Alamo, which lands at LZ1, and the Normandy, which lands at LZ2. They can fly two different kinds of missions: Transport and Close Air Support. You can jump in the Powerloaders at the repair bay to install specialized equipment and ammo onto the dropships to support these missions, though usually it's better to yell over the engineering radio (:e) for the more skilled Ordnance Technicians to do it.
The essentials of piloting
The lions' share of your piloting is orchestrated in the exclusive cockpit of your AUD-25 Cheyenne dropship. Seating two, it offers three consoles with plenty of buttons for you and your co-pilot to push while the autopilot does all the work:
- The camera console on the left allows you to watch over the dropship's cameras as well as any extra sights provided by the installable LZ or laser detector electronics systems.
- The flight console in the middle lets you launch the dropship, toggle the flight mode between transport and flyby, and lock the shutters and doors. It also lets you optimize the flight path - only available to trained pilots like you - to cut down on transport and cooldown time at no cost.
- The weapons console at the right lets you fire your weapons systems in mid-flight towards laser designated targets that troops on the ground mark with tactical binoculars. It also lets you deploy your automated sentries when landed and allows you to medevac wounded marines using the medevac system.
So with that in mind, what are the differences between your two flight modes, transport and flyby? Well, in short, transport mode lets you move marines and supplies between the hangar and LZ, but sacrifices your ability to fire the bigger guns and respond to med-evac requests, while flyby mode lets you use the most deadly weaponry you can load as well as med-evac injured marines, but your dropship will only return to where it launched from. Note that after you have completed a flyby mission the dropships console will be reset to transport mode.
| Transport | Flyby ("Close Air Support and Med Evac") | |
|---|---|---|
| Where does the dropship go? | Moves you from A to B, or B to A. If you take off from the Almayer, you move to the LZ, and if you take off from the LZ, you move to the Almayer. | Moves you from A to A, or B to B. If you take off from the Almayer, you return to the Almayer. |
| Which weapons and utilities can the dropship use mid-air? | Only the GAU-21 and Laser beam gun. | All weapons and the med-evac system. |
| How long does the dropship stay in the air? | Depends on engine upgrades and whether the flight plan was optimized, to move men and supplies as fast as possible. | Also depends on the engine upgrade which extends your flight time by a good bit. |
Close Air Support
Direct Bombardment
Direct bombardment is using only one weapon at a time and firing at lazes and signal flares. To be able to do so, click on the weapon you want to use and you'll be brought into a new menu. This menu will highlight the ammunition as well as available targets. Simply click on the desired target and you will fire what you have loaded to the target. There is a delay between firing on the target and impact. Before impact, there will be a flashing green dot highlighting where the payload will land for a brief moment. Once it's gone, the payload will reach its target.
Once you've fired your payload, there will be a short cool down before you're able to fire again. All weapons can fire using direct bombardment and certain munitions can only be fired using direct bombardment.
Note: The GAU and Laser Beam are the only weapons you can use during transport missions. You must use direct bombardment to fire them at targets.
Fire Missions
Fire Missions are custom made air strikes designed to fire in one direction that cover a wide or narrow area. They allow the pilot to unleash a full arsenal of democracy on any would be trouble maker that dares try to harm your marines.
You have access to a special channel primarily dedicated to coordinating with the ground troops who are able to ask for airstrikes. These include the Scout Specialist, Squad Leader and any one who has the JTAC kit or encryption key. Use :j to talk in that channel.
Note: Fire missions can only be used on flyby.
Setup
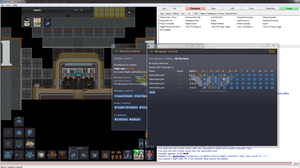
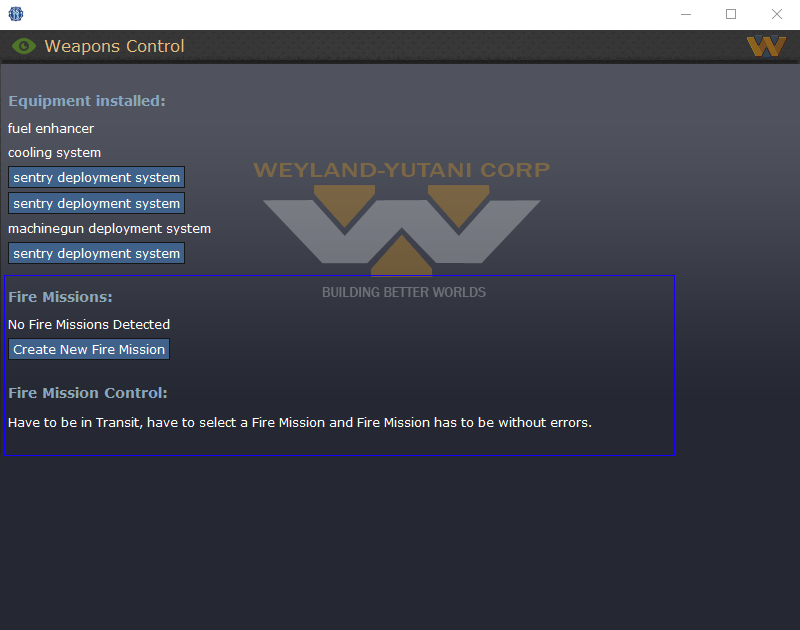
In this menu, there's a new subset of buttons and menus you need to utilize. Highlighted in blue is the new fire mission creator as well as the switch to the fire mission. It's where you'll create fire missions with the weapons you have installed on the dropship.
Once you have clicked on create new fire mission you will be prompted to name your fire mission and then how long the fire mission will be in tiles. 12 being the maximum and 1 being the bare minimum. The fire mission length determines how much fire power you're gonna dispense within those tiles.
For example, having a fire mission length of 12 means you're gonna be firing what ever you have in 12 tiles and firing at a length of 6 means you're gonna be shooting at things in 6 tiles. (Provided you actually setup your gimbal on those weapons, more on that in the next image).
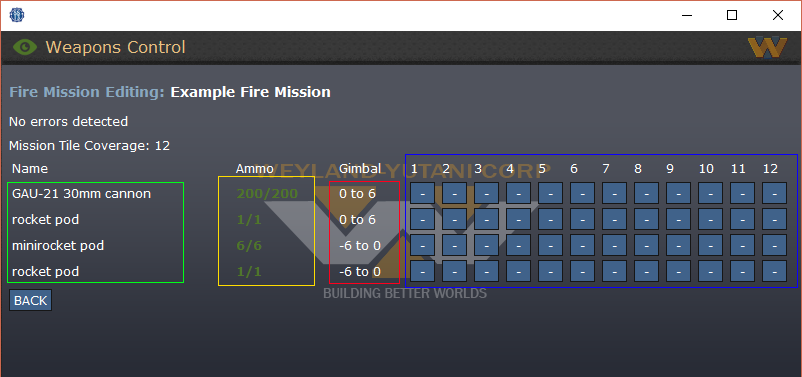
Once you do so, click to edit the fire mission on this screen and you'll be faced with a whole new set of buttons.
In this menu, you'll be greeted with the gimbal. This new system allows you to off set your weapons on a fire mission to shoot further away from the designated target. Zero being the center and -6/6 being the farthest away you can shoot. This is directly linked to how the weapons are installed. For example, in the green box above it shows which weapons are installed. The first two are installed on the right side of the dropship as the corresponding gimbals in the red box shows they can only fire from 0 to 6. Vice versa with the bottom two in the negative form. This means they're installed on the left side of the dropship.
The Gimbal
Moving over to the actual gimbal highlighted in the blue box. This is where you'll setup your fire missions. Each row corresponds with the weapon on the left. Clicking on any of the boxes will prompt a small menu to open, allowing you to input the off set of the weapon. If you want to cancel where you're going to fire because of an error or you want to change it, simply put a hyphen ( - ) instead of a number to cancel it.
An example of how a basic fire mission with a GAU, would follow like this:
![]()
The numbers on the image above shows the off sets for the GAU. The numbers shown in this image will offset the direction of the impact point. For example: The image above shows 6 - 4 - 3 - 1 - 0. This means if you are firing NORTH of your target, the impact point will be EAST 6 tiles away from the center. And the next one will be EAST 4 tiles away from the center etc. Zero will be directly on the target.
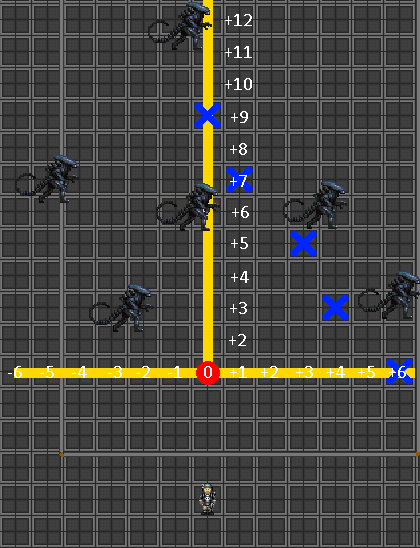
If for example the fire mission length is 12 and you're firing north without any additional offsets (more on that later).
How this would technically be visualized would follow like this:
The blue Xs indicate the impact points of where the fire mission will land in theory, giving a mass amount of BRRRRRTTT at the target. Each blue X corresponds with the example GAU fire mission. Using a negative number would flip the blue Xs onto the negative side.
Be mindful of the ammunition you have remaining. In the fire mission editor, highlighted in the yellow box, it shows the ammunition you have left in each weapon. The color will change, indicating the how much ammo you have left for a fire mission. If the ammo counter is green, that means you have enough ammo for the fire mission. If it's orange, that means you only have enough ammunition for 1 fire mission. And lastly when it's red, that means you don't have enough ammo at all to go on a fire mission.
A fire mission can't be used if any of the weapons don't have enough ammunition for it. You mustn't have any errors in the fire mission for it to be usable.
It's important to keep in mind what weapons you have installed on the dropship as each weapon has a cool down on how fast you can fire it. Listed below will tell you the cool downs of each weapon available:
| Equipment: | Cool down: |
|---|---|
| Rocket pod | The rocket pod is a single shot weapon that can be placed anywhere on the gimbal. But due to it having only one rocket available in the rocket pod, you're going to need to reload it for every time you fire it.
Fires only one rocket. An example of how this would be seen on a gimbal is presented like this: Fire. |
| Mini-Rocket Pod | The Mini-Rocket Pod has the ability to fire multiple small explosive rockets at a target. But they have a small cool down of two spaces.
Fires 1 mini-rocket, per step. An example of how this would be seen on a gimbal is presented like this: Fire, wait, wait, fire. |
| GAU-21 'Rattler' 30mm Cannon | The GAU is an effective weapon that will be able to clear out large areas as well as do plenty of damage on a target. It has the smallest cool down (barring the rocket pod) which allows you to fire in quick succession against a target.
Fires 20 rounds per step and 40 rounds with the high velocity rounds. An example of how this would be seen on a gimbal is presented like this: Fire, wait, fire. |
| Laser Beam Gun | The laser beam gun is the most effective weapon available to the dropship pilots. It is perfectly suitable for the use of fire missions as it will shoot a line of extremely damaging fire against the target. But this weapon has the longest cool down of them all. Having to wait 3 steps before you can fire again, this weapon has a trade off of being extremely powerful for having a long cool down.
Fires 10% of the battery's power per step. An example of how this would be seen on a gimbal is presented like this: Fire, wait, wait, wait, fire. |
Executing Fire Missions
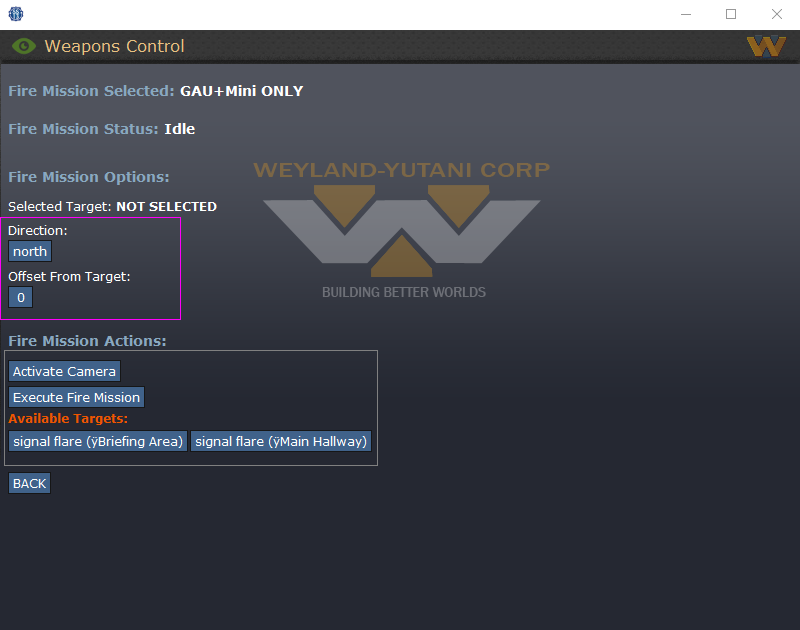
Once you've created your custom fire mission, move back to the start up menu and await for one of your ground work colleges to call in some air support. Make sure you're in flyby mode to be able to use those fire missions. Once you're in the skies above, there will be a new button available to you at the bottom of the menu. Clicking on it will send you to the weapons control menu.
This brings up the buttons where you will see all the action and determined the off sets for the fire mission. In the grey box, the signals for where you can launch a fire mission from is displayed there. It's either from a signal flare or it's from a marine lazing an area to be strafed. Clicking on one of them will select it and you'll be able to Activate Camera on the signal flare. This allows you to see what is around the signal flare which will help you adjust your off sets to better lay waste to any hostile. Changing your off set will also place the camera to where the off set is. In the purple box this is where the fire mission will fire. From the off sets in the menu above, it will fire from the signal's point of origin to the north by however many tiles the fire mission allows. It's better to off set your fire mission by how ever many tiles needed. You can set a maximum of 12 tiles off set from the signal in the cardinal direction (North, East, South, West).
NOTE: You are only able to see the signals with the camera in the open or under a glass ceiling. Your camera will be obstructed if it's under a metal ceiling or underground. If it's under a metal ceiling or underground, you'll still be able to execute the fire mission and see the damage you caused when the fire mission is under way. But if it's deep underground or under thick resin ceilings, you won't be able to see anything or fire at all, yet still be able to Execute it without firing a single shot.
Once you're happy with your off sets and the fire mission you've selected, Execute your Fire Mission and Activate your Cameras to watch the dropship unleash FURY against anything standing in its way. After the fire mission is completed, you'll return to a sub-orbital route that'll allow you to commence another fire mission, provided you have the ammo and the time.
Dropship Upgrades
The key way to customize your dropship is to slap new systems on it, such as weapons, electronics, or engine upgrades. Some of these systems are available in the repair bay at the north of the hangar, with ammo for the weapons to be printed from the dropship fabricator.
Simply climb into a powerloader (click-drag yourself onto it, or right click -> enter powerloader), pick up your desired attachment, and slap it into the appropriate port on your dropship. Before they can be fired, weapons need to be reloaded using their appropriate ammo (minirockets, 30mm, etc); just collect some with an empty clamp and stuff it into the weapons system. If there's already expended ammo inside, just take it out with an empty clamp. Finally for the engine upgrades, simple click on the engine attachment point with said upgrade and you'll install it easily.
Attachable Weapon and Utility Systems
If you want to pimp your ride, the USCM's got nothing but the best and most dangerous armaments.
Attachable Electronics
Want to improve the accuracy of your weapon systems? Or perhaps you'd rather install a couple spotlights to ensure no LZ goes un-lit, either way keep in mind you've only got 2 electronic slots when Detective Gadget'ing up your ship with these fancy gubbinz:
| Attachable Electronic System: | Description: |
|---|---|
 Spotlight |
A high-powered spotlight with a protective glass casing ensures you'll always have an illuminated landing zone, plus a bit extra. |
 Targeting System |
An advanced system that's much better at tracking laser-guided beacons than the standard equipment the drop-ships come with, essential for drop-ships planning on making accurate rocket strikes or a few GAU strafing runs. Not necessary for Fire Missions. |
 Laser Detector System |
Advance camera system that allows the operator to observe the target area of a painted laser target on the ground, can assist the operator to determine if a laser target is worth firing upon. Not necessary for Fire Mission.
Temporarily unavailable. |
 Landing Zone Detector System |
Camera system that lets a pilot observe all available landing zones via a long range camera. Can help the pilot assess the situation on the ground. Only works while in flight, not while docked. |
Attachable Engine Upgrades
Not getting enough thrust out of the standard engines? Tired of waiting so damn long for the suckers to cooldown before you can take-off again? Well here's a couple solutions to your problems. Using two of the same engine upgrades will not enhance your dropship. Two different engine upgrades will work however. (Double cooling systems or double fuel enhancers won't be more efficient, only one is counted for this purpose)
| Attachable Electronic System: | Description: |
|---|---|
 Cooling System |
A more efficient cooling system then the default one. Attach this in your engines and you'll see a huge decrease in engine cooldown times, ensuring you'll be ready to take-off at the drop of a hat, even if you just landed. |
 Fuel Enhancer |
Improves thrust produced by fuel combustion, decreasing the time it takes to get from Point A to Point B and provides that extra bit of maneuverability when avoiding hostile fire. Additionally on flyby, it extends the amount of time you have for undertaking fire missions as well as using the medevac system. |
Dropship Part Fabricator
The dropship part fabricator is the primary way for you to get better equipment than what you start with, or to replace ammunition that you've completely run out of. It works by a point system, with one point being earned every two seconds. Points can be spent on the below items if you have enough of them, and the part will usually print after a dozen seconds or more.
| Equipment | Cost in points | Amount of time required to generate that many points |
|---|---|---|
| Sentry deployment system | 500 | 17 minutes |
| Machinegun deployment system | 300 | 10 minutes |
| Fuel enhancer | 800 | 27 minutes |
| Cooling system | 800 | 27 minutes |
| Spotlight | 300 | 10 minutes |
| Targeting system | 800 | 27 minutes |
| Laser detector | 400 | 13 minutes |
| LZ detector | 400 | 13 minutes |
| GAU-21 30mm cannon | 400 | 13 minutes |
| Rocket pod | 600 | 20 minutes |
| Minirocket pod | 600 | 20 minutes |
| Laser beam gun | 500 | 17 minutes |
| Ammo | Cost in points | Amount of time required to generate that many points |
|---|---|---|
| High-Velocity 30mm ammo crate | 300 | 10 minutes |
| 30mm ammo crate | 150 | 5 minutes |
| High-Capacity laser battery | 100 | 3 minutes |
| AIM-224 'Widowmaker' | 300 | 10 minutes |
| AGM-227 'Banshee' | 300 | 10 minutes |
| GBU-67 'Keeper II' | 300 | 10 minutes |
| SM-17 'Fatty' | 450 | 15 minutes |
| XN-99 'Napalm' | 500 | 17 minutes |
| Incendiary mini rocket stack | 500 | 17 minutes |
| Mini rocket stack | 300 | 10 minutes |
Attaching the parts and loading weapons
To attach modules onto your dropship, you will first need to know how to operate a cargo loader. To board this iconic piece of hardware, simply drag your sprite onto it. Now, only people who are trained in the powerloaders skill can board and operate a cargoloader.
Notice how you have 2 clamps on that thing? That means you can hold 2 items at the same time without having to drop anything. To pick up a module, weapon or ammunition, simply click on it with an empty clamp and you will collect it with your loader.
- To install the module, click on one of the available slots on the dropship that corresponds to the module type with the module in your clamp to install it.
- To load ammunition into a module you need to click on the installed weapon with its corresponding ammunition type in the clamp to load it. To drop a module, simply click on an empty tile next to you.
- To remove a weapon from a slot, simply click on the weapon or the slot that it's in with an empty clamp.
Different Mounting Points
- Install Engine Attachments here: Fuel Enhancers and the Cooling System.
- Install Support equipment here: Med-Evac System and the Fulton Recovery System.
- Install Weapon Mounts here: Standard-Issue Rocket Pod, Standard-Issue Mini-Rocket Pod, GAU-21 'Rattler' 30mm Cannon, Laser Beam Gun, Sentry Deployment System, and the Machinegun Deployment System.
- Install Weapons on the OUTER fitting and Electronics on the INNER fitting. Same Weapons as on the other mounting point. The Electronics are: Spotlight, Targeting System, Laser Detector System, and the Landing Zone Detector System.
Communication
It's all well and good to know how your dropship works, but at the end of the day you're also an officer with a duty to plan, coordinate, and share information regarding your flights. The key to being a successful Pilot Officer is to use your downtime wisely to communicate with others on the various channels to ensure everything goes as smooth as possible. You can also listen to marine squads' channel by activating the headset then click "engage".
Command channel (:v)
As the PO, you'll want to reach out over the command channel to inform them of the status of your dropship, flights, and the LZ, as well as communicate with Squad Leaders lasing targets on the ground. The most effective fire missions are the ones that communicate clearly to determine the purpose of the mission, and use the appropriate payload.
JTAC channel (:j)
In case you choose to do CAS ( Close Air Support ) Instead of transport, you will be communicating more in this channel as Squad leaders and JTAC kit users will be calling you for fire support and you have to provide it to ensure the victory on the ground. They will laze targets for you and sometimes specifying which type of ammo they want to be dropped. You can also watch the effect of your fire support by watching the cameras in the weapons console. Ex: " Alpha lead here, Requesting CAS 6 west of my laze, Fire when ready ! "
Medical channel (:m)
If you have injured on your dropship, it's a good idea to inform doctors on the Almayer that injured are coming up. In the case your dropship gets invaded, you might have patients in critical condition who need to be attended to, in this case using the channel is a good idea to have medics come by and heal them.
Requisitions channel (:u)
Requisitions will often load crates onto the transport dropship, with you responsible for announcing that you have supplies to distribute once you've landed. For that reason, cooperating with the requisitions staff beforehand is a good idea.
Engineering channel (:e)
Should savages batter and beat your dropship, the engineering department will need to be informed so that they can make repairs. As well, it's a good idea to have them load your dropship with attachments in the first place, owing to their superior skill in the use of a powerloader.
Intelligence channel (:z)
Intelligence officers will often wish for you to retrieve the fultons that they have sent up. As they cannot carry it all at once. They will usually just say something along the lines of "Fulton up" over either the Intelligence or JTAC channel. When they say that, activate your fulton system and retrieve the items that they will have sent up.
Your Skillset
To find out about how the skill system works head over to the skills system page.
Tips
- Try to wait a bit for the marines to load up the wounded and late comers to load up in the shuttle before making a trip. Announce on the Squad's frequency when you've just arrived and are about to depart. You want to be efficient with your trips as much as possible.
- A special benefit to being a Pilot Officer is that you're allowed to boss around marines while they're on your shuttle. Don't tolerate rowdy and loud marines but be ready if they fight back. Follow proper escalation procedures. Remember, you out rank them and its your ship (and the USCM's ship and thus the Commanding Officer's ship).
- Leaving the dropship is not recommended unless you have just landed. Try not to stray too far from your craft. Retrieving marines is okay but if it leaves without you then you are in deep shit. You have a high chance of being 1. killed, 2. maimed, 3. captured, 4. killed again, 5. wounded. Although competent command staff will ask for you in the radio before manually piloting your craft.
- If there is damage to your craft, be sure to request for a Maint Tech or the Chief Engineer to come repair it, the next time you're on the Almayer.
- If you want to run CAS using direct bombardment while on trasport, consider not using the fuel efficiency module. More time in the air is good if you want to maximize your chances of being airborne when a CAS request comes through.
- You can combine partially used mini rocket racks/30mm ammo boxes together with the power loaders. Simply take one of them into one claw and click on the other one. It will either combine or transfer ammunition to the other one.
- You can install two medevac systems onto the same dropship to allow you to recover more wounded.
Guides
- CAS Weaponry, Loadouts, and You by Tisx on 22 Nov 2017
- Guide to being "Death From Above" -A PO CAS Guide by mizolo on 02 Nov 2017
- How to have great CAS by Roland410 on 11 Jul 2017
- What makes a good PO? by liltiptop on 22 Mar 2017
- Smashing that motherfucking lockdown button by Bronimin on 19 Apr 2018


