(→Sentry and M56D: Sentry Step fixes) |
|||
| Line 228: | Line 228: | ||
|[[File:Sandbag_Full.png]]||Sandbags||Sandbags||Used for making directional defences, multiple can be applied to a tile. Needs to be filled up with empty sandbags and an entrenching tool. 25 in a filled stack. Second most durable fortification. Can't be repaired. Can be dismantled with an entrenching tool. | |[[File:Sandbag_Full.png]]||Sandbags||Sandbags||Used for making directional defences, multiple can be applied to a tile. Needs to be filled up with empty sandbags and an entrenching tool. 25 in a filled stack. Second most durable fortification. Can't be repaired. Can be dismantled with an entrenching tool. | ||
|- | |- | ||
|[[File:Plasteel_barricade.png]]||Plasteel Barricade||Plasteel||Used to allow passage by closing it, and providing heavy protection | |[[File:Plasteel_barricade.png]]||Plasteel Barricade||Plasteel||Used to allow passage by closing it, and providing heavy protection. Most durable fortification. Can be repaired with a blowtorch if not overtly damaged. | ||
|- | |- | ||
|[[File:Barbed_Wire.png|32px]]||Barbed Wire||Metal||Used to make barricades and sandbags stronger, and making it so they can't be ran or climbed over. Also damages | |[[File:Barbed_Wire.png|32px]]||Barbed Wire||Metal||Used to make barricades and sandbags stronger, and making it so they can't be ran or climbed over. Also damages anything that attacks it. | ||
|- | |- | ||
|[[File:Wall.png]]||Wall||Metal|||Used to fully block off an area. | |[[File:Wall.png]]||Wall||Metal|||Used to fully block off an area. | ||
Revision as of 14:00, 21 February 2018
 |
Difficulty: Medium Supervisors: Squad Leader Rank: Not defined Duties: Set up defenses, babysit sentry guns, open doors and spam barbed wire. Guides: Construction, Guide to Engineering Unlock Requirements: Not available. Detailed Description: Not defined |__________| |
But the good news — we got four of these robot sentries with display and scanners intact. They really kick ass, I think they'll come in handy.
―Corporal Hicks, Aliens
As a Squad Engineer, you main goals will be fixing power, getting through doors, and setting up fortifications for a FOB (Forward Operating Base) that'll be used for defence and to secure a supply route. Without you, your platoon will have no power or a FOB which is critical for mission success.
You'll have two different playstyles you can experiment with. One, as a FOB building and Utility Engineer, who sets up defences and makes sure power is running. The second way to play Engineer is to be a Combat Engineer, breaching walls, hacking open doors, welding vents and repairing broken APC and lights as marines advance. Both are as good as the other, but too much of one is bad. Make sure there is an FOB that will be able to be defended, and if there is one, make sure marines will be able to effectively make it from building to building.
Equipment and Gear
Metal and Sandbags
At round start, there are 30 plasteel sheets, 100 metal sheets and 100 empty sandbags in the prep room. Plasteel is in short supply due to its high cost at Requisitions, it is advised to split the stack with your fellow Squad Engineers. You can do so by having the stack in one hand then click it with the empty hand, moves one sheet per click. Don't hoard loads of building supplies otherwise you might find fellow Squad Engineers unable to perform their jobs.
Sentry and M56D
You'll have to make a choice on what defensive equipment to vend. Keep in mind you can only pick one so it’s worth discussing with your fellow engineer (if you have one) for the one that best suits your needs. Vend the coin then insert the coin to unlock the equipment.
Your Gear
Get your gear from the Squad Engineer prep room. Most notable gear are:
 Welding Goggles are used to avoid eye damage when welding. Remember to flip them down before you start.
 Webbings can be found in your vendor to help carry additional items, apply the webbing to your jumpsuit. Holds 3 normal size items.
 The gloves in your locker are insulated gloves. If you lose them, get another pair from the vendor.
- For backpacks, you can choose from these two out of the vendor:
 Toolbelt, see the table below for details:
| Item: | Function |
|---|---|
Screwdriver |
Used for securing and unsecuring sentries, also used to open maintenance panels for hacking. |
Blowtorch |
Used for cutting through walls and fixing sentries. Has 20 units of fuel inside. Refillable with fuel tank, welder pack or welding tank (turn off before refilling). |
Crowbar |
Used for Opening unpowered doors and displacing girders so you can move them. |
Wrench |
Used for securing most objects to the ground including girders,vendors, also has another use to rotate sentries. Easily the most used tool in your arsenal. |
Cable coil |
Used for fixing robotics and diverting power to other areas. |
Multitool |
Used to hack doors/ vendors along with disabling mines. |
Wirecutter |
Used for cutting cable coil and barbed wire, and mending it. |
Vendor
| Item | Function | ||
|---|---|---|---|
M40 HIDP Incendiary Grenade (2x) |
Used for setting an area ablaze as area denial. | ||
C4 (4x) |
Used for exploding through walls or through people. Mostly used to blow into the CIC to mutiny. | ||
Minebox (1x) |
Used for exploding aliens who run over it. Mostly used for killing survivors and exploding dead aliens. Contains 4 mines.
| ||
Circuit Boards (10x) |
Used for fixing various things that need circuit boards, such as airlocks, APCs, and or air alarms. | ||
| File:Mesons.png Optical Mesons (2x) |
Used for seeing the layout through walls. | ||
Light Replacer (2x) |
Used to replace lightubes and light bulbs quickly. 50 uses, feed with glass to refill. | ||
Entrenching Tool (3x) |
Used for digging and filling up sandbags, as well as deconstructing them. Can be folded to fit in a backpack. | ||
High-Capacity Powercell (10x) |
Used for powering various devices that require power. 10,000W. |
In the field
Power and TComs
Upon the first deployment, you are likely to be tasked to either fixing the Power, fixing the Tcoms (APC) or FOB duty.
Overcoming obstacle
 Use crowbar to pry open powered down doors.
- Hack to power down/unbolt doors for crowbar to pry open.
 C4 down door/walls.
Lighting up the place
Fix the APC's and replace broken lights with the light replacer along the way as you advance.
Floodlight Repair
While you may have fixed the power for the colony, the xenomorphs will have most likely broken floodlights around the place which you'll need to fix. To fix a floodlight you'll want to use the following steps:
- Floodlight can be unwrenched and be moved around.
Wall and lights
You can construct a wall in the open and mount light fixtures on it, then use the light replacer to install the lightubes. By constructing these along
Securing flanks/supply route
It's crucial to secure the supply route from FOB to the front. Otherwise, reinforcements, Medics and wounded marines will be easy targets to be picked off and the front will risk being cut off and encircled. Since material supply is limited so you can't barricade all the way. Instead, you need to focus on the choke points like doorways, to secure as many sections you can with the little materials you have. You can save some materials by simply welding doors shut along the way. And once marines have learnt that Xenos use vents, you can weld the vents shut to deny their usage. You can also use vendors/cabinets as blockades to save more materials but they block bullets as well, resulting in a potential cover for aliens.
 Use blowtorch on the vents/doors. (
 Flip down before you start.)
 Use wrench to move vendors/cabinets/hydro trays as blockades (hydro trays don't block Runner).
Frontline FOB
Without a frontline FOB, Medics and the wounded will be harassed constantly and supply melted. And in the event of counterattack, marines will likely to be routed without a place to fall back to. Frontline FOB doesn't need to be big, often parts of the FOB will be left unguarded and melted. A good frontline FOB would need enough killing zone between the cade line to the nearest corners/covers Xeno can hide. Otherwise, they will keep hitting the cades yet you can't kill them.
Barricade as marines push
Boiler gas and Crusher charge are deadly in choke points and corridors, putting barricades between them and marines helps. Sandbags are particularly well suited for this job, as they can be built by marines and the build time is short. Metal barricades (with barbed wire) work too, though instead of standing in the front and build there, it's much safer to build it just behind the front then use ![]() and
and ![]() to move them to the front (use
to move them to the front (use ![]() and
and ![]() to secure them again). If you are out of Plasteel at this point, you can just build them in the middle of the corridor (e.g. middle 2 tiles out of 4 tiles), then the sides tiles in further one tile. This way, you can provide protection against gas and charge without hindering marines' push too much.
to secure them again). If you are out of Plasteel at this point, you can just build them in the middle of the corridor (e.g. middle 2 tiles out of 4 tiles), then the sides tiles in further one tile. This way, you can provide protection against gas and charge without hindering marines' push too much.
Robotic limbs repairing
Target the damaged limb and use:
FOB Duty
As an Engineer on FOB duty, you'll be setting up the base that the marines will primarily use to organize, resupply, to retreat to, and to make a final last stand at. To make a good FOB, you'll want to make strategic use of your landmines, the smartgun HMG or the sentry gun, and various defensive emplacements. A good FOB is the difference between losing the round and holding off long enough to make a push back and finally win the round.
Principles
You don't need a mega FOB
LZ/FOB will only see poking most of the round until siege happens because FOB is a hard target. Thus, Hunters/Runners are likely to focus on marine's unsecured sections of the supply route. Focusing your effort solely on FOB means using a large amount of material to counter a token force while ignoring the threat targeting the more vulnerable areas. Instead, you need to secure flanks/supply route too.
It is the weakest point that matters
It doesn't matter there are three layers of barricades in Nexus if the one layer metal barricades at LZ is breached, the wounded and the supply will be killed and melted. Even worse, Xeno can ignore Nexus entirely and focus on LZ then everything in Nexus will be wasted.
Use materials wisely
A high traffic corridor? A plasteel barricade with barbed wire. No traffic but a high threat (e.g. Crusher charge/constant poking)? Sandbags barricades with barbed wire. No traffic and just want to keep Runners out? Metal barricades with barbed wire. And try to save materials by
 Use blowtorch on the vents/doors. (
 Flip down before you start.)
 Use wrench to move vendors/cabinets/hydro trays as blockades (hydro trays don't block Runner).
- Then build barricades behind them if it's high treat and you can spare
Plasteel is expensive, 50 points for 30 plasteel (6 doors) vs 10 points for 50 metal (8 barricades with barbed wire). Yet plasteel is crucial to how many secure spaces you can create. If you are out of plasteel, you are force keep an opening in the cade line, thus compromising the effect of the barricade line.
Fortifications of the Trade
See Guide to construction for how to construct and deconstruct.
| Image | Name | Material Needed | Function |
|---|---|---|---|
 |
Wood Barricade | Wood | Used for a hasty defence against aliens. Mostly seen prespawned. |
 |
Metal Barricade | Metal | Used for constructing auxiliary fortifications. Third most durable fortification. Can be repaired with a blowtorch if not overtly damaged. |
 |
Sandbags | Sandbags | Used for making directional defences, multiple can be applied to a tile. Needs to be filled up with empty sandbags and an entrenching tool. 25 in a filled stack. Second most durable fortification. Can't be repaired. Can be dismantled with an entrenching tool. |
 |
Plasteel Barricade | Plasteel | Used to allow passage by closing it, and providing heavy protection. Most durable fortification. Can be repaired with a blowtorch if not overtly damaged. |
| Barbed Wire | Metal | Used to make barricades and sandbags stronger, and making it so they can't be ran or climbed over. Also damages anything that attacks it. | |
 |
Wall | Metal | Used to fully block off an area. |
FOB Construction Quick Tips
Barricade Placement
| Barricade Placement | Description |
|---|---|
|
This is an example of what not to do when constructing a defensive position. In the picture on the left you'll see that the xenomorphs are able to hit the barricade without being shot due to it's forward position and as such the xeno will be able to break through and kill that marine with ease. | |
|
This is an example of what you should do when constructing a defensive position. To rectify the above barricade placement errors you'll want to move the barricades back one tile like the photo on the left. By moving the barricades back this will allow you to shoot xenomorphs who are attacking them. |
Barbed Wire
![]() Barbed wire is a string of sharp metal that will harm and prevent xenos from pouncing over barricades once attached. It also gives a small health boost to the barricade itself.
Barbed wire is a string of sharp metal that will harm and prevent xenos from pouncing over barricades once attached. It also gives a small health boost to the barricade itself.
| Barbed Wire Tactics | Description |
|---|---|
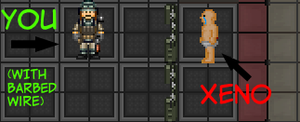
| In the picture you'll see that the engineer was killed due to the xeno being able to pounce over the barricade. | |
|
Due to the engineer placing barbed wire onto the barricades the xenomorph was unable to jump over. |
FOB Space
| How To: Fob Space | Description |
|---|---|
|
This is an example of what not to do when constructing a defensive position. In the picture you'll see that the FOB has very little space for the marines to move around in which will lead to:
| |
|
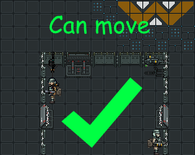
This is an example of what you should do when constructing a defensive position. In the picture you'll see that the FOB has ample space to move which means:
|
Fixing Breaches in Defences
| Fixing Defensive Breaches | Description |
|---|---|
|
This is an example of what not to do when attempting to fix a breach in the defensive line with hostiles nearby. In the picture you'll see that this is a highly dangerous and ineffective way to fix the breach in a defensive line if hostiles are nearby. This will let you get slashed up by an alien running up willy nilly, and will give you less time to react if multiple xenos decide to push the defensive line. | |
|
This is an example of what to do when attempting to fix a breach in the defensive line with hostiles nearby. In the picture you'll see that it shows the optimal way of repairing a breach in your defences if xenos are nearby.
|
Misc. FOB tips
| Fob Tips | Description |
|---|---|
|
In the picture you'll see that it demostrates that windows, even if reinforced, are not an acceptable replacement for a line of all-american steel barricades.
In summary, avoid using them as a defence. | |
|
Barricades will end up damaged due to the ravages of war and incompetence, and if it isn't horribly damaged, you'll be able to use a blowtorch on it to repair it. This works on metal and plasteel barricades.Note that if a barricade is too damaged you will be unable to fix it.
|
Your Skillset
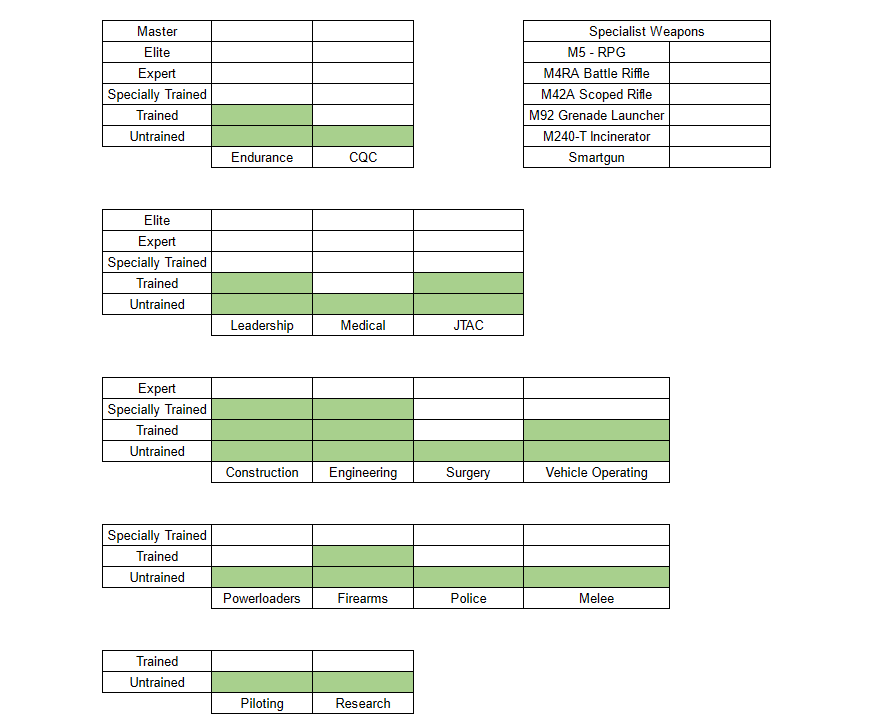
To find out about how the skill system works head over to the skills system page.
Tips
- Don't hoard loads of building supplies otherwise you might find fellow Squad Engineers unable to perform their jobs.
Guides
[WIP] Useful FOB engineering 101 by Challenger on 22 Jul 2017


