User:TopHatPenguin

5,225 editsJoined 1 June 2015

Previous wiki username: Mr. Penguin

CM-SS13 Wiki Maintainer from 2017-2019


http://cm-ss13.com/wiki/Later_Wiki_Project (Previous Maps Page)

map descriptions need updating/adding


CM-SS13 - Wiki Statistics
Number of Wiki pages 4,553
Total Page Edits 25,358
Number of Files 2,900
Number of Users 717
Number of Active Users 13
Number of Administrators 19


Server History

Human vs Xenos | CM Timeline

Date: Events of Significance:
2013, Jun 29
  • StrayKitty becomes the host of Kittyshack.

Server Name: Kittyshack


The founder of the infestation game mode, their server being the first to host a purely human vs xenos faction deathmatch without traitors, antag paranoia, or the classic elements of vanilla SS13.

Linear Server Progression from here onwards:
2013, Circa
  • Virgili555 becomes the host of Infestation Station.

Server Name: Infestation Station

2013, Nov 27
  • CaptainEnglish becomes the host of Infestation Station.

Server Name Changes to: Colonial Marines

2014, Circa
  • Hammer becomes the host of Colonial Marines.
2014, April/May
  • Smokebuds becomes the host of Colonial Marines.

Server Name Changes back to: Infestation Station

2014, Circa
  • Sgt Marine becomes the host of Infestation Station.
Pre-Alpha Era of CM begins:
2014, Sept 27
  • Infestation Station joins with New Eden, Jaggerstep takes over as host.

Server Name Changes to: New Eden Colonial Marines

2014, Nov 18 Sulaco V1 Released
2015, Feb 2: Jaggerstep resigns as host and Verbose Lucidity/Dre9889 becomes the new host for New Eden and Colonial Marines.
2015, April 20: Colonial Marines splits from New Eden Station: Apophis775 becomes the host, Rahlzel becoming Co-Host.

Server Name Changes to: Colonial Marines

2015, Jun 22: M56 Smartgun released as a specialist weapon choice

Planet LV-624 Released (Tested on/off from Feb)


Nostromo taken out of circulation.

2015, July 14: Requisitions Officer, MRE's and Attachments added. Archive
2015, July 19: Predator Whitelist opens.
Alpha Era of CM begins:
2015, July 30:
  • The USS Sulaco receives a major overhaul: Sulaco V2 Released
2015, Oct 24: Haunted House Released for "Nightmare Before Colonialween".
2015, Nov 8: Haunted House taken out of circulation and the Nightmare Before Colonialween event ends.
2015, Nov 14: Prison V1 Released
2016, May 6: Ice Colony Released
2016, May 28: V1 Whiskey Outpost (WO) Released
2016, Jun 27: Gun overhaul: chambering a round, gun jamming etc.
2016, Dec 11: Commander Whitelist opens.
2017, Jan 8: V2 Whiskey Outpost (WO) Released
2017, Jan 22: Clonning Removed
Omega Era of CM begins:
2017, April 24:
  • USS Almayer Map released.
  • Perspective sprite overhaul.
  • Solaris Ridge (Big Red) Map released.
2017, Aug 17: Synthetic Whitelist opens.
2017, Nov 21: Prison Station V2 Released
2018, May 21: Atmos removed
2018, Jun 10: Apophis775 retires as Host.
2018, Jun 11: Rahlzel becomes the Host.

Server Name Changes to: CM-SS13 to appease Fox

2018, Jul 28: Rahlzel retires as Host. NGGJamie becomes the Host, Slc97 becoming Co-Host.
2018, Nov 9: V3 Whiskey Outpost (WO) Released.
2019, Jan 12: Slc97 retires as Co-Host.
2019, Jan 14: DEFCON core gameplay system added.
2019, Mar 18: Trijent Dam released.
2019, Nov 20: Sorokyne Strata released.
2020, Jan 1: CORSAT released.
2020, Jun 29: Sorokyne Strata temporarily taken out of rotation due to lag issues.
2020, Aug 17: Sorokyne Strata put back in rotation.
2020, Aug 20: Ice colony V2 taken out of rotation, pending rework.
2020, Sept 23: Kutjevo Refinery released.
2021, Feb 8: Prison V3 (Fiorina Science Annex) released.
2021, Mar 9: DEFCON core gameplay system removed, Techwebs core gameplay system added.
2021, Mar 29: CORSAT, Sorokyne Strata, and Prison V2 (Fiorina Cellblocks) taken out of rotation.
2021, Jun 26: Ice Colony v3 (Shiva's Snowball) released.
2021, Aug 30: Techwebs core gameplay system disabled.
2022, May 4: Sorokyne Strata re-added to rotation.
2022, Aug 1: IO job re-added, DEFCON v2 core gameplay system added.
2022, Oct 19: NGGJamie retires as Host. ThesoldierLLJK becomes the Host.
Tabula Rasa Era of CM begins:
2022, Oct 20: New Varadero is added for play testing.
2022, Nov 16: Chance's Claim released.
2022, Nov 27: New Varadero formally released.
2022, Dec 6: ThesoldierLLJK retires as Host. Frozentsbgg becomes the Host. The Co-Host rank is reinstated with Forest2001 being given the position.

Historical Occasions of Note

Population Booms

The increased notoriety on video sharing platforms such as youtube has led to population booms for SS13 and in turn CM-SS13. Below is a list of all the population booms that have affected CM-SS13.


Date: Population Booms of Significance:
2019, Mar 17

Seth-Population-Boom2.png Seth-Population-Boom.png


The high player influx on this scale for CM-SS13 required new discord channels to be made to help deal with all the newer players and their various questions.


342 players now sits as CM-SS13's highest player count.

April Fools

Year: April Fools Events:
2016 For the 2016 april fools event the server was changed to use Pre-Alpha code, which led to a lot of confusion from the more recent players and a barrel of nostalgia from the older veteran players.
2017 2017 was an interesting one as it wasn't a Pre-Alpha code revert but it did reintroduce some of the Pre-Alpha maps with a watery theme instead of space. Sulaco V1 was made out of wood and called the USS Iowa the infestation map was the nostromo with a watery theme (space was replaced with water tiles, which if moved into would kill you, as such many a marine was lost to drowning at sea.) icly it was described as an infested oil rig.
2018 2018, 24 hours of Xenos vs Marines basketball and space jam. For your viewing pleasure below are a list of recorded rounds:
2019 Admins released a virus that was updated from the zombie virus code to give player characters ears. All the playable maps were randomly rotated for each round, to add to the horror.
2020 The game was reverted to an older branch of omega. The March 2019 branch was used for the April fools day event.
2021 The Sulaco was updated and used for this years April Fools event with new sprites and modifications to the existing Sulaco to add in the additional features the Almayer has. The two things that stayed the same was the old Rasputin dropship and vindicator drop pod. The Sulaco did not include any deployable vehicles such as the tank or APC.
2022 The Almayer map was rolled back to an older version from September 2020.
2023 To be added
2024 A remade version of Prison station V1, also known as prison classic was used on the 31st of March onto april fools. Supplementary to this was the CM Battlepass that was released within the same timeframe, whch had players earning rewards through winning/losing rounds and completing personal challenges. April-Fools-Battlepass.png

Maps

Marine Ships

Sulaco.png

Date of Circulation: October 30th, 2014 - July 30th, 2015

Era of Creation: Early Pre-Alpha

Sulaco V1, or simply known as the NMV Sulaco at the time was the first Marine ship map used on Colonial Marines before being phased out in favour of its successor, Sulaco V2, due to an ever expanding population in July 2015. It has since been retired and only makes occasional appearances for April fools with a better design, which is known as the USS Iowa.

Sulaco top.png
Sulaco bottom.png

Date of Circulation: July 30th, 2015 - April 24th, 2017

Era of Creation: Early Alpha

Sulaco V2, or known as the USS Sulaco at the time was the revamped version of the Sulaco V1 and was the second marine ship and also first map to use multiple z-levels to simulate different levels of the map as well as two different transportation methods, in this case decks of a ship and the usage of Droppod and Dropship respectively. Uniquely it has been the only map to use a |supermatter for power generation. It was later phased out in favour of its successor, the USS Almayer, due to an ever-expanding population in April 2017. It has since been retired and has not made an appearance since.


Supermatter Basic Setup

Good news, everyone! The SM engine is mostly set up already and ready to provide power the USS Sulaco. There are just a few additional steps you should undertake before flipping that Emitter on. But first, put on a handy pair of Optical Meson Scanners and put on a Radiation Suit and Radiation Hood. Remember, the SM (white) will ruin your eyes if you look at it without Mesons and you will receive radiation damage without the suit simply from being too close to an active supermatter core.

The SM Engine Area

SMEngineNov2015.png


1. Ensure cooling loop is functional

Check on the computer (blue) and refresh until it shows that the SM chamber is 'Injecting' coolant at a rate of 700 L/s. The output pressure should then be toggled to 'Open'. Make sure that the input is maximized and open because otherwise the coolant loop will not function properly.

2. Prep the radiation collectors

The radiation collectors (magenta) are what powers the Sulaco once the SM is active. First go to the phoron tanks (in orange) and fill them to the maximum 1013 kPa capacity using the phoron canister; (orange) To do this first grab a phoron tank in hand then click the phoron canister, (orange) the phoron tank should then be inserted into the canister (you will know if it is inside because a black mark will appear on the side of the canister if it is) after that set the kPa to 1013, then open the release valve, when the tank is full close the release valve and eject the phoron tank. Open the blast doors to the collector and put one full phoron tank into each collector. Make sure click on all eight of the collectors to activate them.

3. Turn on the Engine Room SMES

Turn both the input and output of the SMES (yellow) to maximum and set the input to Auto.

4. Fire the emitter

Open the blast door to the SM chamber using the handy toggle. Fire the emitter (red) 10 times. Emitters fire four shots before a longer pause so count carefully; the audio cue helps here. Turn the emitter off and close the blast door.

5. Maintain an eye on the SM

Use the engine chamber console (blue) to check that the temperature and pressure remain stable. A good safe goal to shoot for is a core temperature of under 500K. After you have done these steps the temperature and pressure should stabilize, which then tells you that you are all safe to walk away, do remember to check up on the SM every once in a while though to see if the temperature/pressure is dropping or rising.

On a side note this SM Engine setup will last you 6 hours and more. - [Tested And Proved]


Uss Almayer V1.png

Date of Circulation: April 24th, 2017 - September 16th, 2018

Era of Creation: Early Omega

Map Changes Over This Time Period:


The USS Almayer is the latest marine ship to be released on Colonial Marines and is by far the largest due to the population growth that the server has witnessed in recent years. The USS Almayer was the first map and marine ship to fully incorporate perspective sprites for the entirety of the map.

USS Almayer V2.png

Date of Circulation: September 16th, 2018 - Current

Era of Creation: Early Omega

The USS Almayer V2 doesn't change all too much besides enlarging the ships length and width due to the increased amount of players actively playing the server.

Infestation Maps

Nostromo.png

Date of Circulation: October 30th, 2014 - June 10th, 2015

Era of Creation: Early Pre-Alpha

Nostromo, aka (CM) boxstation was the sole infestation map used on Colonial Marines before being phased out in favour of its successor, LV-624, due to an ever expanding population in June 2015. It has since been retired and only makes occasional appearances for April Fools, which is known as Waterworld.

link=http://cm-ss13.com/wiki/images/6/6f/LV624.png LV-624

Date of Circulation: June 10th, 2015 - Current

Era of Creation: Late Pre-Alpha

Map creator : Absynth

LV-624 was the successor map to the Nostromo and was additionally the first ground map to be introduced into Colonial Marines. The map itself was created by Abbysynth and then tweaked later by other developers to keep the map fresh and balanced. It was one of the first maps to introduce a method to prevent early game rushing from both sides, which is the thick fog on the map. It was also the first map to incorporate "nightmare mode", where parts of the map change between games. It is the most beloved map by the community, and has been in the game for the longest period of time. It is also the default map for the server.

Haunted house.png

Date of Circulation: October 24th, 2015 - November 8th, 2015

Era of Creation: Early Alpha

The haunted house map is the only map to offer the experience of fighting hostile monsters upon deployment and a cave system which you can use ladders to go down into you can take the cave pathway. An updated version was remade for Halloween 2021.

Date of Circulation: May 6, 2016 - Oct, 2017 (Roughly)

Old Ice Colony.png

Era of Creation: Alpha

Map creator : Infernus

Ice Colony otherwise known as "Shiva's Snowball" was an additional infestation map which contained unique snow mechanics (Slowing of mobs when walking through snow, and the construction of snow barricades).

Ice Colony v2.png

Date of Circulation: Jan 8 2017 - Aug 20 2020

Era of Creation: Alpha

Ice colony V2 was the second snow map, and incorporated two z-levels which could be travelled between with ladders and lifts/elevators.

Map icecolony.png

Date of Circulation: June 26th 2021 - Current

Era of Creation: Omega

Map creator : Triiodine Ice colony V3, or "Shiva's Snowball" is the spiritual successor to Ice V2. It is a smaller map, and uses only one Z-level, but retains the aesthetics of the prior version.

Underground

V1 Big Red Underground.png

Over Ground:

V1 Big Red Ground Map.png


Date of Circulation: October 9th 2016 - Januray 16th 2017

Era of Creation: Alpha

Big Red V1 was a unique design and a massive map with the unique requirement that outside of the colony outpost buildings you were required to have a filtration system on you (aka a breath mask and an oxygen tank) otherwise you'd die. Though that unique feature didn't last too long as it caused a lot of imbalance so it was removed but as the map was played more it became apparent that there were a few atmos issues, especially with pressure. The large open areas of the map also caused the rounds to drag on for a long while. With all that said, the atmosphere of the map itself with tight underground maint tunnels and closely knit hallways was tense at times which made for great rounds.


Map Trivia: There were some original static barricades (the one's marines can build currently) on the map that survivors sometimes used. Do keep in mind they couldn't be built just yet.

Big Red.png

Date of Circulation: April 24th, 2017 - Current

Era of Creation: Early Omega

Big Red V2, otherwise known as "Solaris Ridge" was an entire overhaul of the V1 map, which doesn't share much within common with its predecessor. Though with that said it did share similarities to the Nostromo's Research lab and V2 big reds research lab, along with various other buildings that have a Nostromo to Big red V2 parallel: Bar, Dorms, medbay, engineering, and the cafeteria. The Lambda research section of the map was lifted from big red v1.

Prison V1.png

Date of Circulation: November 14th, 2015 - April 22nd, 2016 (Roughly)

Era of Creation: Early Alpha


Prison Station, also known as Florina Orbital Penetrary takes the players back to the old ways with it's concept being a 'station' in space similar to Nostromo with long hallways and small rooms for both teams to fight over. Prison Station is also the only map to contain a hostile section not controlled by either team.

Map Prison.png

Date of Circulation: November 21st, 2017 - March 29th 2021

Era of Creation: Early Omega


Prison Station, also known as Florina Orbital Penetrary takes the players back to the old ways with it's concept being a 'station' in space similar to Nostromo with long hallways and small rooms for both teams to fight over. It was notably an altered copy of a prison architect map, "harbourside prison", https://steamcommunity.com/sharedfiles/filedetails/?id=524359537 Prison Station is also the only map to contain a hostile section not controlled by either team - this being the crashed shuttle in the south section of the map.


Developers who contributed to the map:
  • Spriting: Gorglol
  • Original Map Creator: Ravingmaniac
  • Additional Map editors: TBD
Prison Station Science Annex.png

Date of Circulation: February 8th 2021 - Current

Era of Creation: Omega

Map creator : Triiodine

Trijent Dam.png

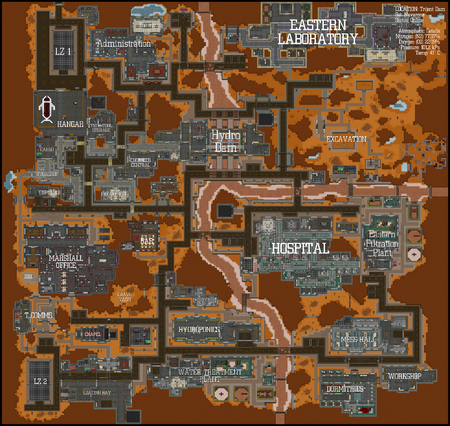
Date of First Public Test: December 12th, 2018

Date of Circulation: March 18th 2019 - Current

Era of Creation: Mid Omega


Desert Dam, also known as Trijent Dam is one of CM-SS13's largest maps ever used (More than 4 times the size of big red) so far. It introduces the new mechanic of water filtration; this mechanic smoothly filters the toxic water into clean water which can change the flow of a round entirely.


Developers who contributed to the map:
  • Spriting: Nicboone | Ribbonflex
  • Original Map Creator: Ribbonflex
  • Additional Map editors: Ravingmaniac | Awan | Cakey
  • Coding: Spookydonut | Ravingmaniac (water filtration) | Chowder

File to be fetched Date of Circulation: Jan 1 2020 - March 29th 2021

Era of Creation: Omega

Map creator : TobiNerd

File to be fetched Date of Circulation: November 20th 2019 - March 29th 2021, May 4th 2022 - Current

Era of Creation: Omega

Map creator : Triiodine


Map trivia : Despite work and testing on Sorokyne being started after CORSAT, it was released before it.

File to be fetched Date of Circulation: September 23rd 2020 - Current

Era of Creation: Omega

Map creator : Triiodine

File to be fetched Date of Circulation: Nov 16 2022 - Current

Era of Creation: Tabula Rasa

Map creator : SpartanBobby

File to be fetched Date of Circulation: Nov 27 2022 - Current

Era of Creation: Tabula Rasa

Map creator : Triiodine

New Varadero has a layout that closely mirrors that of Ice Colony V2's underground Z-level, but features a complete aesthetic overhaul into a beachside theme.

Last Stand Maps

The last stand gamemode, also dubbed as the WO gamemode (due to whiskey outpost being the only available map) was originally created by Infernus44 and since then it has undergone a lot of changes and revisions to what it is today.

V1 Whiskey Outpost.png

Date of Circulation: May 28th 2016 - January 8th 2017

Creator: Apophis775

Era of Creation: Late Pre-Alpha

Whiskey Outpost was loosely based off of the Whiskey Outpost seen in the first starship troopers film at least in namesake, and is the first and only last stand map which is available on Colonial Marines.

Map Trivia: Originally named "Fort Slaughterdale".

V2 Whiskey Outpost.png

Date of Circulation: January 8 2017 - November 9th 2018

Note that there was a timespan between these dates where whiskey Outpost was broken and unplayable, but currently I have been unable to secure those dates.

Creator: Artouris

Era of Creation: Late Alpha

The second major revision of whiskey outpost to turn the map from just a last stand gamemode to a lore based last stand, with the Dust Raiders being introduced. This revision also was required due to the population increasing.

Whiskey outpost.png

Date of Circulation: November 9th 2018 - Current

Creator: Artouris

Era of Creation:Mid Omega

The third major revision of whiskey outpost which expanded upon V2's lore. The map was also enlarged to fit the increasing player population along with the new mechanics/weapons that have been added e.g. mortars and the tank.

Sprite History

Equipment

At the end of each category a sprite designer section is there to provide information on who made what sprites.

Marine Armor:
First Armor concept.png
Concept Marine Armor
The initial concept armor developed for Colonial Marines.


Armor Variations Upon The Initial Concept:
Concept Armor Variations.png
Pre-Alpha Phase One Armor.png
Phase One Armor
The agreed upon first marine armor set which replaced the standard grey/coloured jumpsuits from Infestation Station. Later on the armor was improved upon with a revision of the original helmet.


Phase One Helmet Concept Variations:
Pre-Alpha Helmet Prototype1.png
New Helmet Concept
Wasn't implemented.
Pre-Alpha Helmet Prototype2.png
Final Helmet Concept
Went into Colonial Marines in the Mid Pre-Alpha stage.
Pre-Alpha Phase Two Armor.png
Phase Two Armor
The phase two marine armor was introduced into Colonial Marines in the late Pre-Alpha stage.
Armor Sprite Designer(s):
  • Joshuu


Marine Weaponry:
Colt 1911 with Ammo.png
Colt M1911 / Phase One: M4A3
The Colt M1911 replaced the Stetchkin Pistol from infestation station and became the primary sidearm for the marines. The Colt M1911 near the end of Pre-Alpha recieved a name change to M4A3.


Stechkin: The Predecessor
Pre-Alpha Stechkin.png The original sidearm for the marines which was replaced by the Colt M1911.
S&W Victory with ammo.png
Smith and Wesson Victory
The S&W was the standard revolver for the marines and the predecessor to the M44 Combat Revolver.
Pre-Alpha M39.png
Phase One: M39 Submachine Gun
The M39 was a freshly designed submachine gun for the marines to use. Later on the sprite was improved upon nearing the end of pre-alpha.


Phase Two: M39 Submachine Gun
Late Pre-Alpha smg.png Went into Colonial Marines in the late Pre-Alpha stage.
Phase One M41A.png
Phase One: M41A Pulse Rifle Mk2
The M41A Mk2 replaced the CR20 from Infestation Station and became the primary rifle for the marines. During the late stages of Pre-Alpha the sprite was improved upon.


CR20: The Predecessor
Pre-Alpha CR20.png The original main weapon for the marines which was replaced by the phase one M41A pulse rifle.


Phase Two: M41A Pulse Rifle Mk2
Phase Two M41A.png Went into Colonial Marines in the mid Pre-Alpha stage.
Phase Three: M41A Pulse Rifle Mk2
Phase Three M41A.png Went into Colonial Marines in the late Pre-Alpha stage.
L6saw.png
L6 SAW
The L6 SAW was the only LMG in Pre-Alpha and could be used with one hand in combination with a Riot Shield.
M37.png
Riot Shotgun / Phase One: M37A2 Shotgun
The riot shotgun was renamed to the M37A2 Shotgun and became the primary shotgun for the marines during Pre-Alpha.
Mgun+barrier.png
Heavy Machine Gun
The HMG was the backbone of the Marines during the Pre-Alpha stage. To use the HMG all you had to do was stand on the same tile as the HMG and make sure it was anchored down with a wrench, after that you just clicked on the enemy or a tile to fire. Do note that the HMG could only fire in straight bullet paths, though this did make it extremely useful for defending long hallways. One was available to each squad.
Weaponry Sprite Designer(s):
  • Joshuu

Exceptions to this are:

  • Stetchkin - Baystation developer? still researching.
  • Smith and Wesson Victory - Baystation developer? still researching.
  • CR20 - Baystation developer? still researching.
  • L6 SAW - Baystation developer? still researching.
  • Riot Shotgun / Phase One: M37A2 Shotgun - Baystation developer? still researching.
  • Heavy Machine Gun - Infernus potentially still needs researching.


Storage:
Ammo Bag.png
Ammo Bag
Previously used to store multiple magazines and shotgun shell boxes. One was available to each squad.
Storage Sprite Designer(s):
  • Joshuu
Mechs:
PA-A Powerloader.png
Ripley Powerloader
The original ripley powerloader sprite that was used up until the Omega Era.
Mech Sprite Designer(s):
  • Baystation/Tgstation developer? still researching.
Marine Armor:
[[File:]]
To do
To do


Marine Weaponry:
Phase Two M4A3.png
Phase Two: M4A3 Service Pistol
After the Colt M1911 was renamed to the M4A3 near the end of Pre-Alpha, the M4A3 has continued to be improved upon. Phase Two of the M4A3 Service Pistol was released shortly after Colonial Marines entered it's Alpha state.


Phase Three: M4A3 Service Pistol
Phase Three M4A3.png Went into Colonial Marines in the mid Alpha stage.
Phase Four: M4A3 Service Pistol
Phase Four M4A3.png Went into Colonial Marines in the late Alpha stage and was the last iteration of the M4A3 Service Pistol sprite.
Phase One M44.png
Phase One: M44 Combat Revolver
The M44 Combat revolver was the standard revolver for the marines that replaced the Smith and Wesson Victory from Pre-Alpha.


Smith and Wesson Victory: The Predecessor
S&W Victory with ammo.png The original revolver for the marines which was replaced by the M44 Combat Revolver.
Phase Two: M44 Combat Revolver
Phase Two M44 Combat Revolver.png Was introduced into Colonial Marines in the late Alpha stage and was the last iteration of the M44 Combat Revolver sprite.
Phase Three M39.png
Phase Three: M39 Submachine Gun
Went into Colonial Marines in the mid Alpha stage and was the last iteration of the M39 Submachine Gun sprite.
Phase Four M41A.png
Phase Four:
M41A Pulse Rifle Mk2
After the M41A replaced the CR20 in Pre-Alpha, it has continued to be improved upon. Phase Four of the M41A Pulse Rifle Mk2 was released shortly after Colonial Marines entered it's Alpha state.


Phase Five: M41A Pulse Rifle Mk2
Phase Five M41A.png Went into Colonial Marines in the late Alpha stage and was the last iteration of the M41A Pulse Rifle sprite.
M41ae2.png
M41AE2 Heavy Pulse Rifle
Filled the Light Machine Gun gap after the L6 SAW was removed early into the Alpha.
Phase Two M37 Shtogun.png
Phase Two: M37A2 Shotgun
The Phase Two M37A2 Shotgun replaced the Riot Shotgun sprite from Pre-Alpha and became the primary shotgun for the marines during early-mid Alpha.


Phase Three: M37A2 Shotgun
Shotgun.png Introduced into Colonial Marines in the late Alpha stage and was the last iteration of the M37A2 Shotgun sprite.

[[File:]]


Sprite stuff


Marine Weaponry:
M46C.png
Phase One: M46C
Phase one of the M46C. The designated commanders special rifle.


M46C Sprite Designer(s):
  • Triiodine
  • Kudos to the CO council for input.
ERT Armour:
UPPSingle.png
Phase One: UPP UM5 Personal Armour
This is only seen in the server's Lore. Wasn't implemented.


Mechs:
Omega Powerloader.png
Powerloader
A redid version of the ripley powerloader to fit in line with the servers lore and the revamped graphical theme.
Mech Sprite Designer(s):
  • Joshuu
Trivia:
Black Donnovan Arcade.png
Black Donnovan
The character Black Donnovan from the arcade machine games has a unique set of concept armor and weapons to go with him.
Trivia Sprite Designer(s):
  • Joshuu


Previous Core Gamplay Systems

Defcon System

DEFCON, short for DEFense readiness CONdition or also known as the Threat Assessment Level, is an alert state for the USCM to authorize special assets to be used in the field for the current mission, should the marines complete objectives and perform well in the mission.


DEFCON Threat Level

  • Each DEFCON level gives $20000 + $20000 more funds for every subsequent DEFCON level reached including DEFCON 5. For example, you'll get $20000 funds for DEFCON 5 and $40000 funds for DEFCON 4 and so on. Each unlock will vary in cost.
  • To check the progress of the DEFCON threat level and authorise an asset, use the communications console in CIC.
Threat Level: Description: Unlocks:
DEFCON Five

+ $20000

Default assessment level at the beginning of the mission. Basic assets and deployment are authorised.
  • Additional Supply Points - gives 20,000 dollars for the Automatic Supply Retrieval System.

Costs: $20000

  • Additional Dropship Part Fabricator Points - gives 1600 points for the Dropship Fabricator.

Costs: $20000

  • Additional OB projectiles - HE x2
  • Additional OB projectiles - Cluster x2
  • Additional OB projectiles - Incendiary x2

Deploys a crate with corresponding OB ammo (x2) and fuel (x10) onto the Supply Elevator which appears next time the elevator is called up. Costs: $10000 for any of the crates

DEFCON Four

+ $40000

Elevated threat level. Requires 10% objective points to be lowered.
  • No Unlocks
DEFCON Three

+ $60000

Moderate threat level. Requires 20% objective points to be lowered.
  • Wake up additional troops - spawns a squad of specialized marines fresh from hypersleep, they do not spawn with their gear.

Costs: $40000

DEFCON Two

+ $80000

Extreme threat level. Requires 30% objective points to be lowered.
  • Allow the authorization of points to be allocated to the tank fabricator - authorizes the LTB cannon, TOW Launcher, and a few other modules to be used for the tank operation.

Costs: $60000

  • Order 4 Specialist Kits from the Automatic Supply Retrieval System to allow squad marines to become specialists.

Costs: $60000

DEFCON One

+ $100000

Maximum threat level. Requires 50% objective points to be lowered.
  • Planetary Nuke (Tactical Nuke Deployment) - allows a tactical nuke to be deployed on the area of operations, it explodes in a timer in eight (8) minutes. Note that aliens will be alerted of the activation of the device and the Queen can defuse the nuke once activated.

Costs: $100000

Objectives

Each row in the below table is progressive, e.g. you'll find a paper scrap then be pointed to find a folder etc. Keep in mind that not all objective items will lead towards the next item, some will be red herrings giving you no clues.

Documents/Data retrieval.

Objective: Description:
Paper Scraps.png

Paper Scraps and Progress Reports

A piece of paper located somewhere on the map. It can be found on the ground, on tables, inside filing cabinets, or inside lockers. Paper scraps take about 2 seconds to analyze while progress reports take about 5 seconds, providing you with the location of a folder. You will be indicated whether it should be returned to the Almayer. Once on the Almayer place them on the racks in the computer lab.
Folder.png

Folders

A research folder located somewhere on the map. It can be found on the ground, on tables, cabinets, or inside lockers. It takes about 10 seconds to analyze, providing you with the location of a data disk and its encryption key. You should return it to the Almayer. Once on the Almayer place them on the racks in the computer lab.
Data Disks.png

Data Disks

A floppy disk located somewhere on the map. It can be found on the ground, on tables, or inside lockers. Return it to the Almayer so that someone with the disk's decryption key can decrypt it in the universal disk reader, potentially providing you with an item to retrieve or a console to analyze. Once the data has been scanned place them on the racks in the computer lab.
Technical manual.png

Technical Manual

Scattered around the Area of Operations will be technical manuals. Once read through, will lead directly to an item retrieval clue. They, along with all data items contribute to DEFCON and should be stored in the Computer Storage area.
Data Terminal.png

Data Terminal

A computer located in certain areas of the map. They can be found in rooms of importance and require a password from a decrypted Data Disk. Once the correct password is used, information from the terminal will be sent back towards the ship, increasing the intelligence gathered.

Retrieval of Research Assets.

The Company has promised to pay High Command to lower the DEFCON threat level, if your researchers manage to identify any lost research assets from the colony.

Objective: Description:
Researchnote.png

Research notes

A research note left behind by a scientist from the colony. Bring them to the researcher on-board the Almayer.
Vialbox.png

Vialbox

A box containing up to six vials. These might contain the results of chemical research from the colony. Bring them to the researcher on-board the Almayer so they can identify it.

Recovering corpses

All dead colonists (whether from the map or dead survivors) and KIA marine bodies should be moved to the morgue on the Almayer otherwise they won't be counted and as such won't help raise the DEFCON level.

Alien corpses should also be moved to the research department on the Almayer otherwise they won't be counted and as such won't help raise the DEFCON level.

Specific Item Retrieval

Often, when decoding Data Terminals, there will be an announcement to search and retrieve an item. You will need to recover this specific item with a certain serial number. To find it, examine said object at said location and if it matches the one from the announcement, bring it back to the storage area next to the Computer Labs. Put it on the rack and leave it there.

Map specific DEFCON thresholds

Certain maps have a lower DEFCON threshold to allow for an easier time in lowering DEFCON.

Rest of the maps:

  • DEFCON 4: 10%
  • DEFCON 3: 25%
  • DEFCON 2: 40%
  • DEFCON 1: 60%

LV-624:

  • DEFCON 4: 15%
  • DEFCON 3: 30%
  • DEFCON 2: 45%
  • DEFCON 1: 70%


Techwebs System
Alien Techwebs: https://cm-ss13.com/wiki/Alien_Techwebs


Alien Techwebs

Techwebs allow you to unlock special abilities and structures for the hive, You do it by spending points. You gain points passively starting at 1 every minute increasing by another 1 for every 20 minutes that pass. As the queen, You're the ONLY one who can spend the points so it is important to do so! Here is an overview of the techwebs and what they do:

Techs: Tier One

The starting techs that allow you to give the aliens an initial boost at the start of the operation.

Techwebs: Description: Unlocks:

TechWebs-Transition-Unlocked-Xeno-T1.png

Upgrade to Next Tech Tier

Progress to the next tier of techs.

Unlocks the starting set of techs to be purchased.

Costs: 0 Points

TechWebs-Unknown-Unlocked-Xeno-T1.png

Blockades

The queen gets the ability to place blockades.

Allows you to spawn a temporary 3x3 reinforced resin wall on a resin tile. It has a 8 second casting time, With a obvious warning sign and a 1 minute life span. After 30 seconds, the reinforced resin wall will become brittle, turning into resin membranes, drastically weakening the blockade. Once the 1 minute life span, the walls will delete themselves along with the resin underneath it.

Must be used in Ovipositor mode.

Purchasing it grants you two uses.

Can be bought more than once.

Costs: 5 Points

TechWebs-Comms-Distruption-Xeno-T1.png

Telecommunication Disruption

You releases a psychic field that temporarily disables telecommunications for a duration of time.

Temporarily disables marine communications on the same Zlevel (The almayer is one ZLevel and the ground map is another) as you for 3 minutes.

Can be bought more than once

Costs: 5 Points

TechWebs-Build-Distribute-T1-Xeno.png

Build Distribution

Distribute the ability to build to all xenomorphs

Allows all xenomorphs that aren't larva to build standard resin structures slightly slower than their build castes counter parts.

Costs: 15 Points

TechWebs-Unknown-Unlocked-Xeno-T1.png

Defensive Structures

Unlock defensive structures to use to defend the hive with.

Allows 3 new types of structures to be built by building castes

Reflective Wall: A weak resin wall that deflects all bullets and projectiles back to the sender. Extremely weak to melee.

Limited to 5 per Building Caste.

Resin Spikes: A tile of 3 spikes stick out of the ground. Deals 8 damage to the one of the legs or feet of anyone walking over it.

Limited to 8 per Building Caste.

Acid Pillar: A pillar of acid that sprays acid at anyone within a 11x11 tile range. Can also extinguish Aliens on fire.

Limited to 1 per Building Caste.

Costs: 15 Points


Techs: Tier Two

Techwebs: Description: Unlocks:

TechWebs-Transition-Unlocked-Xeno-T2.png

Upgrade to Next Tech Tier

Progress to the next tier of techs.

You must have at least purchased two permanent techs of the previous tier to unlock

Unlocks the next set of techs to be purchased.

Costs: 10 Points

TechWebs-Frenzy-Xeno-T2.png

Evolution Boost

The hive is put on an evolution frenzy! Increases evolution rate temporarily.

Temporarily increases alien evolution speed by 5 per second.

Lasts 5 minutes.

Can be bought more than once

Costs: 10 Points

TechWebs-Queen-Beacon-Xeno-T2.png

Queen Beacon

Rally the hive to a specific location.

Teleports all aliens to a selected location on weeds.

Purchasing it will grant you one Queen Beacon

Can be bought more than once

Must be used in Ovipositor mode.

Costs: 10 Points

TechWebs-Unknown-Unlocked-Xeno-T2.png

Shielding Slash Evolution

Every time a xenomorph slashes a marine enough times, they'll get protection.

All aliens gain an internal shield build up of 160. Every slash generates 20 build up. Once it reaches over 160, the alien gains 160 shield and the internal build up is reset.

Does not stack.

Costs: 25 Points

TechWebs-Unknown-Unlocked-Xeno-T2.png

Offensive structures

Unlock offensive structures to use to attack people with. Upgrades the acid pillar to a stronger variation.

Allows the aliens to construct the following:

Moveable Resin Membranes: A moveable membrane on weeds that can be pushed to act as mobile window. (Max of 7 can be placed per caste)

Moveable Resin Walls: A moveable wall on weeds that can be pushed to act as mobile cover. (Max of 7 can be placed per caste)

Shield Pillar: Grants 25 shield points every 7 seconds as long as you're next to it with a max of 200 Shield Points. (Max of 1 per caste)

Resin Acid Grenade: Secret a resin acid grenade that functions like a normal grenade but spews level 1 acid on a 5x5 tile range. (Max of 1 per caste)

Costs: 25 Points

TechWebs-Fortifying-Weeds-Xeno-T2.png

Fortifying Weeds

Actively causes weeds to reduce the damage taken by Xenomorphs by providing a light layer of armour, reducing all incoming damage by 35% as long as a xenomorph is on weeds.

Upon purchases, the Queen will be able to scale the effectiveness of fortifying weeds from 5% to 50%. Point loss is dependent on how effective the fortifying weeds bonus is.

Can be activated and deactivated.

Costs: 15 Points


Techs: Tier Three

Techwebs: Description: Unlocks:

TechWebs-Transition-Unlocked-Xeno-T3.png

Upgrade to Next Tech Tier

Progress to the next tier of techs.

You must have at least purchased two permanent techs of the previous tier to unlock

Unlocks the next set of techs to be purchased.

Costs: 15 Points

TechWebs-Artillery-Blob-Xeno-T3.png

Artillery Blob

Allows you to fire a glob of gas to siege fortified enemies or stall attackers!

Launch a normal Boiler acid blob anywhere you have line of sight on provided the target isn't obscured by anything else.

Works with the Queen Eye ability

Purchasing it will grant you two uses.

Costs: 15 Points


TechWebs-Revival-Jelly-T3.png

Revival Jelly

You dispense a special type of royal jelly, which can be given to a fallen sister to rejuvenate and revive them. The amount of jelly required depends on the caste tier. Can only be used whilst the Queen is on her ovipositor.

You spawn 1 stack of 6 revival jelly for an Alien to carry and apply to a dead Alien. Revives a non-gibbed alien back to full health. Amount needed is tied to their tier (1 Jelly for a tier 1, 2 for a tier 2 and so on).

To revive one, simply take the Revival Jelly in hand and click on a dead non-gibbed Alien body, Any xeno can do this.

If the dead Alien's original owner is still in the server and in the body, they will retake their Alien.

Otherwise, the Alien is up for the taking by Observers.

Must be on Ovipositor mode to dispense.

You can not revive a Queen or Larva with this.

Costs: 15 Points

TechWebs-Acidic-Evolution-Xeno-T3.png

Acidic Blood Evolution

Increases the damage of acidic blood, punishing close-ranged combatants.

Drastically increases the damage acid blood causes when it is spewed out against marines fighting in close range.

Increases its damage by 200%.

Costs: 30 Points

TechWebs-Endurance-Xeno-T3.png

Endurance

Xenomorphs become faster off weeds. Additionally, they heal very slowly as well.

As the description says, Aliens become faster off weeds and can heal slowly without the need to being on weeds.

Aliens become 5% faster off weeds.

Heals 0.3 per second.

Costs: 25 Points

Marine Techwebs: https://cm-ss13.com/wiki/Marine_Techwebs

How Techwebs worked for marines: toleft

The Marine's Techwebs allow your battalion to purchases powerful abilities that improves the individual Marine capabilities.

In order for you to unlock them for your marines, head over to the tech control console to take command of the purchasing of Techs.

There can be only one Officer allowed to take control of purchasing Techs.

If an Officer outranking the current control wants to take over, they simply follow the instructions above, overriding the previous controller.


Head over to here to learn more.


Partially Tested Prototype Techwebs Equipment These items were partially tested in a few rounds of CM but didn't make it into the full game.

Equipment: Contents:
M2 Thermal Goggles case.png

M2 Thermal Goggles case

M2 Thermal Goggles crate containing the following:
M2 Thermal Goggles.png

M2 Thermal Goggles

Thermal goggles that require a battery to function. Comes with a rechargable electrochemical power cell already inside with 1000w
Powercell.png

AA rechargeable battery.

A spare AA baterry that can hold up to 500w.
Screwdriver.png

Screwdriver

Screwdrive the thermal goggles to take out a powercell.
B18 Defensive Armor crate.png

B18 Defensive Armor crate

B18 Defensive Armor crate containing the following:
Welding Helmet.png

Welding Helmet

Should be used when repairing the B18 armor otherwise you'll go blind.
Welder.gif

Welder

Used to repair the B18 armor after combat
Crowbar.png

Crowbar

Can be used on B18 armor to remove the plasteel plates
Screwdriver.png

Screwdriver

Can be used on B18 armor to remove firstaid injectors. Currently you cannot put injectors back into the B18 armguard once taken out.
B18 Experimental Personal Armour.png

B18 Armor

Protects your body.
Stats:

Armor Melee = 30

Armor Bullet = 30

Armor Bomb = 40

Armor Internal Damage = 25

Armor Bio = 15

Armor Slowdown = 1


Tool Usage:

  • Weld to repair the armor after combat
  • Crowbar to remove plasteel plates
  • Screwdrive to remove firstaid injectors. Cannot cannot put injectors back into the B18 armguard once taken out.

Internal Holdings:

  • Contains storage 3 slots
  • Holds 3 Plasteel plates
  • Holds 4 firstaid injectors for usage during combat
B-18 helmet, 2.png
B18 Helmet
Protects your head. Can be screwdrived to remove armor in favour of more vision.
Stats:

Armor Melee = 30

Armor Bullet = 30

Armor Bomb = 50

Armor Internal Damage = 30

Armor Bio = 30

B18 Armored Gloves They protect your hands.
Hoverpack.png

Hoverpack

This prototype hoverpack allows marines to quickly jump over to strategic locations on the battlefield, at the cost of their backpack. You can change the settings with a screwdriver.


Hoverpack Modes:

Strong Mode:

  • Expends 5% Gas for 2 tiles of movement in any direction.
  • 6 meters per second
  • Cooldown of 5 seconds.

Default Mode:

  • Expends 5% Gas for 4 tiles of movement in any direction.
  • 5 meters per second
  • Cooldown of 10 seconds.

Weak Mode:

  • Expends 2.5% Gas for 6 tiles of movement in any direction.
  • 4.5 meters per second
  • Cooldown of 5 seconds.


Medic Combat Zone Support Package

Item: What it does:
UpgradedAdvtraumakit.png
Upgraded Advanced Trauma Kit
Used to treat high brute damage. Heals 36 brute damage once applied and fixes it over time.The time spent of using the trauma kit and efficiency depends of one's medical skill.


Available through Marine Techwebs and once purchased, more can be ordered through requisitions.

UpgradedAdvburnkit.png
Upgraded Advanced Burn Kit
Used to treat high burn damage. Heals 36 burn damage once applied and fixes it over time. The time spent of using the burn kit depends of one's medical skill.


Available through Marine Techwebs and once purchased, more can be ordered through requisitions.

Nano-Splint.png
Nano Splints
Used to hold that broken/fractured bone of yours in place so you don't die a lot more securely than the standard issue splints. Will not break when the affected splinted limb takes damage. The time spent of using the splints depends of one's medical skill.


Available through Marine Techwebs and once purchased, more can be ordered through requisitions.

Defibrillator.png
Upgraded Emergency Defibrillator
Used to bring recently dead marines and other personnel back to life. Can be recharged in a special recharger (usually located in the medbay).

This upgraded variant can work through armour.

  • Starts with 15 charges and goes yellow when 5 charges are left. The availability of the defibrillator's usage depends of one's medical skill.

Available through Marine Techwebs and once purchased, more can be ordered through requisitions.

Previous Marine Jobs

Intelligence Officer
COMMAND
IntelOfficer.png
Intelligence Officer
Difficulty: Medium
Supervisors: Executive Officer, Commanding Officer
Rank: Ensign
Duties: Collect intel and decrypt it. Lower the DEFCON level.
Guides: Defcon
Unlock Requirements: Six hours as any squad role.
Detailed Description:
|__________|
Your job is to assist the marines in collecting intelligence related to the current operation to better inform command of their opposition.
You are in charge of gathering any data disks, folders, and notes you may find on the operational grounds in order to decrypt any data in order to further the DEFCON status.
|__________|


"Military Intelligence is a contradiction in terms." - Groucho Marx

Overview

Good job Intelligence Officer (IO). Seems you're now in the position of scouring the Area of Operations and securing any intelligence you find for the brass! Got yourself the rank of Ensign, a nice sidearm, some fancy equipment and have gotten the job of collecting all the incriminating evidence, sorting it all and decoding everything you find. High Command wants you to collect enough intelligence in the area to warrant them to lower the DEFCON threat level to give your battalion some extra fire power. Stay in communication gathering Intelligence on the Intelligence Channel (:z) to better organize your search. Get to it Ensign, that threat level isn't gonna lower itself!


Intelligence Officer Area

The intelligence officer has their unique area where they decode and catalog all the data they have. Whether it would be an item, scrap of paper or folder, you'll need to process them and put them into storage to be safely accounted for.

Computer lab.png

In this area you'll be greeted with your information finding equipment in your locker, the computer lab where you'll decode disks and a place to store all that precious information. Those computers will need disks and passwords to be decoded and you are the prime candidate to search and retrieve them.


Intelligence Officer Equipment Rack

Equipment: Description:
Insulated Gloves.png

Insulated Gloves

Protects users against electrical shocks.
XM4 Pattern Intel Armor.png

XM4 Pattern Intel Armor

A well tinkered and crafted hybrid of Smart-Gunner mesh and M3 pattern plates. Robust, yet nimble, with room for all your pouches.
Stats:

Armor Melee = 20

Armor Bullet = 20

Armor Bomb = 15

Armor Internal Damage = 20

Armor Bio = 25

Armor Slowdown = 0.55

Headset.png

Headset

Standard issue USCM headset which has an inbuilt HUD for the user that displays marine roles. This one is a command variant which has access to all channels.
IO Pack.png

USCM Lightweight Expedition Pack

A heavy-duty IMP based backpack that can be slung around the front or to the side, and can quickly be accessed with only one hand. Usually issued to USCM intelligence officers.
MRE.png

MRE

Standard issue USCM brand Meal Ready-to-Eat, property of the US Colonial Marines. Meant to be consumed in the field, and has an expiration that is at least two decades past your combat life expectancy.
Pick One
Sidearms: Description:
M4a3Commander.png
M4A3 Custom Pistol
This special variant of the M4A3 Pistol has an ivory-colored grip and has a slide carefully polished yearly by a team of orphan children. Looks like it belongs to a low-ranking officer. It is slightly better than the M4A3 Service Pistol in terms of statistics, in terms of damage and accuracy.

Standard issue to Staff Officers, Pilot Officers, Intelligence Officer and Vehicle Crewmen.


Stats:

Recoil Wielded: 1

Recoil Unwielded: 1

Scatter Wielded: 3

Scatter Unwielded: 5

Burst Scatter Multiplier: N/A

Burst Amount: N/A

Effective Range: 4 Tiles

Firerate: 600 RPM

Burst Firerate: N/A

Accuracy Multiplier Wielded: 1.19

Accuracy Multiplier Unwielded: 1

Base Accuracy: 5

Damage Mod: 1.1

Ammunition:
M4A3mag.png

M4A3 Magazine

Capacity: 9

Damage: 41

Max Range: 22

Fall off: 7

Penetration: 10

Punch: 0.5

Holds nine (9) 9mm heavy pistol rounds.
M4A3-AP-mag.png

M4A3 Armor Piercing Magazine

Capacity: 9

Damage: 25

Max Range: 22

Fall off: 7

Penetration: 31

Punch: 0.5

Holds nine (9) 9mm pistol rounds. Has better armour penetration, but lower overall damage.
M4A3-Hollow-Point-mag.png

M4A3 Hollow Point

Capacity: 9

Damage: 54

Max Range: 22

Fall off: 7

Penetration: 0

Punch: 0.5

Holds nine (9) 9mm pistol rounds. Has lower overall penetration but better damage. Smartgunner belts come with one magazine. More can be obtained through the Surplus Ammo Crate which can be ordered by Requisitions.
M4A3-Incen-mag.png

M4A3 Incendiary Magazine

Capacity: 9

Damage: 20

Max Range: 22

Fall off: 7

Penetration: 0

Punch: 0.5

Holds nine (9) 9mm pistol Incendiary rounds. Will set ablaze any and all targets hit with this round. Obtainable through the Surplus supply crate in Requisitions.
M4A3-Cluster-mag.png

M4A3 Cluster Magazine

Capacity: 9

Damage: 40

Max Range: 22

Fall off: 7

Penetration: 10

Punch: 0.5

Cluster Stack: 1.5

Holds nine (9) 9mm pistol cluster rounds. Designed to attach tiny explosives to targets, to detonate all at once when more than 15 cluster bombs are attached to the target.

Not currently obtainable.

M4A3-wall-piercing-mag.png

M4A3 Wall Piercing Magazine

Capacity: 9

Damage: 30

Max Range: 22

Fall off: 7

Penetration: 30

Punch: 0.5

Holds nine (9) 9mm pistol Wall Piercing rounds. Able to penetrate through up to 6 solid non-indestructible walls and people/aliens alike.

Not Currently Obtainable

M4A3-toxin-mag.png

M4A3 Toxin Magazine

Capacity: 9

Damage: 25

Max Range: 22

Fall off: 7

Penetration: 0

Punch: 0.5

Holds nine (9) 9mm pistol Toxin rounds. Temporarily lowers alien armour through every hit with a maximum of 75 toxin applicable. Once the toxin level is above their armour, they will receive full damage from all sources.

Applies 10 toxin per hit.

Not currently obtainable.

Attachments:
Muzzle Attachments Supressor.pngSuppressor

Extended barrel.pngExtended Barrel

Barrel charger.pngBarrel Charger

Recoil compensator.pngRecoil Compensator

Rail Attachments Mountedflash.pngRail Flashlight

Reflex.pngS6 Reflex Sight

Reddot.pngS5 Red-Dot Sight

Underbarrel Attachments Burstfire.pngBurst Fire Adapter

Laser sight.pngLaser Sight

Stock Attachments None
Vp78.png
VP-78 Pistol
A massive, formidable automatic handgun chambered in 9mm rounds and contains 14 squash-head pistol rounds in the magazine. In addition, this sidearm has 2-burst capabilities. It can be found in the Personal Self Defense kits in the ColMarTech Automated Closets.

It is the standard sidearm for Corporate PMC Officers, Squad Specialists, Intelligence Officers and the Executive Officer

Stats:
Recoil Wielded: 1

Recoil Unwielded: 2

Scatter Wielded: 4

Scatter Unwielded: 3

Burst Scatter Multiplier: 5

Burst Amount: 3

Effective Range: 4

Firerate: 85 RPM

Burst Firerate: 124 RPM

Accuracy Wielded: 6

Accuracy Unwielded: 6

Ammunition:
VP78 Magazine.png

VP78 Magazine

Capacity: 18

Damage: 45

Max Range: 22

Fall off: 5

Penetration: 30

Punch: 0.5

Holds eighteen (18) 9mm squash-head pistol rounds.
VP78-Incendiary-Magazine.png

VP78 Incendiary Magazine

Capacity: 18

Damage: 35

Max Range: 22

Fall off: 5

Penetration: 30

Punch: 0.5

Holds eighteen (18) 9mm Incendiary squash-head pistol rounds. Will set ablaze any and all targets hit with this round.

Not currently obtainable.

VP78-Cluster-Magazine.png

VP78 Cluster Magazine

Capacity: 18

Damage: 45

Max Range: 22

Fall off: 5

Penetration: 30

Punch: 0.5

Cluster stack: 2

Holds eighteen (18)) 9mm cluster squash-head pistol rounds. Designed to attach tiny explosives to targets, to detonate all at once when more than 15 cluster bombs are attached to the target.

Not currently obtainable.

VP78-Wall-Piercing-Magazine.png

VP78 Wall Piercing Magazine

Capacity: 18

Damage: 45

Max Range: 22

Fall off: 5

Penetration: 50

Punch: 0.5

Holds eighteen (18) 9mm Wall Piercing squash-head pistol rounds. Able to penetrate through up to 6 solid non-indestructible walls and people/aliens alike.

Not Currently Obtainable.

VP78-Toxin-Magazine.png

VP78 Toxin Magazine

Capacity: 18

Damage: 45

Max Range: 22

Fall off: 5

Penetration: 30

Punch: 0.5

Holds eighteen (18) 9mm Toxin squash-head pistol rounds. Temporarily lowers alien armour through every hit with a maximum of 75 toxin applicable. Once the toxin level is above their armour, they will receive full damage from all sources.

Applies 10 toxin per hit.

Not currently obtainable.

Attachments:
Muzzle Attachments Supressor.pngSuppressor

Recoil compensator.pngRecoil Compensator

Extended barrel.pngExtended Barrel

Barrel charger.pngBarrel Charger

Rail Attachments Mountedflash.pngRail Flashlight

Reflex.pngS6 Reflex Sight

Reddot.pngRed Dot Sight

Underbarrel Attachments

Laser sight.pngLaser Sight (Default)

Stock Attachments None


Pick One
Belt: Description:
G18-Utility-Pouch.png
G8-A General Utility Pouch
A small, lightweight pouch that can be clipped onto Armat Systems M3 Pattern armor to provide additional storage. The newer G8-A model, while uncomfortable, can also be clipped around the waist. Can hold more varied items than the standard belts. It is one of the rarer pouches inside the ColMarTech automated armaments vendor in Requisitions. They can hold 3 items.
M276 Pattern Ammo Load Rig.png
M276 Pattern Ammo Load Rig
The M276 is the standard load-bearing equipment of the USCM. It consists of a modular belt with various clips. This version is the standard variant designed for bulk ammunition-carrying operations. Holds 5 various magazines.
M276 pattern M4A3 holster rig.png
M276 Pattern M4A3 Holster Rig
The M276 is the standard load-bearing equipment of the USCM. It consists of a modular belt with various clips. This version has a holster assembly that allows one to carry the M4A3 or the MK88 comfortably secure. It also contains side pouches that can store 9mm or .45 magazines.
M276 pattern knife.png
M276 Pattern Knife Rig
The M276 is the standard load-bearing equipment of the USCM. It consists of a modular belt with various clips. This version is specially designed with four holsters to store throwing knives. Not commonly issued, but kept in service. Holds up to 6 throwing knives.
M276 pattern M39 holster rig.png

M276 Pattern M39 Holster Rig

The M276 is the standard load-bearing equipment of the USCM. It consists of a modular belt with various clips. This version is designed for the M39 SMG and features a larger frame to support the gun. Due to its unorthodox design, it isn't a very common sight and is only specially issued.
M276 pattern M44 holster rig.png
M276 Pattern M44 Holster Rig
The M276 is the standard load-bearing equipment of the USCM. It consists of a modular belt with various clips. This version is for the M44 magnum revolver, along with three pouches for speedloaders. It faintly smells of hay.
Shotgun belt.png
Shotgun Shell Load Rig
An ammunition belt designed to hold shotgun shells or individual bullets. Holds 10 handfuls of shells.
M276 Pattern Toolbelt Rig.png
M276 Pattern Toolbelt Rig
The M276 is the standard load-bearing equipment of the USCM. It consists of a modular belt with various clips. This version lacks any combat functionality and is commonly used by engineers to transport important tools. This contains all the tools for the Combat Engineers and Maintenance Technicians to do their work.
Pick Two
Pouch: Description:
Document-pouch.png

Document Pouch

A pouch used to hold documents for safe keeping. Can hold 21 items.
Aid-pouch.png
First-Aid Pouch
Standard issue field aid for all soldiers. Comes pre-loaded with basic medical supplies. Expended autoinjectors can be restocked at a NanoMed NanoMed.png on the Almayer and Dropships.
Ointment.png

Ointment

Tramadol Injector.png

Pain-stop autoinjector

Tricord.png

First-aid autoinjector

Gauze.png

Gauze

Flare-pouch.png
Flare Pouch
Can hold 8 flares (including activated flare). Refillable with a M94 Flare Pack.
Flame-pouch.png
Fuel tank strap pouch
Two rings straps that loop around M240 variety napalm tanks. Handle with care.
Large-gen-pouch.png

Large General Pouch

A general purpose pouch used to carry even more small items and also magazines. Contains 3 slots.
Largemag-pouch.png

Large Magazine Pouch

Special issue pouch that can hold up to four magazines and/or handfuls of shotgun shells. Issued to Squad Leaders and Specialists. It is one of the pouch options of the ColMarTech Automated Closet and can be ordered by Requisitions.

Contains 4 slots.

Pistol-mag-pouch-large.png

Large Pistol Magazine Pouch

Pouch able to 6 hold pistol magazines. It is one of the uncommon pouches inside the ColMarTech automated armaments vendor in Requisitions.
Medmag-pouch.png
Magazine Pouch
Uncommon issue pouch that can hold three magazines and/or handfuls of shotgun shells. Issued to Medics and Engineers. It is also one of the pouch options of the ColMarTech Automated Closet and is found in the ColMarTech automated armaments vendor in Requisitions. Contains 3 slots.
Pistol-pouch.png
Sidearm Pouch
A holster to carry pistols, typically a standard issue M4A3 handgun, or 88M4 Pistol.
Tool Pouch.png
Tools Pouch
Designed to hold all your different types of tools. Issued to Engineers, part of the Combat Technician Support Kit, or found inside the ColMarTech automated armaments vendor in Requisitions.

Contains 4 slots. Can hold the following items below:

Screwdriver.png

Screwdriver

Welder.gif

Blowtorch

Crowbar.png

Crowbar

Wrench.png

Wrench

CableCoils.png

Cable Coil

Multitool.png

Security Access Tuner

Wirecutters.png

Wirecutters

Entrenching Tool Unfolded.png

Entrenching Tool

Pick One
Accessories: Description:
Black webbing vest.png
Black Webbing Vest
Robust black synthcotton vest with lots of pockets to hold whatever you need, but cannot hold in hands. Holds 5 small sized items.
Brown webbing vest.png
Brown Webbing Vest
Worn brownish synthcotton vest with lots of small pockets to unburden your hands. Holds 5 small sized items.
Shoulder Holster.png
Shoulder Holster
A traditional shoulder holster that can be attached to all uniforms. Can holster any handgun and completes the look of any hard-boiled detective.
Webbing.png
Webbing
Sturdy mess of synthcotton belts and buckles, ready to share your burden. Holds 3 small sized items or magazines.
Pick One
Equipment: Description:
XM12 Pattern Intel Helmet.png

XM12 Pattern Intel Helmet

An experimental brain-bucket that works better as a brain-plate. Moderately better at deflecting blunt objects at the cost of humiliation. But who will be laughing at the memorial? Not you, you'll be busy getting medals for your intel work.
Beret green.png

Standard Beret

A hat typically worn by the field-officers of the USCM. Occasionally they find their way down the ranks into the hands of squad-leaders and decorated grunts. This one is green
Beret tan.png

Tan Beret

A hat typically worn by the field-officers of the USCM. Occasionally they find their way down the ranks into the hands of squad-leaders and decorated grunts. This one is tan.
Officer Cap.png

USCM Officer Cap

A hat usually worn by officers in the USCM. While it has limited combat functionality, some prefer to wear it instead of the standard issue helmet.
Pick One
Mask: Description:
File:Gas mask.png
Gas Mask
A face-covering mask that can be connected to an air supply.
Heat absorbent coif.png
Heat absorbent coif
A close-fitting cap that covers the top, back, and sides of the head. Can also be adjusted to cover the lower part of the face so it keeps the user warm in harsh conditions.

Part of the marine uniform on snow planets. Without one of these or a Rebreather keeping their face warm the bitter cold will slowly freeze them to death. It's a good idea to bring down a few spares in a backpack for those that might've forgot theirs. Spawns at the Automated Closet as Standard Equipment if the map is Sorokyne Strata or Corsat. Otherwise available at the Surplus Uniform Vendor.

Intelligence Officer Gear Rack

Equipment: Description:
Crowbar.png

Crowbar

Used for Opening unpowered doors and displacing girders so you can move them.
Fulton Device.png

Fulton Device

A system used by the USCM for retrieving objects of interest on the ground from a AUD-25 dropship. Can be used to extract unrevivable corpses or crates, typically lasting around 3 minutes in the air. There are 20 uses in the stack.
Data Detector.png

Data Detector

The Data Detector highlights any documents or objects that is on your screen and a few tiles off screen. For example, if a document is on the other side of a wall, it will be highlighted and give off a high-pitched pinging sound. Hold the data detector in your hand or store it in your belt slot, and turn it on either by clicking on it or Z (in hotkey mode). You can switch modes with Alt+Click.
Data Detector Range Modes:
You can cycle through two different range modes, Long Range and Short Range by right clicking the Data Detector and then clicking on Toggle Range Mode.
  • Long Range: The Data Detector will detect Intel on your whole screen and further at a slow rate.
  • Short Range: The Data Detector covers a smaller amount of your screen but detects Intel at a faster rate.
Binoculars.png
Binoculars
A military-issued pair of binoculars. There is nothing special about this pair of binoculars.
Weapons: Description:
M41amk1.png

M41A Mk1 Pulse Rifle
Costs: 30 Points

An older design of the Pulse Rifle commonly used by Colonial Marines. Uses 10x24mm caseless ammunition. Holds 95 armour piercing rifle rounds per magazine. Slightly less accurate than the standard MK2 but fires in 4 round bursts instead of 3. It's also less modular than the MK2 but makes up for it in its high capacity armour piercing magazines.


Template:M41A MK1 Stats

Template:M41A MK1 Ammunition

Template:M41A MK1 Attachments

Supplies: Description:
Autoinjector-pouch.png
Autoinjector Pouch
Costs: 15 Points
A Large pouch dedicated to holding autoinjectors. Issued to squad medics, doctors and can also be found in First Responses Medical Support kits.

Contains:

Bicaridine.png

2x Bicaridine Auto-injectors

Kelotane.png

2x Kelotane Auto-injectors

Tramadol Injector.png

2x Tramadol Auto-injectors

Emergency Auto injector.png

Emergency Auto-injector

Binoculars.png
Binoculars
Costs: 5 Points
A military-issued pair of binoculars. There is nothing special about this pair of binoculars.
Data Detector.png
Data Detector
Costs: 15 Points
The Data Detector highlights any documents or objects that is on your screen and a few tiles off screen. For example, if a document is on the other side of a wall, it will be highlighted and give off a high-pitched pinging sound. Hold the data detector in your hand or store it in your belt slot, and turn it on either by clicking on it or Z (in hotkey mode). You can switch modes with Alt+Click.
Data Detector Range Modes:
You can cycle through two different range modes, Long Range and Short Range by right clicking the Data Detector and then clicking on Toggle Range Mode.
  • Long Range: The Data Detector will detect Intel on your whole screen and further at a slow rate.
  • Short Range: The Data Detector covers a smaller amount of your screen but detects Intel at a faster rate.
Mini Extinguisher.png

Mini Extinguisher
Costs:5 points

A portable fire extinguisher, highly useful for saving inventory space compared to the traditional extinguisher.
Fulton Device.png

Fulton Device
Costs: 10 Points

A system used by the USCM for retrieving objects of interest on the ground from a AUD-25 dropship. Can be used to extract unrevivable corpses or crates, typically lasting around 3 minutes in the air. There are 20 uses in the stack.
Largemag-pouch.png

Large Magazine Pouch
Costs:10 points

Special issue pouch that can hold up to four magazines and/or handfuls of shotgun shells. Issued to Squad Leaders and Specialists. It is one of the pouch options of the ColMarTech Automated Closet and can be ordered by Requisitions.

Contains 4 slots.

H5 pattern M2132 machete scabbard.png

H5 Pattern M2132 Machete Scabbard
Costs:5 points

A large leather scabbard used to carry an M2132 machete. It can be strapped to the back or the armor.
Motion Detector.gif

Motion Detector
Costs:15 points

The Motion Detector highlights anything not wearing an ID that is on your screen and a few tiles off screen. For example, if an alien is on the other side of a wall, it will be highlighted and give off a high-pitched pinging sound. Hold the motion tracker in your hand or store it in your belt slot, and turn it on either by clicking on it or Z (in hotkey mode).


Motion Tracker Range Modes:
You can cycle through two different range modes, Long Range and Short Range by right clicking the motion detector and then clicking on Toggle Range Mode.
  • Long Range: The motion detector will detect movement on your whole screen and further at a slow rate.
  • Short Range: The motion tracker covers a smaller amount of your screen but detects movement at a faster rate.
C4.png
Plastique Explosive
Costs:10 points
C4 is typically issued to Squad Leaders, Specialists (Using the Demolitions Loadout), Engineers and Responders. C4 is primarily used for quickly breaking into secure buildings, but its also the most effective method to destroy alien tunnels. The minimum time that can be set on a charge is 10 seconds and detonates in a 5 meter radius.


Requires the Trained level of engineering to plant C4.

Goggles.png
Welding Goggles
Costs:5 Points
A pair of Welding Goggles. Goes on the eyes slot.
Magazine: Description:
L42 AP mag.png
L42A Armor Piercing Magazine
Costs:10 points
Holds twenty five (25) 10x24mm AP rifle rounds. Has better armor penetration, but lower overall damage.
Uses the same caliber bullets as armor piercing M41A magazines, so it can be refilled using bullets from armor piercing M41A magazines.
Stats:

Capacity: 25

Damage: 32

Max Range: 22

Fall off: 0

Penetration: 31

Punch: 0.5

M39-AP-mag.png
M39 Armor Piercing Magazine
Costs:10 points
Holds forty eight (48) 10x20mm AP rounds. Has better armor penetration, but lower overall damage.
Stats:

Capacity: 48

Damage: 34

Max Range: 22

Fall off: 3

Penetration: 31

Punch: 0.5

M39-extended-mag.png
M39 Extended Magazine
Costs:10 points
Holds seventy two (72) 10x20mm rounds. Holds more ammunition than the standard magazines.
Stats:

Capacity: 72

Damage: 41

Max Range: 22

Fall off: 2

Penetration: 5

Punch: 0.5

M41A-AP-mag.png
M41A Armor Piercing Magazine
Costs:10 points
Holds forty (40) 10x24mm AP rifle rounds. Has better armor penetration, but lower overall damage.
Stats:

Capacity: 40

Damage: 33

Max Range: 22

Fall off: 0.8

Penetration: 31

Punch: 0.5

M41A-extended-mag.png
M41A Extended Magazine
Costs:10 points
Holds sixty (60) 10x24mm rifle rounds. Holds more ammunition than the standard magazines.
Stats:

Capacity: 60

Damage: 44

Max Range: 22

Fall off: 0.8

Penetration: 0

Punch: 0.5

M44-HR-SL.png
M44 heavy speed Loader
Costs:10 points
Holds seven (7) .44 rounds. Has lesser damage than the standard M44 Speed loader but gives a weakened stun and knock-back effect.
Stats:

Capacity: 7

Damage: 37

Max Range: 22

Fall off: 1

Penetration: 23

Punch: 0.5

Attachment: Benefits: Drawbacks:
Angled Grip.png
Angled Grip
Costs:10 points


Wielded:
  • Majorly decreased wield delay
  • Slightly decreased recoil
  • Slightly increases accuracy
  • Slightly decreased bullet spread


One Handed:
  • Slightly decreases accuracy
  • Slightly increased bullet spread
Both:
  • Increased weapon size
Extended barrel.png
Extended Barrel
Costs:10 points


Wielded:
  • Moderately increases accuracy
Both:
  • Slightly decreases damage
Gyro.png
Gryoscopic Stabilizer

Costs:10 points


Wielded:
  • Slightly reduces bullet spread
One Handed:
  • Majorly reduces bullet spread
  • Moderately increases accuracy
  • Greatly reduces the accuracy penalty for moving.
Both:
  • Moderately reduces burst spread
Both:
  • Moderately decreased firing speed
Laser sight.png
Laser Sight
Costs:10 points
Wielded:
  • Slightly increases accuracy
One Handed:
  • Slightly increases accuracy
  • Moderately reduces bullet spread
  • Slight reduction of accuracy penalty when moving
Both:
  • None
Undershot.png
U7 Underbarrel Shotgun
Costs:10 points
Both:
  • Adds the ability to fire three semi-auto buckshot rounds
  • Reloadable with additional buckshot
  • Toggled by using Activate Weapon Attachment Activate-Weapon-Attachment.png


Both:
  • The short barrel reduces the ammo's effectiveness
  • Slightly reduced accuracy compared to an actual shotgun
  • Slightly reduced knockdown/stun effect compared to an actual shotgun
  • Slightly reduced accuracy when firing compared to an actual shotgun
  • Moderately reduced damage compared to an actual shotgun
  • Can only be loaded with buckshot
M37 stock.png
Shotgun Stock
Costs:10 points
Wielded:
  • Moderately increases accuracy
  • Moderately reduces recoil
  • Greatly reduces bullet spread
  • Slight reduction of the accuracy penalty when moving


Both:
  • Slightly increases weapon melee damage
Wielded:
  • Major wield delay
  • Slightly decreases movement speed.
One Handed:
  • Moderately decreases accuracy
  • Greatly increases bullet spread
  • Moderately increases recoil
Both:
  • Increases weapon size
  • Slightly decreases firing speed
Smg Stock.png
Submachinegun Stock
Costs:10 points
Wielded:
  • Moderately increases accuracy
  • Moderately reduces recoil
  • Greatly reduces bullet spread
  • Slight reduction of the accuracy penalty when moving


Both:
  • Slightly increases weapon melee damage


Wielded:
  • Major wield delay
  • Slightly decreases movement speed.
One Handed:
  • Moderately decreases accuracy
  • Greatly increases bullet spread
  • Moderately increases recoil
Both:
  • Increases weapon size
M41astock.png
M41A Solid Stock
Costs:10 points
Wielded:
  • Moderately increases accuracy
  • Moderately reduces recoil
  • Greatly reduces bullet spread
  • Slight reduction of the accuracy penalty when moving


Both:
  • Slightly increases weapon melee damage


Wielded:
  • Major wield delay
  • Slightly decreases movement speed.
One Handed:
  • Moderately decreases accuracy
  • Greatly increases bullet spread
  • Moderately increases recoil
Both:
  • Increases weapon size
  • Slightly decreases firing speed
Quickfire.png
Quickfire Adapater
Costs:10 points
Both:
  • Moderately increases firing speed
Both:
  • Moderately decreases accuracy
  • Decreases burst-fire shots by 1 (from 3 or 4)
  • Moderately increases spread
Recoil compensator.png
Recoil Compensator
Costs:10 points
Wielded:
  • Greatly reduces recoil
One Handed:
  • Moderately reduces recoil
Both:
  • Moderately increases accuracy
Both:
  • Moderately decreases damage
Reddot.png
Red Dot Sight
Costs:10 points
Wielded:
  • Greatly increases accuracy
One Handed:
  • Slightly increases accuracy
One Handed:
  • Slight decrease in accuracy for moving.
Reflex.png
Reflex Sight
Costs:10 points
Wielded:
  • Slightly increases accuracy
  • Moderately decreases bullet spread
One Handed:
  • Slightly increases accuracy
Both:
  • Moderately increases the accuracy penalty when moving
Supressor.png
Suppressor
Costs:10 points
Wielded:
  • Slightly increases accuracy
Both:
  • Greatly decreases firing sound
  • Removes muzzle flashes
  • Removes firing messages
  • Slightly decreases recoil
  • Slightly decreases bullet spread
Both:
  • Slightly decreases damage
Forwardgrip.png
Vertical Grip

Costs:10 points


Wielded:
  • Moderately increases accuracy
  • Slightly decreases recoil
  • Slightly decreased bullet spread
Both:
  • Moderately reduces burst spread
Wielded:
  • Slightly decreases movement speed
One Handed:
  • Moderately decreases accuracy
  • Slightly increased bullet spread
Both:
  • Increased weapon size
  • Slight increase of the accuracy penalty when moving

Documents/Data retrieval

Listed below are the items of importance hidden about the Area of Operations. You're gonna need to find them and more then likely bring them back to the ship's storage for safe keeping.

Objective: Description:
Paper Scraps.png

Paper Scraps and Progress Reports

A piece of paper located somewhere on the map. It can be found on the ground, on tables, inside filing cabinets, or inside lockers. Paper scraps take about 2 seconds to analyze while progress reports take about 5 seconds, providing you with the location of a folder. You will be indicated whether it should be returned to the Almayer. Once on the Almayer place them on the racks in the computer lab.
Folder.png

Folders

A folder located somewhere on the map. It can be found on the ground, on tables, cabinets, or inside lockers. It takes about 10 seconds to analyze, providing you with the location of a data disk and its encryption key. You should return it to the Almayer.Once on the Almayer place them on the racks in the computer lab.
Data Disks.png

Data Disks

A floppy disk located somewhere on the map. It can be found on the ground, on tables, or inside lockers. Return it to the Almayer so that someone with the disk's decryption key can decrypt it in the universal disk reader, potentially providing you with an item to retrieve or a console to analyze. Once the data has been scanned place them on the racks in the computer lab.
Technical manual.png

Technical Manual

Scattered around the Area of Operations will be technical manuals. Once read through, will lead directly to an item retrieval clue. They, along with all data items contribute to DEFCON and should be stored in the Computer Storage area.
Data Terminal.png

Data Terminal

A computer located in certain areas of the map. They can be found in rooms of importance and require a password from a decrypted Data Disk. Once the correct password is used, information from the terminal will be sent back towards the ship, increasing the intelligence gathered.


Item Retrieval

Sometimes when uploading data disks or data terminals, ARES will occasionally ask you to retrieve items with specific serial code numbers. You can examine items to see what their serial code is.

Objective: Description:
Advanced mass-spectrometer.png

Advanced Mass-spectrometer

An item that ARES may ask you to retrieve with a special serial code number on it. Simply secure the item in the computer storage area for it to contribute to DEFCON.
Healthanalyzer.png

Health Analyzer

An item that ARES may ask you to retrieve with a special serial code number on it. Simply secure the item in the computer storage area for it to contribute to DEFCON.
Datacard.png

Datacard

A disk of data containing one of the administration authentication codes necessary to lift the lockdown. Typically found in administrative areas and must be used in a pair at the lockdown override terminal. Found on CORSAT.

Retrieval of Research Assets
The Company has promised to pay High Command to lower the DEFCON threat level, if your researchers manage to identify any lost research assets from the colony.

Objective: Description:
Researchnote.png

Research notes

A research note left behind by a scientist from the colony. Bring them to the researcher on-board the Almayer.
Vialbox.png

Vialbox

A box containing up to six vials. These might contain the results of chemical research from the colony. Bring them to the researcher on-board the Almayer so they can identify it.

Search & Retrieve
This is a very simple task. You search for documents, you retrieve the document and you store them into storage. Sounds easy right? Well it is. The hard part of this job is that you're gonna usually be alone out there, with little to no support if you're hunting for Intel alone.


Documents and objects of interest will be scattered all over the area of operations. Whether they're in lockers, on the floor or anywhere in buildings, it's up to you to find them all. Your trusty data detector will help you find these items with ease. It'll help you detect anything worth bring back to the Almayer for processing and storage.


Items in safes can not be open with C4 or Thermite.

Cataloging and sorting data When you've been gathering folders, scraps of paper or anything in the field that is considered valuable to DEFCON. It is important to sort out what you've read through and what needs to be read through.

It is recommended that all intel items requiring processing be put in Storage and processed intel items in the High-Sec Storage.

Disks should also be sorted into encrypted and decrypted piles so as not to waste efforts on finished tasks.

If you have lost track of what is left to retrieve, open the IC > View objective clues tab.

A key objective is to find decryption disks in order to reduce the DEFCON. In order to do that,

1. Read all the scraps.

2. Check if you have the folders ship-side already. If not, broadcast the clues to the Intelligence chat to any planet-side IOs to retrieve them.

3. Once the right folder is retrieved, read it and the decryption disk will be revealed along with its decryption key.

4. Check if you have the disk on ship-side. If not, broadcast the clues to the Intelligence chat to any planet-side IOs to retrieve them.

5. Load the disk onto one of the ARES terminals, enter the decryption key and continue with the cataloging.

Your Skillset

IO skill set.png

Resources


Previous Marine Equipment

Marine Kits

Kits: Description:
Exp Trooper kit.png

Experimental Trooper Kit

Specialization kits give weapons and/or equipment to anyone who uses them. This specific kit must be handed out from Requisitions.
  • SU-6 Smartpistol
  • 5 SU-6 Smartpisol Magazines
  • Extended Barrel
  • Quick Fire Attachment
  • Laser Sight
Intel kit.png

Field Intelligence Support Kit

Specialization kits give weapons and/or equipment to anyone who uses them. This specific kit must be handed out from Requisitions.
  • Intel Radio Encryption Key
  • Fulton recovery device.
Heavy Support kit.png

Heavy Support Kit

Specialization kits give weapons and/or equipment to anyone who uses them. This specific kit must be handed out from Requisitions.
  • HPR
  • 1 HPR magazine
  • MB-6 Folding Barricade
  • Bipod
  • Welding goggles
  • Welder
Mini Pyro kit.png

M240 Pyrotechnician Support kit

Specialization kits give weapons and/or equipment to anyone who uses them. This specific kit must be handed out from Requisitions.
  • USCM Pyrotechnician G4-1 Fuel Tank
  • M240A1 Incinerator Unit
  • 2 Incinerator Fuel Tank
  • 1 Large incinerator Fuel Tank (Gel)
  • Pocket Extinguisher
  • Underbarrel Extinguisher
Mini JTAC kit.png

JTAC Kit

Specialization kits give weapons and/or equipment to anyone who uses them. This specific kit must be handed out from Requisitions.
  • 2x Signal flares packs
  • Tactical Binoculars
  • JTAC encryption key (Use :j to speak on this radio channel)
  • USCM Small Radio Telephone Pack
M2C Heavy Gunner kit.png
M2C Heavy Gunner Kit
Description: This marine kit gives you access to the very limited but powerful M2C Heavy Machine Gun. This specific kit must be handed out from Requisitions.
  • M2C Assembly-Supply Crate
M2C Undeployed.png

M2C Heavy Machine Gun

M2C Ammunition Box.png

4 x M2C Ammunition Box

  • M804 Heavygunner Storage Rig
  • M10 Technician Helmet
  • Tools Pouch containing the following:
Crowbar.png

Crowbar

Wrench.png

Wrench

Welder.gif

High Capacity Industrial Blowtorch

Mini Extinguisher.png

Mini Extinguisher

  • 2 stacks of Plastic Explosives
  • Heavy Machinegunner Pamphlet (Engineering Pamphlet)
Pursuit kit.png

M39 Point Man Kit

Specialization kits give weapons and/or equipment to anyone who uses them. This specific kit must be handed out from Requisitions.
  • M39 SMG, comes pre-loaded
  • Sub-Machine gun arm brace
  • Magnetic Harness
  • H5 Pattern M2132 Machete Scabbard
  • 1 M39 Extended magazine
Sapper kit.png

M-OU53 Field Test Kit

Specialization kits give weapons and/or equipment to anyone who uses them. This specific kit must be handed out from Requisitions.
  • M-OU53 Break Action Shotgun
  • M-OU53 Tactical Stock
  • Box of shotgun slugs
  • Box of flechette slugs
  • Shotgun shell loading rig

Previous Special Jobs

Agent
SPECIAL
Agent.png
Agent
Difficulty: Hard
Supervisors: Dependent on role
Rank: Dependent on role
Duties: Complete objectives for your assigned faction.
Guides: None
Unlock Requirements: Opt-in, specific roles.
Detailed Description:
|__________|
We know your secret, we know what you're keeping hidden and want nobody to find out about. Follow our demands or we'll tell everyone. Ignoring our orders will have serious consequences, so we suggest you keep this hidden and just do it.
|__________|


"I say we grease this rat-fuck son-of-a-bitch right now!" ―Pvt. Hudson, Aliens


Introduction to Agency

Agents are ship-side crew (or stowaways) designed to function as minor antagonists and as a foil to the Military Police on the USS Almayer. These agents are assigned various objectives that they are expected to complete by the end of the operation without being detected. Those selected will have access to exclusive equipment to complete these objectives. If an agent is detected by security they will be terminated.


Beginning 20 minutes into the round and reoccurring every 10 minutes afterwards, a beacon will be sent out. If less agents than MPs are active than a new agent will be selected or a stow-away will be invited from deadchat to spawn. If the ratio to MPs and agents is balanced, a random agent is given a new objective. To become a candidate for agency, you must have it enabled in your preferences and be one of the following roles: Corporate Liaison, Cargo Technician, Researcher, Maintenance Technician, Mess Sergeant, and Nurse. An automated ARES message over MP comms will always alert when this beacon is sent, so they will be aware of your presence.

Agent Rules

As an agent, you will have to properly follow Rule 18, which dictates how you may play this role. Failure to abide by these regulations will lead to a potential agent job-ban. Be smart, and if you're not sure if something is okay, always ask the staff.

  • Agents have to follow proper escalation and are encouraged to use non-lethal abilities to avoid capture. The goal of an agent is not to murder anyone, however they can defend themselves if need be.
  • Agents may not kidnap people. They may incapacitate them, restrain them, and run away. Agents should not be removing a player from the round unless proper escalation was met while defending themselves.
  • Agents should follow their objectives, however they should avoid destroying equipment required for round progress (OB Equipment, CIC/Overwatch Consoles/Reactors, etc...) They should also not upset the flow of the round or cause a severe imbalance.
  • Agent violations are handled by Marine law, and agent actions may not be considered outright sedition. Refer to Marine Law if an agent is caught conducting illegal activity. (Example: It is not sedition to place a tracking device down, or break a window in a specific place. It may be sedition to blow up a wall in CIC which injures anyone within the explosion radius)

Art of the Agent

Congratulations if you're one of the lucky ones who meet the criteria, you will receive a pop-up determining if you would like to become an agent or not. If you accept, you will be given a prompt in chat that informs you of your special frequency code and your objectives. Afterwards you will be carrying out the wishes of the UPP, WY, RESS, or CLF.


Once you are aware of your objectives, it's time to get to work. As an agent, your superiors offer you an uplink based inside your headset which you can access by holding it, clicking it, and then calling the special frequency with your code. If you ever forget your objectives or your code, you can always check with the Show Objectives ability in the top left. If you wish to receive new tasks after your current ones are completed, the Receive Incoming Transmission ability (if displayed) will grant you another objective to fulfill.


Abilities: Description:
Objective1.png
Show Objectives
Display all of your current objectives and your special frequency code at any time.
Objective2.png
Receive Incoming Transmission
Accept a new objective from your agency.
Agenthud.png

Getting that Greentext

Your uplink in your headset grants you a flat 40 points to start. You are free to spend these points at your leisure. Be advised that these points are scarce and you will not be able to get more. However, you are able to share points with other agents by printing them from your headset. You are also able to identify agents of your own faction by the symbol beside your character, but not agents of opposing factions.


Your main goal is to complete your objectives without getting caught. If the MPs detain you and they find reasonable evidence that you're committing the crime of Subterfuge (being an agent), you will be jailed, terminated, and discharged to the colony. If your ID is terminated you fail all objectives, period.


The end of the round report will display all agents, their objectives, and whether or not they completed them. For a proper greentext, you cannot fail any of your tasks.

Possible Objectives

Objective: Description:
Metal.png
Prepare a Hideout
Have the given amount of structures constructed to complete this objective.
Example: Prepare a hideout by building 4 walls.
C4.png
Destroy
Destroy structures at the given location.
Example: Weaken the structurals of the USS Almayer by destroying 3 walls at Upper Medbay.
APC Red.png
Disable APC
Make sure the power of the APC is off.
Example: Cause a blackout. Disable an APC in Briefing.
Floppy disk.png
Floppy Disk
Insert the disk into a sensor computer.
Example: Ruin the computer systems, by inserting the suspicious floppy disk in a sensor computer in CIC.
Cash.png
Money
Obtain cash and have it on your person.
Example: Cause confusion and disarray of the USS Almayer economy by amassing 7500 dollars.
Jelly toast.png
Poison
Make an officer (Ensign and above) eat the poisoned food.
Example: Poison an officer with the rotten jellied toast to upset their stomach.
Poster agents.png
Propaganda
Put up propaganda posters, make sure they aren't ripped down.
Example: Spread the message! Place 2 propaganda posters around the USS Almayer hallways.
Goldencup.png
Steal
Steal an objective item and have it on your person.
Example: Drain the USS Almayer supplies by stealing a golden cup.
Tracking device.png
Tracking Beacon
Deploy the tracking beacon in the proper location. Make sure it remains there.
Example: Track USS Almayer's vital area by placing the tracking device in Captain's Mess. Make sure it doesn't get found.

Items of Interest

Item: Description:
Autopsy scanner.png
Autopsy Scanner
Extracts information on wounds.
Location: Autopsy room, upper medbay.
Earmuffs.png
Earmuffs
Protects your hearing from loud noises, and quiet ones as well.
Location: The CE's locker.
Folded medical sheet.png
Folded Medical Sheet
A folded medical sheet, it is neatly packed.
Location: Lower medical storage, research.
Goldencup.png
Golden Cup
A sign of vanity for the coffee addict. What idiot decided this was a good idea? Belongs to CiC staff.
Location: CIC front desk.
Coin gold.png
Gold Coin
A shiny and collectable gold coin.
Location: CMP's backroom, north of the brig.
Goldenhealth.png
Golden Health Analyzer
A special health analyzer with a golden front place. Property of the Chief Medical Officer.
Location: CMO's office, upper medical.
Obmanual.png
Orbital Bombardment Manual
Manual for the OB cannon.
Location: Orbital Bombardment room, at the lower fore of the ship.
Tally book.png
Tally Book
Property of the Requisitions Officer, this is the holy book of Requisition. It keeps count of all the money spent on supplies.
Location: RO's office, in Requisitions.

Agent Equipment

Weapon: Description:
Stunbaton.png

Configured Stunbaton

A stun baton with more charge, tuned to work only for agents.

Costs: 25 points.

Tranquilizer.png

Tranquilizer Gun

A tranquilizer gun. Comes with 5 darts. Deals no damage, knockout guaranteed.

Costs: 25 points.

Rag.png

Chloroform Cloth

A cloth dosed with chloroform. Has 8 effective uses and can only be used whilst behind a target. You must be in disarm intent to use.

Costs: 18 points.

Tool: Description:
Stimulant.png

Experimental Stimulant Pills

Useful stimulants that allow you to resist stamina damage. Lasts for approximately 2 minutes. Take only 1 pill. Use with care.

Costs: 20 points.

Decoy.png

Decoy

A decoy grenade. Emits a loud explosion that can be heard from very far away, keep away from ears. Can be used 3 times.

Costs: 14 points.

Tool: Description:
Multitool.png

Security Access Tuner v2

An upgraded access tuner, able to rapidly hack various machinery. Disguised as a regular multitool.

Costs: 25 points.

Tracker.png

OoI Tracker

A tracker that tracks different objects of interest in a nearby range.

Costs: 20 points.

Kit: Description:
Box.png

Badass Kit

Contains MP private comms encryption key, for snooping into enemy communications and sunglasses that protect you from flashbangs.

Costs: 12 points.

Suspicious toolbox.png

Tools Kit

A toolbox containing general tools and an engineering pamphlet to help you break into places of interest.

Costs: 15 points.

Box.png

Hacking Kit

A box containing a screwdriver, a multi-tool and an engineering pamphlet, as well as 5 signallers to help you hack doors.

Costs: 15 points.

Aliens

Alien Evolutionary Charts

Date of Applicability: October 30th, 2014 - December 12th, 2014

Era of Creation: Early Pre-Alpha

First Pre-Alpha Evolution Chart.png


Date of Applicability: December 13th, 2014 (Pre-Alpha) - August 14th, 2015 (Alpha)

Era of Creation: Early Pre-Alpha

Second Pre-Alpha Evolution Chart.png

Date of Applicability: August 14th, 2015 - August 29th, 2015

Era of Creation: Early Alpha

First Alpha Evolution Chart.png


Date of Applicability: August 29th, 2015 - May 21st, 2018

Era of Creation: Early Alpha

Second Alpha Evolution Chart.png

Date of Applicability: May 21st, 2018 - Sept 25th, 2018

Era of Creation: Early Omega

First Omega Evolution Chart.png


Date of Applicability: Sept 25th, 2018 - Current

Era of Creation: Early Omega Second Omega Evolution Chart.png

Alien Castes

Xenomorph Sprite Designer(s):
  • Pre-Alpha Era: WJohnston (TG Station Spriter) with small modifications from early CM developers.
  • Pre-Alpha Queen sprite: Original sprite made by Cawoijfaoiw (TG Station Spriter) but heavily modified by WJohnston (TG Station Spriter)
  • Alpha Era: Fridge with modifications from Joshuu
  • Omega Era: Fridge with modifications from Nicboone
Caste Pre-Alpha Alpha Omega Additional Information
Drone PA-Drone.png

Sprite Circulation: October 30th, 2014 - June 11th, 2016

Alpha-Drone.png

Sprite Circulation: June 11th, 2016 - May 21st, 2018

Alien-Drone.png

Sprite Circulation: May 21st, 2018 - Current


Description:

Support: Grow the hive and support the Queen.

(Latest Alpha sprites are still used in Mob NPCs instead of players)

Sentinel PA-Sentinel.png

Sprite Circulation: October 30th, 2014 - June 11th, 2016

Alpha-Sentinel.png

Sprite Circulation: June 11th, 2016 - December 9th, 2016

2nd-Alpha-Sentinel.png

Sprite Circulation: December 9th, 2016 - May 21st, 2018

Alien-Sentinel.png

Sprite Circulation: May 21st, 2018 - Current

Description:

Defence: Defend the hive, guard captured prey and eliminate and deter threats from range.

Runner PA-Runner.png

Sprite Circulation: October 30th, 2014 - June 11th, 2016

Alpha-Runner.png

Sprite Circulation: June 11th, 2016 - May 21st, 2018

Alien-Runner.png

Sprite Circulation: May 21st, 2018 - Current

Description:

Offence: The fastest Xeno with the most constant speed (besides the Crusher). Leap over tables with ease and pounce on the enemy. Capture and harass prey. Recon threats.

Defender Not Applicable

Sprite Circulation: N/A

Not Applicable

Sprite Circulation: N/A

Defender.png

Sprite Circulation: May 21st, 2018 - Current

Description:

Defence: A good engagement starter that additionally specifies in protecting other castes with it's unique tail sweep ability being key to keeping those marines at bay while injured sisters retreat back to heal.

Caste Pre-Alpha Alpha Omega Additional Information
Spitter PA-Spitter.png

Sprite Circulation: October 30th, 2014 - June 11th, 2016

Alpha Spitter.png

Sprite Circulation: June 11th, 2016 - December 9th, 2016

2nd Alpha spitter.png

Sprite Circulation: December 9th, 2016 - May 21st. 2018

Alien-Spitter.png

Sprite Circulation: May 21st, 2018 - Current

Description:

Defence: Defend the hive, employ your more powerful acid to better stun targets and break down fortifications.

Hivelord PA-Hivelord.png

Sprite Circulation: October 30th, 2014 - June 11th, 2016

Alpha-Hivelord.png

Sprite Circulation: June 11th, 2016 - May 21st, 2018

Alien-Hivelord.png

Sprite Circulation: May 21st, 2018 - Current

Description:

Support: The ultimate support. Very large plasma capacity for spreading weeds and resin. Dig holes into the ground to create pathways for other Xenos to travel between.

Lurker PA-Warrior.png

Sprite Circulation: October 30th, 2014 - June 11th, 2016

Alpha-Warrior.png

Sprite Circulation: June 11th, 2016 - December 9th, 2016

2nd Alpha Warrior.png

Sprite Circulation: December 9th, 2016 - May 21st, 2018

Lurker.png

Sprite Circulation: May 21st, 2018 - Current

Description:

Offence: Capture and harass prey. Use stealth to turn nearly invisible and set up ambushes or assault prey positions.


The Lurkers name transition throughout Cm's history:

Warrior - Pre-Alpha

Hunter - Alpha

Lurker - Omega

(Latest Alpha sprites are still used in Mob NPCs instead of players)

Carrier PA-Carrier.png

Sprite Circulation: October 30th, 2014 - February 4th, 2015

Alpha-Carrier.png

Sprite Circulation: February 4th, 2015 - June 11th, 2016

2nd-Alpha-Carrier.png

Sprite Circulation: June 11th, 2016 - June 24th, 2018

Alien-Carrier.png

Sprite Circulation: June 24th, 2018 - Current

Description:

Support: Carry a pile of facehuggers and throw them at prey, or use them as area denial.

During the Omega period this caste was changed to a tier 3 as of September 25th 2018.

Warrior Not Applicable

Sprite Circulation: N/A

Not Applicable

Sprite Circulation: N/A

Warrior.png

Sprite Circulation: May 21st, 2018 - Current

Description:

Offence: A highly mobile xeno which packs a punch, good for ambushing and general harassment of the marines supply lines.

Caste Pre-Alpha Alpha Omega Additional Information
Corroder PA-Corroder.png

Sprite Circulation: October 30th, 2014 - December 12th, 2014

Not Applicable

Sprite Circulation: N/A

Not Applicable

Sprite Circulation: N/A

Description:

Defence: Very strong and quick-firing acid. Able to melt space itself. Is the embodiment of marine fear.

Boiler Not Applicable

Sprite Circulation: N/A

Alpha Boiler.png

Sprite Circulation: August 29th, 2015 - June 11th, 2016

2nd Alpha Boiler.png

Sprite Circulation: June 11th, 2016 - May 21st, 2018

Alien-Boiler.png

Sprite Circulation: May 21st, 2018 - Current

Description:

Offence: Bring the Hive's ranged combat castes to their maximum potential with long range acid glob shots, allowing you to bombard and heavily damage areas after a bit of setup. Use your enhanced vision to locate targets without being seen and shot. Use your acid spray for close range defense. Use your incredibly strong acid to make short work of everything in your way.

(Latest Alpha sprites are still used in Mob NPCs instead of players)

Praetorian PA- Praetorian.png

Sprite Circulation: October 30th, 2014 - June 11th, 2016

Alpha-Praetorian.png

Sprite Circulation: June 11th, 2016 - May 21st, 2018

Alien-Praetorian.png

Sprite Circulation: May 21st, 2018 - Current

Description:

Offence: Act as a surrogate Queen. Use your powerful pheromones to lead and support major assaults. Enjoy even stronger neurotoxin and acid spits. Use a special resin spit to cover a small area in mobility-inhibiting sticky resin. Use your strong acid to quickly melt into places.

Crusher Not Applicable

Sprite Circulation: N/A

Alpha Crusher.png

Sprite Circulation: August 14th, 2015 - June 11th, 2016

2nd Alpha-Crusher.png

Sprite Circulation: June 11th, 2016 - Current

Not Applicable

Sprite Circulation: N/A

Description:

Defence: Make use of your armored front crest and your massive body to shield and tank bullets. Eat up explosions without flinching thanks to your thick hide. Charge your foes down and stomp on them to dislodge every single bone in their body.

Ravager PA-Ravager.png

Sprite Circulation: October 30th, 2014 - June 11th, 2016

Alpha - Ravager.png

Sprite Circulation: June 11th, 2016 - May 21st, 2018

Alien-Ravager.png

Sprite Circulation: May 21st, 2018 - Current

Description:

Offence: The bringer of death. Very powerful claws, and able to charge to close short distances.

Burrower Not Applicable

Sprite Circulation: N/A

Not Applicable

Sprite Circulation: N/A

Alien-Burrower.png

Sprite Circulation: Sept 25th, 2018 - Current

Description:

During the Omega period this caste was changed to a tier 2 as of September 25th 2018.

Caste Pre-Alpha Alpha Omega Additional Information
Queen PA Queen.png

Sprite Circulation: October 30th, 2014 - April 7th, 2015

2nd PA Queen.png

Sprite Circulation: April 7th, 2015 - June 11th, 2016

Alpha Queen.png

Sprite Circulation: June 11th, 2016 - June 24th, 2018

Queen.png

Sprite Circulation: June 24th, 2018 - Current


Description:

Lead the hive.