User:HKO2006/SS13 setup char
More actions
Getting Started

Rules
Every server has their own set of Rules. You MUST read all of the server rules before you start playing. If you don't you're likely to get banned. Not reading the rules (just because "you know the rules" and whatnot) is NOT an excuse!
Setting up a character
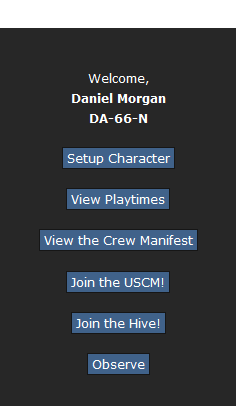
At the start of your game, you'll be in the Lobby Menu. From there, you have four options to choose from. Click Setup Character to open the window for customizing your human character and setting your roles.
| Option: | Function: |
|---|---|
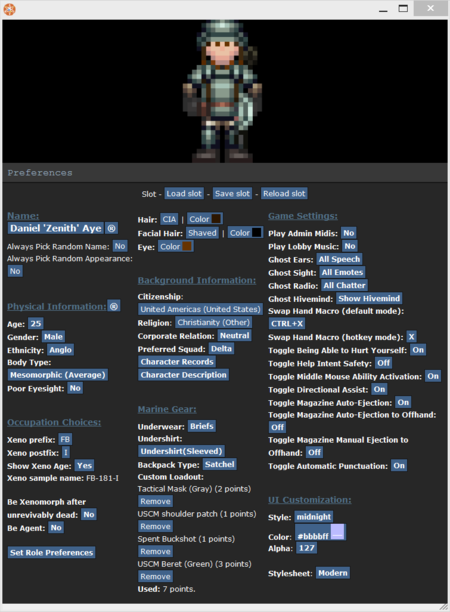
| Name |
Lets you change the name of your character. Many servers want your name to be realistic, but not based off something popular or something that is part of the game's lore, which includes this server. If you click (®) the name will be randomized. You may include a nickname in between your first name and last name. |
| Always Pick Random Name |
Lets you chose if your character's name will be randomized each round. |
| Physical Information |
Lets you choose your character's age, gender, skin colour, eyesight and body type. If you click (®) the settings will be randomized. |
| Age |
Lets you change the age of your character. This DOES NOT change the look of your character. It's just for roleplaying. |
| Gender |
Lets you change your character's gender between male and female. |
| Ethnicity |
Lets you change your body colour preselected from the options in it. |
| Body Type |
Lets you change your character's body type - Underweight, Average or Overweight. ((Unknown if it could change the look of the character)) |
| Poor Eyesight |
Lets you decide if your character requires glasses in order to see correctly or not. If you do, you'll spawn with a pair of Prescription Glasses. |
| Hair |
Lets you change your hair type and colour. |
| Facial Hair |
Lets you change your facial hair type and colour. |
| Eyes |
Lets you change your eye colour. |
| Option: | Function: |
|---|---|
| Be Xenomorph |
If selected it allows you to spawn as an alien upon round start. Additionally it allows you to join alien Larvae that are ready to burst as well as Larvae that are burrowed underground. If you're playing as an Alien for the first time, it is recommended to set all other roles to None or No and set Be Xenomorph to Yes. |
| Be Xenomorph Queen |
If selected it allows you to have a chance at spawning as the alien queen upon round start. Not recommended for beginners! |
| Be Survivor |
Allows you to have a chance at spawning as a survivor when the round starts. Not recommended for beginners! |
| Be Responder |
Allows you to become a responder during a distress signal. Not recommended for beginners! |
| Be Predator |
Allows you to spawn as a predator when the round starts. You must be whitelisted to play as a predator! |
| Be WO Commander |
Allows you be spawn as the commander when the map Whiskey Outpost starts. You must be whitelisted to play as a commander! |
| Set Marine Role Preferences |
Allows you to pick what marine role you play when the round starts. If you're playing as a Marine for the first time, it is recommended to set all other roles to None or No and Squad Marine to HIGH. |
| Option: | Function: |
|---|---|
| Marine Gear |
Lets you choose your underwear, undershirt, backpack type and your custom loadout for your character. |
| Custom Loadout |
Lets you pick items like berets and cigars to spawn with at the start of the round. |
| Option: | Function: |
|---|---|
| UI Customization |
Changes the look of your in game interface. |
| Custom UI |
While not listed directly in the setup, this changes the color and transparency of the UI. White UI is recommended. |
| Option: | Function: |
|---|---|
| Citizenship |
Lets you change your characters citizenship e.g where you come from. This is only for roleplaying. |
| Religion |
Lets you change your characters religion. This is only for roleplaying. |
| Corporate Relationship |
Allows you to set your character's relationship to Weyland-Yutani. This is only for roleplaying. |
| Preferred Squad |
Allows you to set your character's preferred squad (Alpha, Bravo, Charlie, Delta or None). This increases the chance of being spawned in that squad. |
| Character Records |
Allows you to edit your medical, employment, and security records. This is only for roleplaying. |
| Character Description |
Lets you describe your character's physical description in a more in-depth form. This is shown to another player when they examine your character. You do, however, have a hidden character limit while making your description. |
| Option: | Function: |
|---|---|
| Play Admin Midis |
If enabled you will hear sounds that admins play during the round, like music or round-related noises. |
| Play Lobby Music |
If enabled you will hear the lobby music while you're in the lobby. |
| Ghost Ears |
Lets you chose to see all the /say dialogue in the round or only sounds in sight while you're a ghost. |
| Ghost Sight |
Lets you chose to see all the certain emotes (Like Bob gasps! or /me actions) in the round or only the /me actions in sight while you're a ghost. |
| Ghost Radio |
Lets you chose between hearing all the radio chatter or only the radio chatter of the people near you while you're a ghost. |
| Ghost Hivemind |
Lets you chose between hearing all the Hivemind chatter or only the Hivemind chatter of the aliens near you while you're a ghost. |
Joining a Round
- If a round hasn't started yet you can select "Ready Up" and you'll spawn in when the round starts.
- If you join in the middle of the round and want to play as a marine you select "Join the USCM!" . When you select "Join the USCM!" you'll get a list of roles you can play. Select one and you'll spawn in.
- If you join in the middle of the round and want to play as an alien select "Join the Hive!" . When you select "Join the Hive!" you'll need to wait until a larva bursts for you to play.
- If you want to spectate the entire round and learn the basics while you're not playing select "Observe". When you select "Observe" you'll receive a confirmation if you wanted to join as a ghost. You cannot respawn as a Marine once you spectate the round! You can respawn, however, as an alien or other characters that might be in this round. Keep in mind that the Metagaming rule applies when repsawning as a character from a ghost.


