Vehicle Crewman: Difference between revisions
More actions
XSlayer300 (talk | contribs) No edit summary |
Forest2001 (talk | contribs) m Cupola IFF Update |
||
| Line 307: | Line 307: | ||
|- | |- | ||
![[File:TankModule_Secondary-M56-Cupola.png]]<br>M56 Cupola | ![[File:TankModule_Secondary-M56-Cupola.png]]<br>M56 Cupola | ||
|A heavily modified smartgun made for tanks. Has IFF features. | |A heavily modified smartgun made for tanks. Has IFF features. '''Note: The IFF feature is currently non-functional''' | ||
'''Costs:400''' | '''Costs:400''' | ||
Revision as of 16:20, 9 May 2020
 |
Difficulty: Hard Supervisors: Command staff Rank: Sergeant First Class Duties: Operate the M34A2 Longstreet Light Tank or M577 Armored Personnel Carrier, and provide the deployed troops with vehicular support during the operation. Guides: No external guides Unlock Requirements: Six hours as any squad role, three hours as a Squad Engineer Detailed Description: Your job is to operate and maintain the ship's armored vehicles. You are in charge of representing the armored presence amongst the marines during the operation, as well as maintaining and repairing your own vehicles. |__________| |
"The Ridge' is a scary tank. Its got stealth, mobility, firepower and point defenses better'n anything we had on the M22. What's so neat is the way the automatics handle the workload - you'd think you need at least three crew to run all this crap, but in fact you can do it with the same two girls you had in the Jackson. The only problem we had in our battalion was running the panzers in after they were delivered, factory fresh - you need to fire the guns a lot and run all the equipment a number of times before the sensors and weapons settle down and fully integrate." - Capt. Andrea Mae Samona, 2nd Colonial Marine Tank Battalion, Colonial Marines Tech Manual
Overview
After you somehow passed the vehicle operator test you're now finally going to get to use the vehicles the USCM provides during a military operation, though you'll have to wait first as the vehicles you have has been left un-maintained in the vehicle bay throughout the Almayer's voyage. Make sure to either fix the vehicle yourself or to radio in to the resident grease monkeys over in engineering and tell them that you need the vehicle repaired and retrofitted.
Note: You the crewman, Maintenance Technicians, the Chief Engineer, and the synthetic are the only personnel currently capable of performing repairs and replacing parts of the tank.
Ask the personnel who are repairing your tank to also attach the starting modules unless you are doing it yourself.
The Vehicles
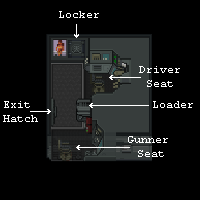
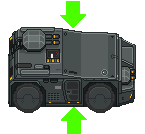
- Once the Tank has been fully repaired and retrofitted head to the highlighted green square at the sides of the Tank (as seen below) and click on the Tank . Upon clicking the Tank from that position will appear into the interior of the Tank . Make sure to discuss with your tanker companion which seat to take.
| Armored Personnel Carrier: | Description: | |||
|---|---|---|---|---|
 M577 Armored Personnel Carrier |
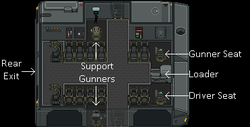
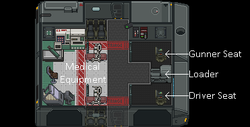
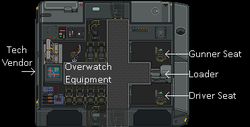
A versatile Armored Personnel Carrier (APC). Doesn't have any armor so be careful when sustaining damage. Has 3 variants, Transport, Medical and Command.
Only Vehicle Crewmen can operate the APC. |
- Once the APC has been fully repaired and retrofitted head to the highlighted green square at the sides of the APC (as seen below) and click on the APC. Upon clicking the APC from that position will appear into the interior of the APC. Make sure to discuss with your tanker companion which seat to take.
Repairing Modules
Due to your crafty ingenuity and taking a course at your engineering college where you've somehow learned to drive tanks and APCs, you're now able to repair your own modules on the go! Assuming it's not Fucked Up Beyond All Repair, you'll be able to repair all modules back to pristine condition! Simply take any damaged modules off of the vehicle, weld it and you've repaired the module by a certain percentage. Continue doing so until you've fixed it all.
Pull down your goggles or get your welding helmet at crewmen's quarter (in hangar, south of dropship 2), remember to flip them down before you start to avoid eye damage when welding. Remember to turn off your welder before refilling or the fuel tank will blow up.
The Vehicle Operators
There can only be two Vehicle Crewmen on the Almayer. This is useful, because the vehicles of the USCM requires a driver, and a gunner; one person cannot operate both at the same time effectively. Each Vehicle Crew member is able to fulfill either role, and switch out at either time with their fellow tanker. In case a tank crew is SSD inside the tank, you can use grab intent and click the vehicle exit to drag them out.
| Role: | Description: |
|---|---|
| The Driver | Drives the vehicles of the USCM. You are only able to move the tank backwards or forwards of where you are facing. You must rotate the tank clockwise or counter-clockwise in order to turn. |
| The Gunner | Utilises the support, secondary and main armaments of the vehicles of the USCM. Be wise though, that some weapons only fires in a 45 degree angle, which means the vehicle must always be turning. But for the tank, you're able to rotate the turret to fire in any direction. Though there is a small delay between turning turret. |
Driver
| Driving the Vehicles: | Description: |
|---|---|
|
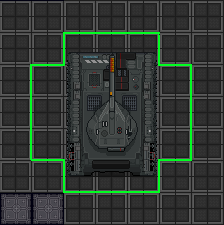
The Green highlighted areas are places you can turn the vehicles to. You are able to do so by using either WASD or the arrow keys.
|
|
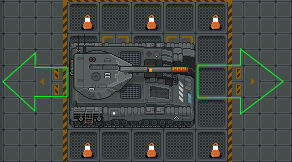
The arrows show that the vehicles can only move forward/backwards when facing that direction. |
|
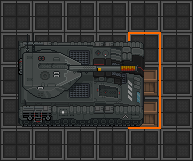
Areas highlighted in orange means that the vehicles is not able to move. The object must either be removed or destroyed in order for the tank to rotate. The vehicles can destroy walls/resin structures (up to reinforced walls) by continuously driving into them. Doing this damages the vehicles's modules so be careful not to over do it. The weapons on some vehicles are an alternative for destroying walls/resin structures, though you will be expending a lot of ammunition to take them down. It's best to find another route or get the marines to remove it. |
Gunner
| Using the armaments: | Description: |
|---|---|
| Switching the vehicle's weapons | In order to change the weapon you are currently using. You must click on the Vehicle tab and click Cycle Hardpoint Module (you can bind a hotkey for it with Macros). A menu will open, allowing you to select from Primary, Secondary and Support if you have them installed on the tank. |
| Using the weapons | To be able to fire any of the weapons when selected, you simply left click' on a tile to fire the armament selected. To fire the alternative armament, middle click a tile. If you select the support module, you can Click a tile to activate it. You can also use middle click to fire the primary armament and Ctrl+Click to fire the secondary armament while having the support module selected. Do note that this method can only be used while the support module is selected. IMPORTANT: Do note that the tank's primary armaments only has a 90 degrees firing arc, which means the tank must constantly rotate in order to fire elsewhere. Secondary and support armaments will have a 180 degrees firing arc. You are also unable to point while in the tank as well as shoot anything directly next to it. |
| Reloading | Inside the vehicles interior, click on the auto loader, there will be a menu that'll pop open. Select the armament you want to reload in order to reload it. |
Vehicle Modules 
The modules listed below are available for purchase from the Vehicle Equipment Fabricator or the Vehicle Equipment Vendor next to the ASRS Elevator at round-start, note that the fabricator needs to be authorized points through the DEFCON system as it starts with none.
| Main Armament Module: | Description: | ||
|---|---|---|---|
 LTB Cannon |
The LTB Cannon is a formidable high explosive primary armament which can heavily damage a target upon direct hit. It has a medium-sized area of effect when fired, causing all within the explosion radius to take damage. The LTB Cannon can additionally have 3 magazines loaded for a total of 12 shots, reloading after every 4.
DEFCON 2 ONLY Costs:600
| ||
 AC3-E Autocannon |
The AC3-E Autocannon is a primary armament for the tank. It fires explosive flak rounds that decimate enemy combatants within a tight area, damaging anyone in range with its flak.
Costs:600
| ||
 DRG-NF Flamethrower |
 Costs:600
| ||
 LTAA AP Minigun |
The LTAA AP Minigun fires armor piercing rounds at a high fire rate. Its ability to fire projectiles in rapid succession dominates against any infantry opponent, shredding them apart. Can hold 1 extra magazine.
Costs:600
| ||
 Boyar's Dual Flak Cannon |
A primary two-barrel cannon for the APC that shoots explosive flak rounds. Fires in two round bursts. The flak rounds are similar to the Auto-Cannon on the Tank.
Costs:600
|
| Secondary Armament Module: | Description: | ||
|---|---|---|---|
 Secondary Flamer Unit |
 Costs:400
| ||
 TOW Launcher |
Fires rockets at the enemy.
DEFCON 2 ONLY Costs:500
| ||
 M56 Cupola |
A heavily modified smartgun made for tanks. Has IFF features. Note: The IFF feature is currently non-functional
Costs:400
| ||
 Grenade Launcher |
A heavily modified grenade launcher made for tanks. Fires grenades. Can hold 4 magazines including one into the chamber.
Costs:300
| ||
 RE-RE700 Frontal Cannon |
The marketing department over at Bleihagel would have you believe that the RE-RE700 is an original design. However, experts who pried the cover off the cannon have discovered an object with a striking similarity to the popular M56 Cupola. It is still unknown why the cannon has two barrels. Though they seem similar, the RE-RE700 does not have IFF.
Costs:400
|
| Support Module: | Description: | ||
|---|---|---|---|
 Smoke Launcher |
Launches smoke forward to obscure vision.
Costs:250
| ||
 Integrated Weapons Sensor Array |
Improves the accuracy and fire rate of all onboard weapons.
Costs:300 | ||
 Overdrive Enhancer |
Increases the movement speed of the vehicle it's attached to.
| ||
 Artillery Module |
Enables the gunner to see further. Similar to binoculars in function.
| ||
 Flare Module |
Fires flares in the direction you're facing.
|
| Armor Module: | Description: |
|---|---|
 Concussive Armor |
A jack of all trades against all sources of damage. Also protects against damage if you ram into a wall.
Costs:600 |
 Caustic Armor |
Protects the tank from chemical weapons and acid attacks.
Costs:800 |
 Ballistic Armor |
Protects the tank from high penetration weapons and slashing attempts.
Costs:600 |
 Paladin Armor |
Protects the tank from large explosive projectiles.
Costs:600 |
 Snowplow Armor |
Provides no armor but the ability to plow through snow tiles to forge supply lines out of the cold wasteland that is Shivas Snowball. Additionally targets ran over will take additional damage.
Costs:500 |
| Treads and Wheels: | Description: |
|---|---|
 Tank Treads |
Integral to the movement of the tank.
Costs:300 |
 Tank Robus Treads |
A more reinforced and stronger variant of the tank's treads. Though with the stronger tracks, it will slow the tank down a bit more.
Costs:350 |
 APC Wheels |
The wheels of the APC. Necessary for it to move.
Costs:300 |
Your Skillset
File:Tank Crewman Skillset.png
To find out about how the skill system works head over to the skills system page.


