More actions
Eod501 wiki (talk | contribs) (QC is gone) |
m (Protected "Military Police" ([Edit=⧼protect-level-Trusted⧽] (indefinite) [Move=⧼protect-level-Trusted⧽] (indefinite))) |
(No difference)
| |
Revision as of 20:22, 31 May 2023
 |
Difficulty: Hard Supervisors: Command Officers, Chief MP, Warden and Marine Law Rank: Sergeant Duties: Enforce Marine Law. Detain Criminals. Keep Shipside Personnel Safe. Guides: Marine Law, Server Rules, Rank Unlock Requirements: Ten hours as Squad Roles. Detailed Description: You are held by a higher standard and are required to obey not only the server rules but the Marine Law. Failure to do so may result in a job ban or server ban. |__________| |
"The difference between a normal policeman and a military policeman, is that a military policeman deals with trained killers" - Anonymous.
Overview
DISCLAIMER: Keep in Mind that both Marine Law, Server Rules, Rank occasionally change, meaning parts of this guide can then be out of date. If this guide ever contradicts what is being said in one of those three pages, notify the Wiki Maintainer and follow what is said in those pages.
As a Military Police Officer, your primary duty is to obey and enforce Marine Law.
MPs are held to a very high standard of conduct because you are the source of in-character discipline as well as the server's first line of defense against out-of-character infractions. You are bound to Marine Law as Server Rules meaning if you break any laws in Marine Law you risk being punished outside of "In Character", meaning you may be Job banned or even outright banned due to your actions.
Enforcing Marine Law may be a hard task due to Marines being up to no good and refusing to come quietly. But fear not, you are equipped with state of the art Non-Lethal Weaponry that can keep a marine down for the time you need to get them cuffed and transported to the brig.
When it comes to Marine Law matters, you are always to listen to the CMP above all else as long as it does not interfere with Marine Law or Server Rules. The only one higher than the CMP in marine law is the CO and High Command. If you are ever in doubt, Ahelp the Situation and Ask before proceeding. This can save a lot of hassle and is a good tip you should keep in mind. You should never act against the Commanding Officer or Chief MP without a very good IC reason. Your job is to keep the ship safe and enforce marine law.
Unless Authorized by the CMP or aCO you are NEVER to use lethal force against a Suspect. - See Marine Law for more information.
Patrolling & Investigations
When beginning your shift, your first task is generally to get geared up and report to the checkpoints, req or briefing as per your CMP's orders. The briefing can be a delicate time and can get out of hand very quickly, be diplomatic, and always remember you are outnumbered. Once the marines have gone down it's time to patrol the ship unless told otherwise, check all rooms of the ship you never know what you might find or who you might find.
Access Privileges
As MP you have access to most places onboard the ship, but there are certain places you do not have access to such as upper medbay. This is for various reasons such as gameplay, but if you have a proper RP reason you may request the aCO to give you access to the specific area that is needed from the ID Computer in CiC or Briefing if it is for an extended amount of time such as to be stationed as a guard by the Containment cells in upper medbay.
If it is just a search on a person or area, follow the procedure listed in Marine Law here: Search Procedure
Due to MP's having access to almost all places onboard the ship you will often be called to help out CT's, Doctors, or OT's even for various reasons, but make sure you always prioritize between requests. A doctor that needs access to a prep room since a marine has died there comes before an OT needing access to fix a light another place.
List of Areas MP's can't access:
- Any specialized prep room (Spec, engineer, medic, smartgunner and squad leader.)
- Upper research
- Morgue
- Research containment
- Chemistry Laboratory LVL1
- Medical lockers
Application of the law
Prisoners
Detainment and Brig Procedures should always be followed meaning you do every step as stated in no particular order. If a prisoner harms himself or tries to break the window, you can temporarily cuff him to the bed, run to Perma and grab a Straightjacket. The Straightjacket will remain on for the duration of the timer until the prisoner is released.
As a Military Policeman, you are assigned to the protection of USCM prisoners as well as POW (Prisoners of War) held in the Brig. Remember, you're not a 'no-mercy' type of officer from the early wars and should treat Prisoners by Marine Law.
Once a prisoner is appropriately sentenced you are to make sure they are provided their basic rights which CANNOT be denied, such as Medical treatment, food, etc ... except for in extreme situations with approval from the Chief Military Police Officer or the Commanding Officer.
NJP's
As per Marine Law for crimes with a sentence equal to or lower than 10 minutes, the arresting MP, Chief MP or the Commanding Officer may administer a Non-Judicial Punishment instead of a brig sentence. NJPs may only be issued to those they outrank. You must still update the records, and if they do not complete the NJP, you may add 10 minutes to the sentence. NJPs may only be as long as the punishment would be, and no longer.
Possible NJP suggestions:
- Clean up briefing/req/lounge
- Mopping floors
- Push-ups or laps
- Writing an apology letter
Survivors
You may not always be informed when someone comes aboard, but when found or informed this can be a good outline of things you should do to cover your bases.
1. Secure any weapons. This is preferably done in the brig or another secure area. Ensure all bags, belts, boots and any other container on their persons is checked for items in contravention of current Marine Law
2. If done in the brig you can do a quick scan of them in the brig medbay if they weren't first checked out or treated when they arrived.
3. Update their ID to colonist or passenger at the ID computer in the CIC or the one near briefing. In addition to this, survivors can also be enlisted into the USCM as a private, with the permission of the Commanding Officer. Once completed you can print the access report for the CMP or use it for the next step.
4. Add the survivor to the ship security records and optionally remove their gloves and take prints from the survivor with a forensic scanner for future investigations. Take a photo of their front-facing and side facing sprite to also add to the records.
5. The CL, CO, CMP or researcher may want to RP with them. Contact them!
5. If the aCO allows them to assume a role in one of the departments, you can update the ID to reflect the change.
- Armed survivors in the CIC is a big danger to the command staff and operations; they should be intercepted before they can gain access.
- Colonial marshalls are not from the Marshal provost office and do not receive immunity. Ahelp when unsure!
- Survivors cannot keep their weapons while on the ship if at a green alert level.
- You cannot take fingerprints from someone wearing gloves.
Updating ID's or demotions
To demote or add someone to the crew. Try to use the ID they are wearing as opposed to creating a new ID from a blank card.
1. Take their ID and enter it into the Target Identity slot on the ID computer
2. Enter your ID into the Authorized Identify slot
3. Under the assignment section, you can set someone to a job, and it will automatically assign the appropriate privileges to the ID or remove them in a demotion.
4. Alternatively, you can manually change accesses by adding or subtracting areas of access.
- If you do not change the assignment or use a custom assignment on a colonist ID they will continue to display a File:Unknown.png on the security HUD
- ID cards without "USS Almayer Identification" checked will detonate claymores and be engaged by sentries. It must always be checked on friendlies!
- Survivors cannot be given combat, police, command roles or assignments in departments they don't have skills in.
- Custom roles can be assigned such as Janitor, Pastor, Chef, Receptionist, etc..
- At this time REQ or Command positions are not assignable by MP's.
Your Workspace
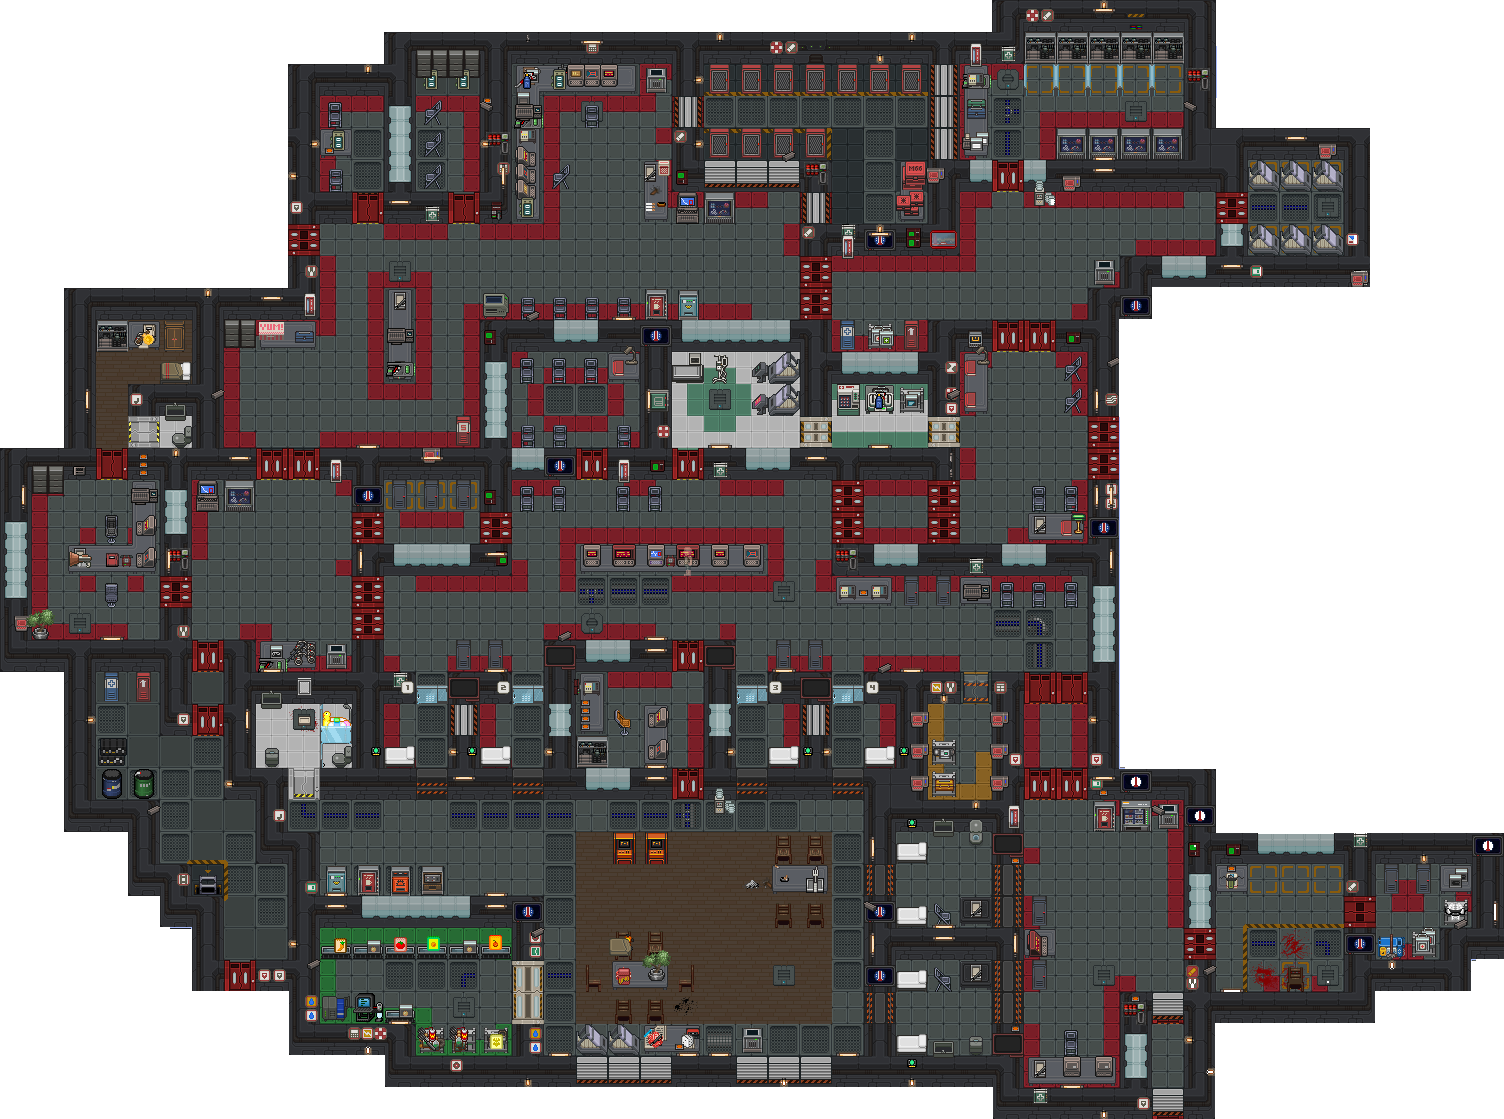
The Brig is located West (fore) of Briefing and can be accessed through the numerous doors on each side.
The Brig is likely where you will spend a lot of time as MP. The Chief MP's office is in the north checkpoint and contains a fax machine, records console, and a camera console plus the CMP's bunks.
To the south (or port) of the office is the brig itself. It contains the brig cells with timers, you can also find the general work area there, which includes some vendors, the Evidence room, some general gear, and the forensic computer. The infirmary where prisoners can be treated is located next to the general work area. The holding cells, the execution room, and the isolation cells or as its also known; perma. It is located in the main part of the brig.
The Execution room is where the executions usually should happen. It contains a single chair for the unlucky person that will have his/her life ended and in the corner of the room: a blindfold, pack of cigarettes and a lighter. In the bottom right corner, there is a locker. The locker itself can only be opened by the CMO/CO. Inside the locker lies the lethal injection in both syringe and autoinjector forms. The lethal injection procedure is made up of a cocktail of dangerous drugs. For the procedure of Execution, please see Marine Law - Executions.
The Perma section has two lockers for the prisoner's gear and is equipped with the standard radio headset, prisoner orange jumpsuit, and orange boots. The perma cells vary a bit between each other but have a few things in common like flash's Mounted in the cells and blast shield doors that can be brought down. Next to the Isolation cells in perma is where you find some straightjackets and muzzles for bad-tempered prisoners.
Armory and Security Lockers
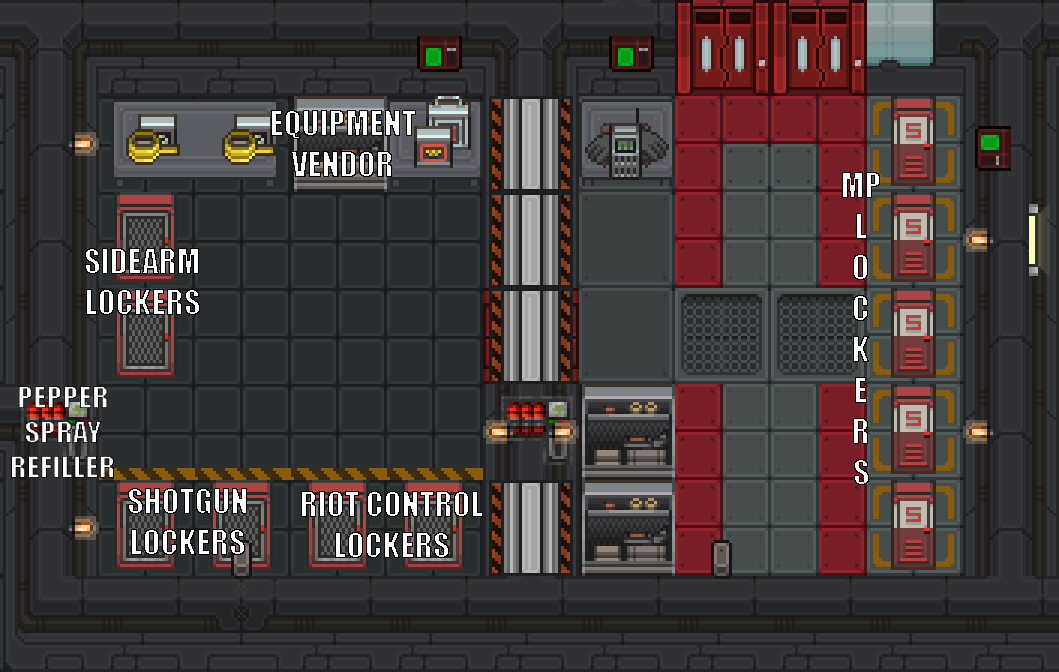
The Armory and Security lockers, located in the south checkpoint contains six lockers in the armory and the security lockers outside. The lockers in the armory are bulletproof and only open on Red Alert, but can be opened manually by the CMP or the XO/CO.
Sidearm Lockers:
- M4A3 Service Pistol's
- M4A3 Magazines.
Riot Control Lockers:
- Box of Flashbangs
- Box of M66 Tear Gas Grenades
- M81 Riot Grenade Launchers
- Gas Masks
- M37A2 Shotguns
- Shotgun Bean Bag Shells
- M5 Riot Armor and Helmet
- Riot Shield
Shotgun Lockers:
- Mk221 Tactical Shotguns
- Box of Shotgun Slug Shells
- Box of Shotgun Buckshot Shells
MP Lockers
- A spare uniform set with a headset and armor
- Flashlight
- SecHud
- Pepper Spray
- Taser
- Stun Baton
- Flash
- Handcuffs
- Medium General Pouch
- Security Backpack
Your Tools
Being an MP is not an easy job. You are responsible for the security and law of the ship. Luckily, you have plenty of tools at your disposal to help you fulfill your duties.
- The Fax Machine: This is used for contacting High Command. Primarily used to ask permission to remove the acting Commanding Officer from their position, it may also be used to inform High Command of unusual circumstances and receive instructions on how to proceed and when in doubt of the CMP's action you can report it through the fax machine. Make sure you send a properly formatted Fax. It makes it both easier to read and looks more quite a lot more professional. You can find the proper format to use and a lot of other goodies in our Paperwork Guide.
- The Records Console: You can find this console in the general brig area, at security checkpoints, and the CMP's office. It is used to review and update records and as such is one of your most essential tools. Use it to make sure people have their status (arrest, released, incarcerated, or none) as well as any crimes they may have committed up to date. Status and comments may also be edited by examining someone if you have a secHUD on. To identify fingerprints found on your forensic scanner, click the console with your scanner in hand to place it in, and then print out the results. Note: Removing your ID does not log you out. It is imperative you don't leave a computer logged in especially in high traffic areas such as the CIC Entrance. The logs will show as if you made the changes.
- The Camera Console: There's one of these in the brig and a few more scattered around the ship in checkpoints and other workstations. The Console allows you to see through any camera in the USS Almayer, and it's useful to find or follow fleeing suspects as well as to keep an eye on shipside operations.
- Recharger: There is one in the brig and a few in Medbay. They can charge up stuff that runs on electricity. Some of the Equipment it can charge is: Stun baton, Flash.
- Pepper spray refiller: Located in the brig armory and locker room, can be used to refill pepper spray.
- HUDGlasses: Wearing these glasses will show jobs onboard the Almayer, someone not on the crew-list or not wearing ID.
File:Unknown.png Unknown
File:Wanted.png Arrest - Examine them to find out why they are wanted.
File:Incarcerated.png Incarcerated - This can be an indication of a prisoner that has broken out, call this in and check it out!
File:Released.png Released - Keep an eye on these in case they continue their mischief.
- MP tools: You have access to a variety of items such as flashes, handcuffs, and tasers to help you control and subdue hostiles.
Equipment
Jurisdictional Automated System
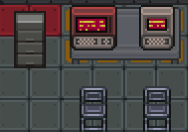
A new helpful tool has been installed in the brig, the ever fine Jurisdictional Management System. You may be asking yourself, how do I use this machine? It is all quite simple, and by following this easy guide you will master it.
Firstly, open the machine by clicking on it.
Secondly, you will then be prompted with TWO options: Import Report; where you can Insert an existing Security Incident Report Paper, and then New Report; where you can create a new report. Select New Report for now.
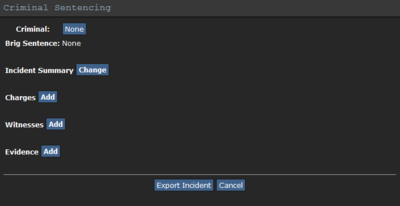
Thirdly, you will be brought to a page with various options. You can select the Criminal, Incident Summary, Charges, Witnesses, and Evidence.
Fourthly, input your info:
- Take the prisoners ID and click on the criminal option, this will set them as the perpetrator.
- Next write out the incident under incident summary, just describe what happened. This is basically the event that justified an arrest.
- Then select the crimes option to apply charges. Once selected you can choose from Minor, Major, Capital, and Additional Crimes.
- Same as selecting the criminal you can additionally add a witness to the report by taking their ID and clicking on the witness option; also you can add notes about the witness afterwards.
- Finally import evidence, take any item involved and click on the evidence option. This will enter it in your report; you can also add notes on the evidence if desired.
Lastly, hit Export Incident and a piece of paper will pop out. Grab the paper and bring it over to any of the Brig Cell Displays on the wall adjacent to the sliding glass doors south of you. Insert the paper into the display, select the report, and then start the timer.
CONGRATULATIONS, now you know how to use the Jurisdictional Automated System.
Your Skillset
|
| ||||||||||||||||||||||||||||||||||||||||||||||||||||||
|
| ||||||||||||||||||||||||||||||||||||||||||||||||||||||
|
|
To find out about how the skill system works head over to the skills system page.


