| Line 20: | Line 20: | ||
= Your Squad = | = Your Squad = | ||
Once you have your earpiece on, you will see the Squad HUD. Your squad is led by '''[[Squad Leader]]''' [[File:Squad_leader_icon.png]], try to stay in his vision so SL can see you too. Second in command is '''[[Specialist|Squad Specialist]]''' [[File:Squad_specialist_icon.png]], try to distant your self few tiles away from Spec and don't be in front of them, as they tend to be too focused on the targets in sight and friendly-fire the marines in front. '''[[Squad Medic]]''' [[File:Squad_medic_icon.png]] are prime targets for the enemies, stay near them to guard them (and the wounded) when you are not pushing the enemy, same goes to '''[[Squad Engineer]]''' [[File:Squad_engineer_icon.png]]. '''[[Squad Smartgunner]]''' [[File:Smartgunner_icon.png]] can shoot pass marines so try to be in front of them to protect them during an assault. If they are ahead of everyone, point at them (shift + middle click) to remind them they are out of position. | |||
= The Weapons = | = The Weapons = | ||
Revision as of 07:23, 2 May 2018
 |
Difficulty: Easy Supervisors: Squad Leader Rank: Not defined Duties: Follow orders. Don't get yourself killed. Don't shoot your squadmates. Guides: Bullet Paths and Friendly Fire Unlock Requirements: Not available. Detailed Description: Not defined |__________| |
"How do I get out of this chickenshit outfit?"- Hudson, Aliens
You're in the United States Colonial Marine Corps. Follow your sergeant's orders and don't ask too many questions. Whether you've been to Hell and back or you're fresh out of Boot, you're expected to maintain a level of professionalism. Do your job, follow orders, and maybe you'll go home in one piece.
This guide assumes you have finished the Marine Quickstart Guide and will hopefully help you transit out from being a baldie.
Your Squad
Once you have your earpiece on, you will see the Squad HUD. Your squad is led by Squad Leader ![]() , try to stay in his vision so SL can see you too. Second in command is Squad Specialist
, try to stay in his vision so SL can see you too. Second in command is Squad Specialist ![]() , try to distant your self few tiles away from Spec and don't be in front of them, as they tend to be too focused on the targets in sight and friendly-fire the marines in front. Squad Medic
, try to distant your self few tiles away from Spec and don't be in front of them, as they tend to be too focused on the targets in sight and friendly-fire the marines in front. Squad Medic ![]() are prime targets for the enemies, stay near them to guard them (and the wounded) when you are not pushing the enemy, same goes to Squad Engineer
are prime targets for the enemies, stay near them to guard them (and the wounded) when you are not pushing the enemy, same goes to Squad Engineer ![]() . Squad Smartgunner
. Squad Smartgunner ![]() can shoot pass marines so try to be in front of them to protect them during an assault. If they are ahead of everyone, point at them (shift + middle click) to remind them they are out of position.
can shoot pass marines so try to be in front of them to protect them during an assault. If they are ahead of everyone, point at them (shift + middle click) to remind them they are out of position.
The Weapons
In Marine Quickstart Guide, M41A is recommended as the weapon of choice due to its versatility and ease of use. However, you may find other firearms more appealing to use. Below is a list of standard weapons to choose from, just click expand.
|
Attachments and Requisitions
Now you may have heard of that mythical land where special equipment, grenades and weapon mods flow like it's motherfucking Christmas. That place is called Requisitions and it ain't no Mount Olympus and that sweaty guy over there ain't Zeus. He's the RO. Rule motherfucking one: Don't fuck with the Requisitions Officer. If he says you don't get attachments, guess what, Boot? You don't get attachments. If he says so, the MPs will throw you in the fucking brig. So don't go screaming and trying to bash your way into cargo because you couldn't get a third red dot for the M39. Now, the RO answers to "On-High" and "On-High" has deemed it acceptable for you to request two to four attachments and probably 2 pieces of special equipment (such as webbing and grenades) from Requisitions, depending on how the RO sees it. To get these attachments you're treating like holy fucking relics, you must go to the requisitions line, located aft of the briefing room. Now, remember, the RO has a low tolerance for bullshit so if you show up in your underwear he'll refuse to serve you. Then your "buddies" will throw your ass out of the line. Then the MPs will kick your ass out of boredom.
Alright, you've managed to wake up, eat breakfast, get dressed, let your squad leader know you exist, and wait in a single file line for a little over three minutes. Aren't you fucking special? Think again! Your ass is still bottom of the food chain so don't hold your breath over getting anything good but seeing as you're holding some sort of weapon, I guess there's still hope for you yet. Everyone's got their favorite loadouts but it all boils down to what you prefer. Trial and error is the best way to know what you like and don't like.
In the field
You have superior firepower and can fire across the screen, the limiting factors are lighting, vision, and terrain.
Lighting
To overcome low visibility of the battlefield, you need a rail flashlight and flares. Rail flashlights not only extend your light range, it also extends your throw range (you can only throw/shoot at tiles that are lit), allowing you to throw flares further thus even more light. Rail flashlight increases your throw range from 3 tiles to 6 tiles (one tile into the dark).
Inventory management
Notable items to recover are:
- Squad Leader: OB, SB, Binocs, Motion Detector, Whistle, B12 armor and B11 helmet
- Engineer: Building materials, explosives, just take them out from backpack/pouches and give/drop them to other engineers
- Medic: Roller Bed, first aid kit (keep one or two advanced kit, standards can use them)
- Specialist/Smartgunner: Sights
logistics
Everyone who outranks you has their own tasks to handle, leaving only standards free enough to handle supplies.
- Bring crates back to FOB and onto the dropship, RO can recover them for supply points, use
 (:i) to tell RO there are crates in hanger
 - Bring supplies off the dropship to FOB (supply crates, ammo bags, etc) and from FOB onto dropship (wounded marines, empty Smartgunner powerpacks, etc)
- Bring some supplies to the front whenever you set off from FOB, be it an ammo/flare bag, a roller bed/statis bag or pull a crate of supplies (if the front is stable and you have few marines protecting on the way)
- To make sense of all the bags lying around, you can drag a bag, take one item then drop it on the bag, signifying what the bag contains. Throw the empty bags away to a corner.
First aid
Helping others
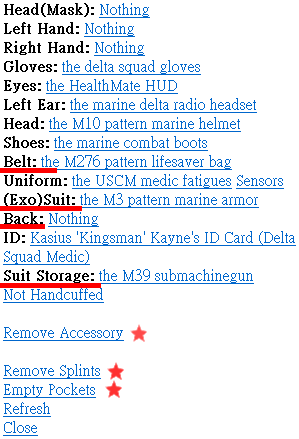
Before pulling a downed marine back in the front, use point at (shift + middle click) to show your intention of going in or to urge the nearer marines to pull them. As you are pulling the downed marine back, shift + click to check the marine, bandage the bleeding wounds when it's safe. If the marine is conscious (not seems to be asleep), shake them with Help intent to get them up, get them to a medic if he doesn't get up. If the marine has no pulse, get them to a medic then remove their armor (drag their sprites onto yours to open their equipment window, click ExoSuit: M3 armor) so that medic can immediately revive them (can't revive with armor on).
- Get splints
 , you can split the stack by holding it in the active hand then click it with another hand, restock the new stack (one splint) to a NanoMed
  then you keep the rest.
 - Get a roller bed in your bag so you can quickly transport wounded out in an emergency (being overrun/no Medic/no CASevac).
- Marines whose revive timer ran out, without a head, chestbursted and turned gray (aka husked, too much burn damage) are unrevivable.
Your Skillset
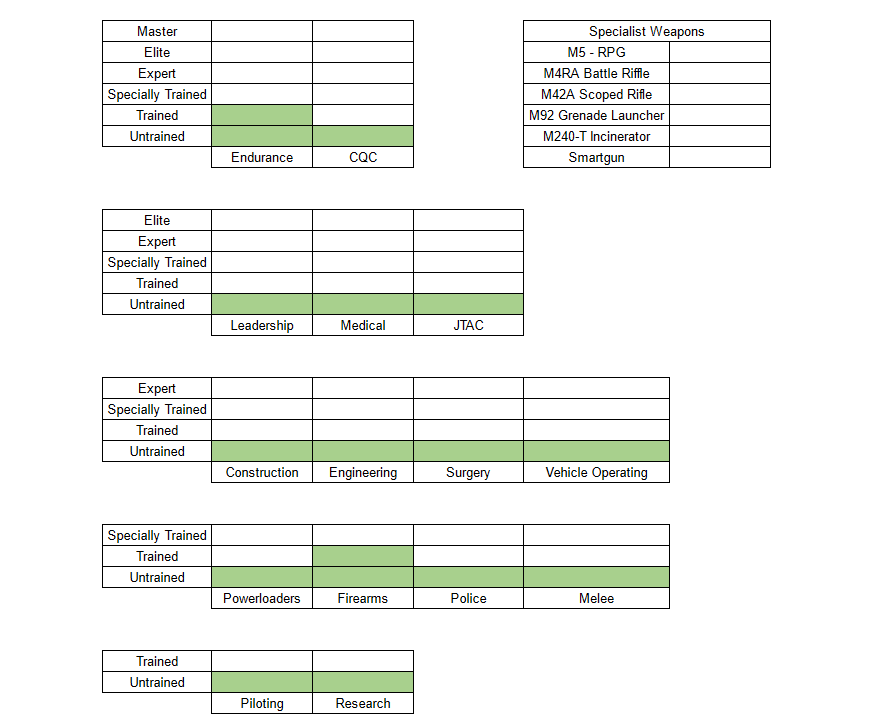
To find out about how the skill system works head over to the skills system page.
Tips
- Only take what you need. You're going to need somewhere between zero and one armor piercing magazine in the field for heavily armored enemies and probably more if you see tin men in the field. For everything else, soft point ammunition to hollowpoint to incendiary is superior.
- Stick with your squad at all times, a lone Marine is a dead Marine.
- Follow the chain of command. If someone tells you jump, you'd better ask how high on the way up.
- Use appropriate titles. Your Squad Leader is Staff Sergeant, or Squad Leader. He's not an officer so don't call him "Sir" and he's not in the Army so don't call him "Sarge."
- Be useful. Offer to carry extra engineering, medical, or some specialist/smartgunner supplies. Those guys are already carrying more weight than you'll ever be able to.
- Keep your superiors informed. Stay on the radio and keep the squad and command up to date on what's going on. Do you see movement outside the perimeter? Let your fireteam know. Did Private McFuckface blow his hand off playing catch with a grenade? Let your squad leader know. Did your staff sergeant just get his head taken off by incoming artillery? Let command know.
- Stay in the light. There ain't many things out there scarier than marines and they all like the dark. Keep your shoulder lamp on and pop a flare whenever you're stopped for more than a moment.
- Use single fire for long to medium ranges and burstfire for CQC and close range engagements. By doing this you conserve ammo but can still dish out the pain to incoming hostiles.


