More actions
(→Sulaco) |
|||
| Line 157: | Line 157: | ||
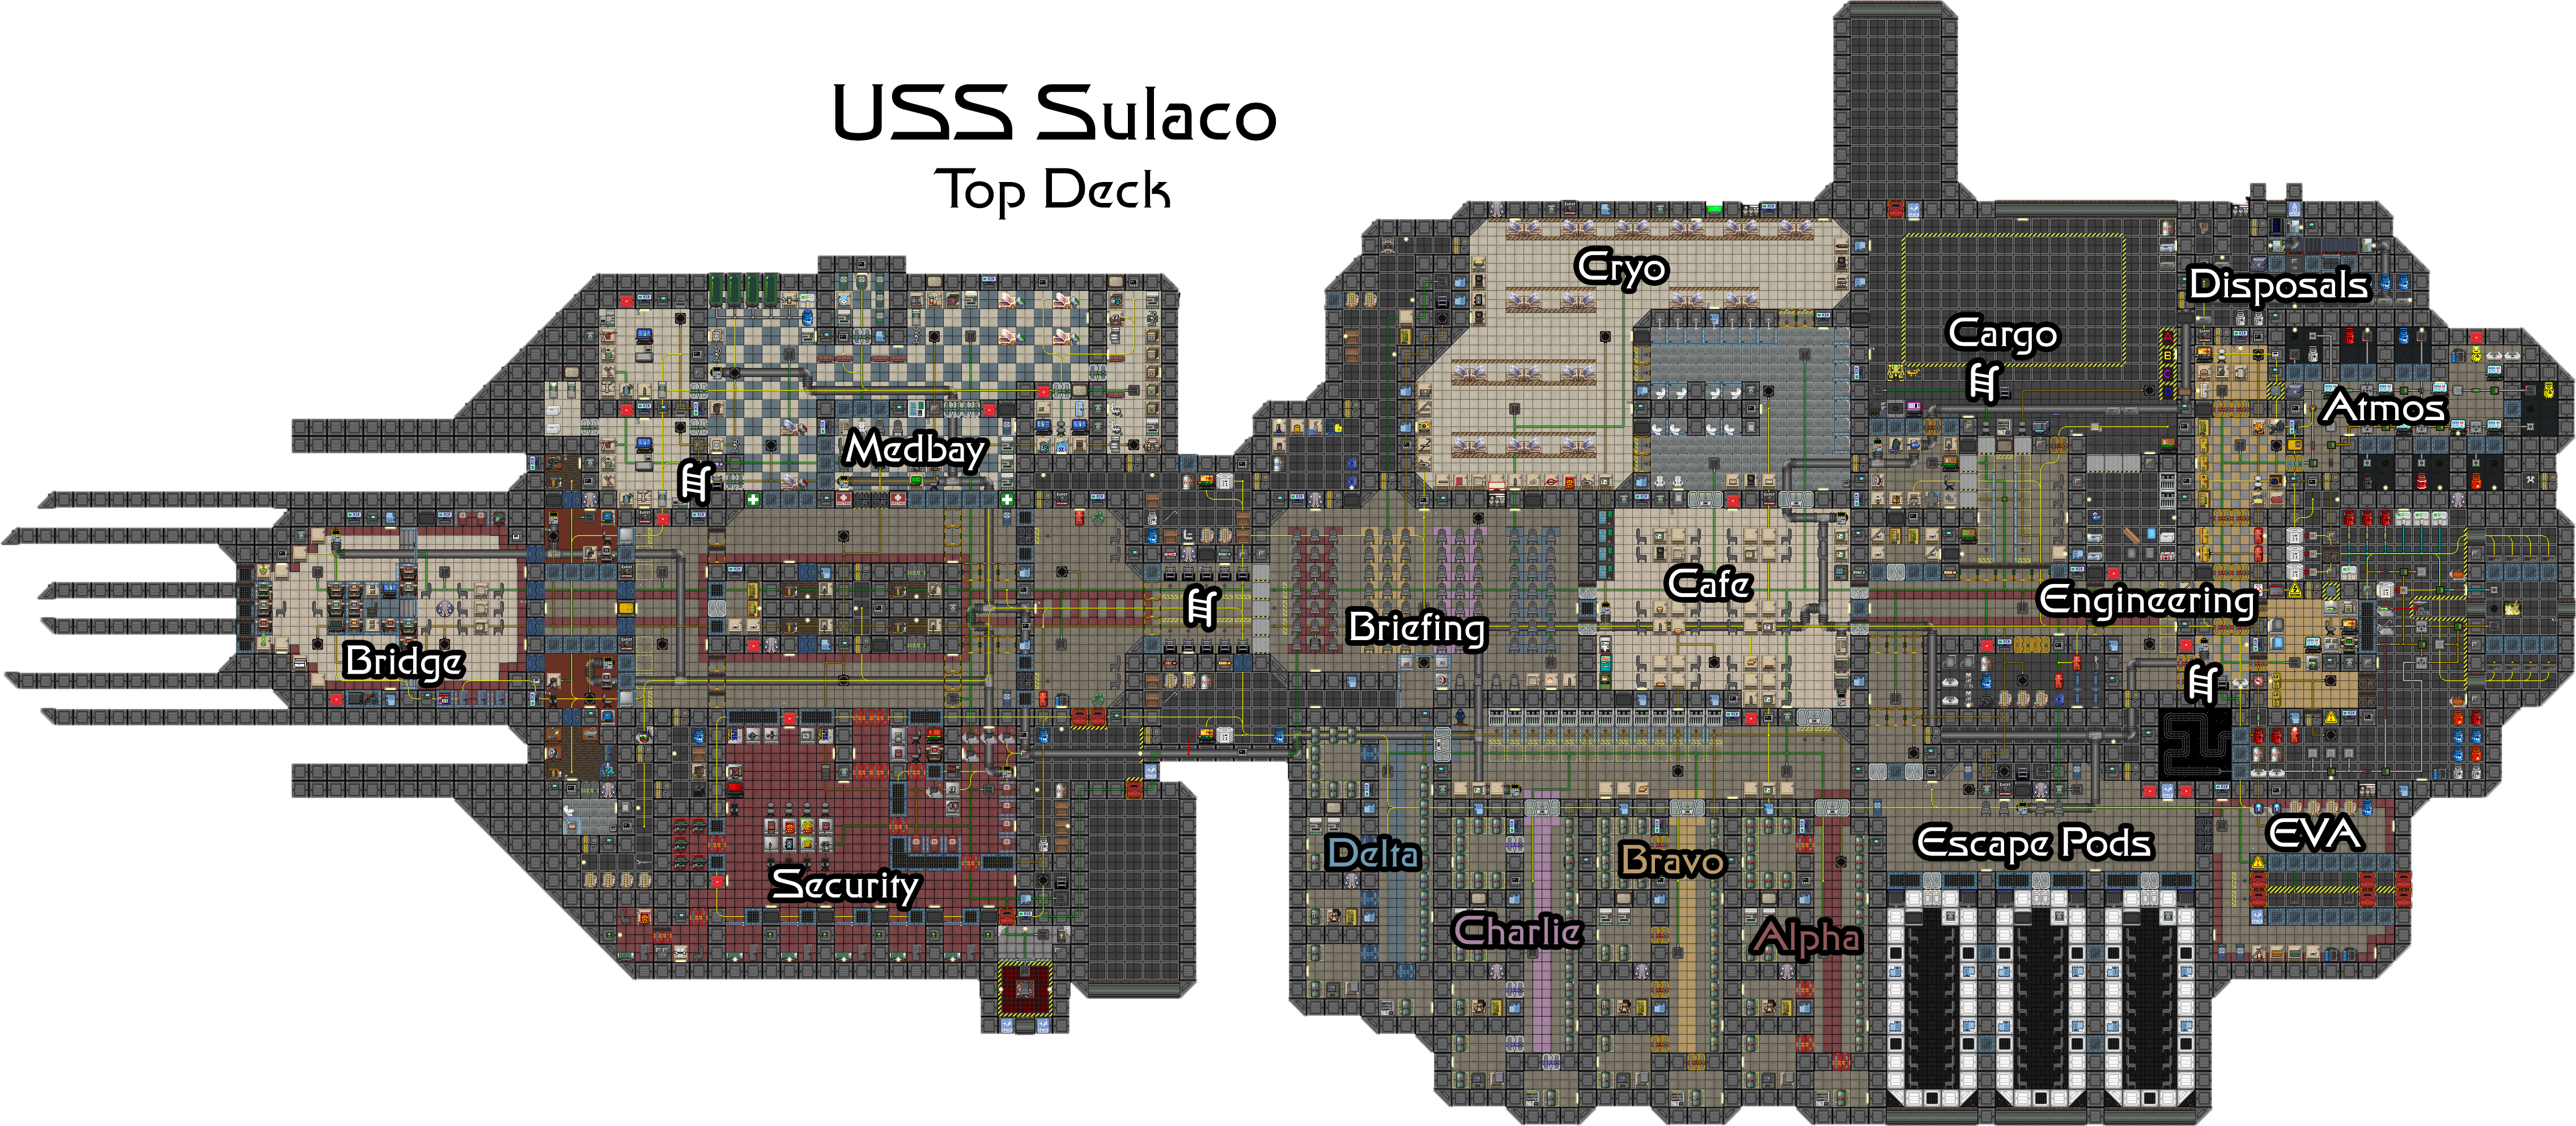
[[File:Sulaco_top.png]] | [[File:Sulaco_top.png]] | ||
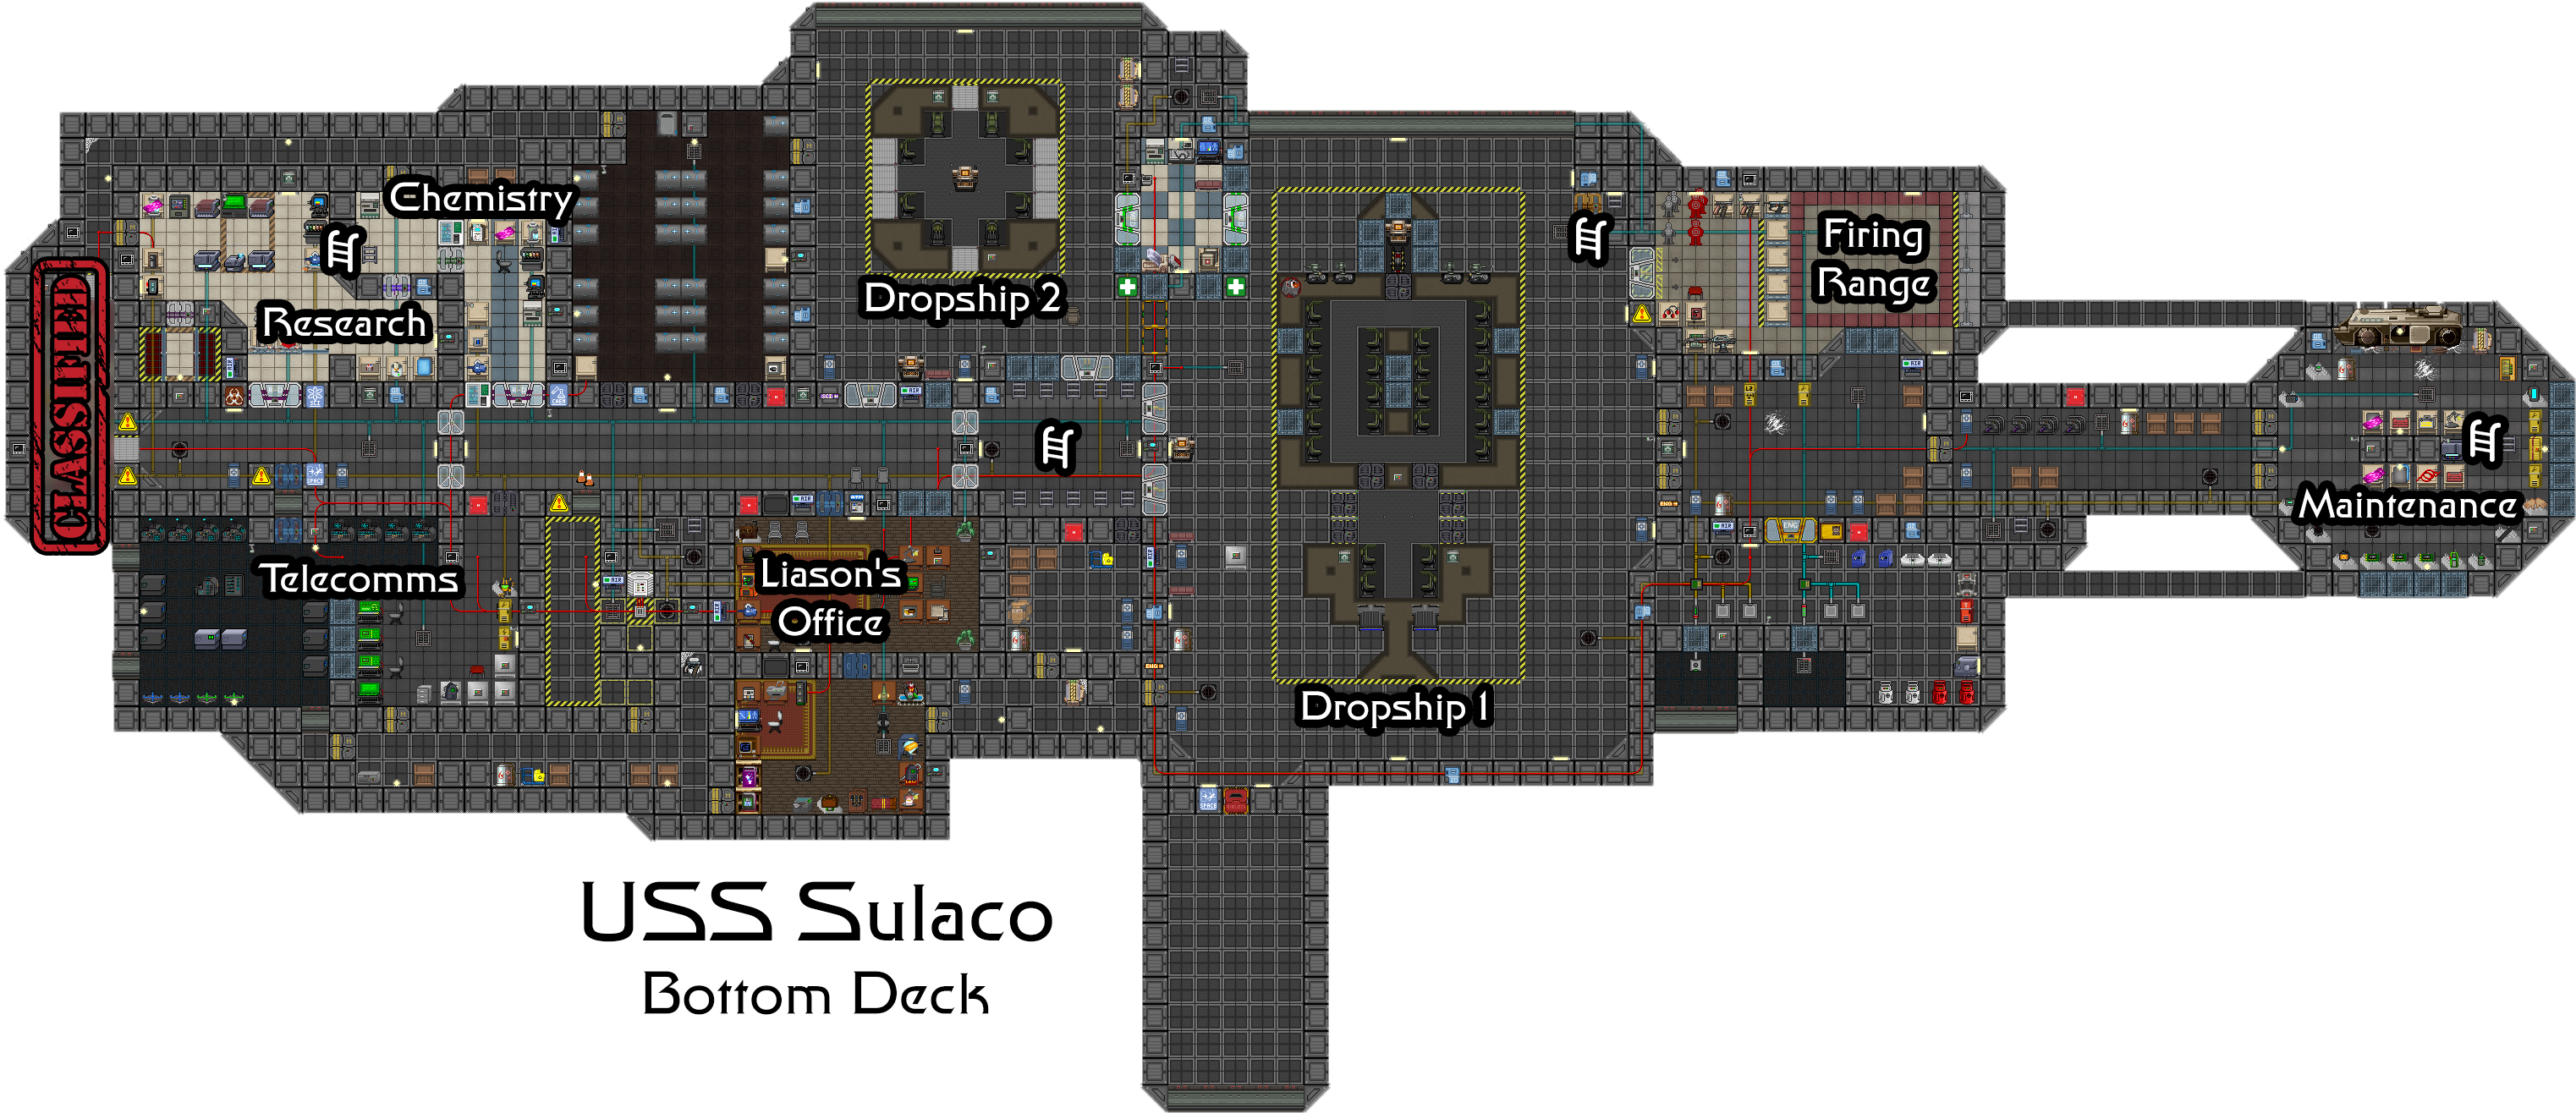
[[File:Sulaco_bottom.png]] | [[File:Sulaco_bottom.png]] | ||
===Supermatter Engine=== | |||
=== Basic Setup === | |||
Good news, everyone! The SM engine is mostly set up already and ready to provide power the USS Sulaco. There are just a few additional steps you should undertake before flipping that Emitter on. But first, put on a handy pair of Optical Meson Scanners and put on a Radiation Suit and Radiation Hood. Remember, the SM ('''white''') will ruin your eyes if you look at it without Mesons and you will receive radiation damage without the suit simply from being too close to an active supermatter core. | |||
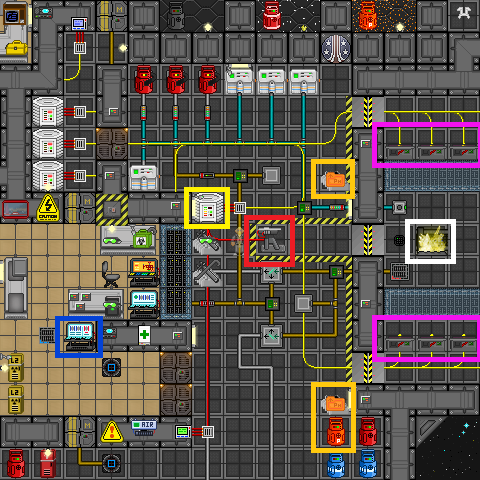
''The SM Engine Area'' | |||
[[File:SMEngineNov2015.png]] | |||
'''1. Ensure cooling loop is functional''' | |||
Check on the computer ('''blue''') and refresh until it shows that the SM chamber is 'Injecting' coolant at a rate of 700 L/s. The output pressure should then be toggled to 'Open'. Make sure that the input is maximized and open because otherwise the coolant loop will not function properly. | |||
'''2. Prep the radiation collectors''' | |||
The radiation collectors ('''magenta''') are what powers the Sulaco once the SM is active. First go to the phoron tanks (in orange) and fill them to the maximum 1013 kPa capacity using the phoron canister; ('''orange''') To do this first grab a phoron tank in hand then click the phoron canister, ('''orange''') the phoron tank should then be inserted into the canister (you will know if it is inside because a black mark will appear on the side of the canister if it is) after that set the kPa to 1013, then open the release valve, when the tank is full close the release valve and eject the phoron tank. Open the blast doors to the collector and put one full phoron tank into each collector. Make sure click on all eight of the collectors to activate them. | |||
'''3. Turn on the Engine Room SMES''' | |||
Turn both the input and output of the SMES ('''yellow''') to maximum and set the input to Auto. | |||
'''4. Fire the emitter''' | |||
Open the blast door to the SM chamber using the handy toggle. Fire the emitter ('''red''') 10 times. Emitters fire four shots before a longer pause so count carefully; the audio cue helps here. Turn the emitter off and close the blast door. | |||
'''5. Maintain an eye on the SM''' | |||
Use the engine chamber console ('''blue''') to check that the temperature and pressure remain stable. A good safe goal to shoot for is a core temperature of under 500K. After you have done these steps the temperature and pressure should stabilize, which then tells you that you are all safe to walk away, do remember to check up on the SM every once in a while though to see if the temperature/pressure is dropping or rising. | |||
On a side note this SM Engine setup will last you 6 hours and more. - [Tested And Proved] | |||
=Pre-Alpha Maps= | =Pre-Alpha Maps= | ||
Revision as of 00:10, 3 July 2017
Very much a WiP
Pre-Alpha Trivia
- Ravagers for a brief period of time could slash through walls and doors due to having a two tile slash.
- Colonial Marines use have text to speech, although it caused a fair amount of lag.
- Aliens could strip marines in their nests of certain clothes and items.
- If you stood one tile directly in front of the HMG there was a bug which allowed you to not be hit by the bullets as they only appeared on the second tile in front of the HMG not the first.
- Custom events were plentiful, some of which being: Necromorphs, The Re-enactment of 1812, Space Marines, Aka Bruva Spess, Borers, Zombies and more.
- Firing a taser at a xeno would slow it down.
Pre-Alpha Marines
Marine Equipment
M37 Shotgun
 |
Description: Traditional shotgun used during Pre-Alpha times of colonial marines, could only be used to fire slugs and bean bag rounds at the xeno menace. |
L6 Saw
| Description: The L6 saw was the only light machine gun in Pre-Alpha and could be used in one hand in combination with a riot shield which was often seen with it. | |
M41A
| Description: The M41A is the classic rifle that's lived on throughout CM's history although to begin with it was just a CR20. | |
M39
| Description: The M39 was the good ol'SMG of the time. | |
S&W
 |
Description: The S&W was the predecessor of revolvers on CM to the M44 Revolver |
Colt 1911
| Description: The Colt was the predecessor of most pistols on CM and was used as the standard sidearm players should carry, much like the m4a3 currently in that respect. | |
HMG
Heavy Infantry Team
The heavy infantry team was the only available response team at the time and were armed with advanced lasers, riot shields and a few other nifty weapons as well as all the tools you'd see in a typical ss13 ERT spawn area.The Heavy Infantry Team or 'HIT' for short, are a group of specially trained Marines. Usually called in when the Colonial Marines cannot complete the assigned mission on their own. HIT squads are specially equipped with the best gear credits can buy and are recruited from the best marines who can prove themselves in most dire of situations while utilizing the knowledge learned from their advanced training courses.
For all those new people think of them as a death squad that is friendly and will help you there to complete the mission at all costs.
Goal
Your goal is to assist the marines in their mission, what ever said mission maybe, either to reclaim a station or evacuate. You don't know Xenomorphs are until you are told or see it with your own eyes. The first step as a HIT member would be to find the Commanding Officer to obtain available intelligence about the situation and be informed of the current mission objectives. Your goal is to protect the marines as best as you can as you all try to complete your assignments.The HIT team is every rarely called due to certain circumstance that must be met in order to call them. These circumstances are that:
- The shuttle has not been called
- The aliens outnumber the marines
- There must be about five observers to join the HIT
- Centcomm must be receiving the message (A.K.A an admin must be online)
Pre-Alpha Aliens
Tier 1 Evolution
You have a choice of three castes of xenomorph: the Runner, the Sentinel, or the Drone. After that, advanced evolutions become available as long as the hive has a living Queen. Each caste has its pros and cons.
| Job | Role | Difficulty |
|---|---|---|
 Drone |
Support: Grow the hive and support the Queen. | Medium |
 Sentinel |
Defence: Defend the hive,guard captured prey and eliminate and deter threats from range. | Medium |
 Runner |
Offence: The fastest Xeno with the most constant speed (besides the Crusher). Leap over tables with ease and pounce on the enemy. Capture and harass prey. Recon threats. | Hard |
Tier 2 Evolution
| Job | Role | Difficulty |
|---|---|---|
 Spitter |
Defence: Defend the hive, employ your more powerful acid to better stun targets and break down fortifications. | Hard |
 Warrior |
Offence: Capture and harass prey. Use stealth to turn nearly invisible and set up ambushes or assault prey positions. | Hard |
 Hivelord |
Support: The ultimate support. Very large plasma capacity for spreading weeds and resin. Dig holes into the ground to create pathways for other Xenos to travel between. | Medium |
 Carrier |
Support: Carry a pile of facehuggers and throw them at prey, or use them as area denial. | Hard |
Tier 3 Evolution
| Job | Role | Difficulty |
|---|---|---|
 Corroder |
Defence: Very strong and quick-firing acid. Able to melt space itself. Is the embodiment of marine fear. | Hard |
 Ravager |
Offence: The bringer of death. Very powerful claws, and able to charge to close short distances. | Hard |
Tier 4 Evolution
| Job | Role | Difficulty |
|---|---|---|
| File:PA-Queen.png Queen |
Lead the hive. | Very Hard |
Alpha Maps
Sulaco
Supermatter Engine
Basic Setup
Good news, everyone! The SM engine is mostly set up already and ready to provide power the USS Sulaco. There are just a few additional steps you should undertake before flipping that Emitter on. But first, put on a handy pair of Optical Meson Scanners and put on a Radiation Suit and Radiation Hood. Remember, the SM (white) will ruin your eyes if you look at it without Mesons and you will receive radiation damage without the suit simply from being too close to an active supermatter core.
The SM Engine Area
1. Ensure cooling loop is functional
Check on the computer (blue) and refresh until it shows that the SM chamber is 'Injecting' coolant at a rate of 700 L/s. The output pressure should then be toggled to 'Open'. Make sure that the input is maximized and open because otherwise the coolant loop will not function properly.
2. Prep the radiation collectors
The radiation collectors (magenta) are what powers the Sulaco once the SM is active. First go to the phoron tanks (in orange) and fill them to the maximum 1013 kPa capacity using the phoron canister; (orange) To do this first grab a phoron tank in hand then click the phoron canister, (orange) the phoron tank should then be inserted into the canister (you will know if it is inside because a black mark will appear on the side of the canister if it is) after that set the kPa to 1013, then open the release valve, when the tank is full close the release valve and eject the phoron tank. Open the blast doors to the collector and put one full phoron tank into each collector. Make sure click on all eight of the collectors to activate them.
3. Turn on the Engine Room SMES
Turn both the input and output of the SMES (yellow) to maximum and set the input to Auto.
4. Fire the emitter
Open the blast door to the SM chamber using the handy toggle. Fire the emitter (red) 10 times. Emitters fire four shots before a longer pause so count carefully; the audio cue helps here. Turn the emitter off and close the blast door.
5. Maintain an eye on the SM
Use the engine chamber console (blue) to check that the temperature and pressure remain stable. A good safe goal to shoot for is a core temperature of under 500K. After you have done these steps the temperature and pressure should stabilize, which then tells you that you are all safe to walk away, do remember to check up on the SM every once in a while though to see if the temperature/pressure is dropping or rising.
On a side note this SM Engine setup will last you 6 hours and more. - [Tested And Proved]


